Phone and Voicemail System
 This article provides information on utilizing Cisco Webex Calling and Voicemail.  If you are looking for instructions for the existing Avaya Voicemail system please see our previous  documentation.
 If you are utilizing a room with a Cisco Webex Roomkit, please visit the Roomkit page for more information.
Information Technology is responsible for the design implementation and management of the University’s voice systems consisting of the Cisco Webex Calling, end user instruments and supporting peripherals, inclusive of messaging, call and invoice management systems, automated operator and directory services.
Here are some helpful links with detailed instructions pertaining to the Phone and Voicemail System:
What is Webex?
Webex is Cisco’s video and phone conferencing platform. It allows individuals to make and receive calls from any device.
Using the Webex App (Desktop)
Installation
The full application is available through the Software Center on University imaged machines.
For personal machines, go to https://www.webex.com/downloads.html to install full application for your platform.
After installing, you will need to sign in to the application:
- Select Sign in
- Enter your full WPU email address
- Sign in again with WPU login and Duo authentication.
Upon initial login, you may encounter ‘Phone service disconnected’ message – to resolve click the message, then click ‘New Session’.

Interface Overview

Help
Spaces
Navigation Menu
Profile and Preferences
Status
Search
Filters
Start a Conversation, Make a Call, or Add a Contact
Devices
Activities
Messages — Messages are where you chat with colleagues. We keep these messages secure so you can feel confident sharing your work ideas in Webex.
People — see who's in the space, or if you're a moderator you can add people to the space.
Content — find and see all your shared files, photos, links and whiteboard content.
Schedule — create a meeting from the space or get a list of meetings already scheduled for the space.
Call/Meet
Audio — make an audio call to a person or to people in a Space.
Application Update Available
Audio Calling
Place an Audio Call
To place an audio call, navigate to the calling tab:

From here you can dial a number or search directory to make call.
You can view your call history in the left pane.
Answer an Audio Call
When receiving a call, you will receive a desktop notification in the lower right hand corner of the screen with buttons that give you options to answer, decline, or send a message to the caller:

The application will also ring. Ring settings can be adjusted under Audio Preferences, located under your account menu in the upper left hand corner of the application and clicking "Settings" > "Audio."

If you are looking to purchase a headset, we suggest the Poly Plantronics Blackwire 3225 USB-C as a reliable device.
Audio Call Settings
To view and manage call settings, click on “Call Settings” bottom left of UI, dialog box will open (see below).

Helpful settings available here include:
- Forward Calls to Voicemail or another registered number (see next section on adding numbers)
- Select a registered phone for “Single Number Reach” - this will allow incoming calls to ring on both your desktop app and the selected phone
Audio Call Preferences
Call preferences can be located under your account menu in the upper left hand corner of the application and clicking "Settings" -> "Calling":

- Choose whether to start calls with your video enabled.
- Choose whether to forward calls to VM or another number, add forwarding numbers.
- Add phone number for Single Number Reach, and enable/disable for numbers.
Voicemail
Setting Voicemail Pin
A voicemail pin will be required to access voicemail and change voicemail settings. This process is also to be used if user forgets or is locked out of their voicemail. The pin must be set by the user.
1.) Go to website: https://user.webex.com/webappng/hub/welcome
2.) Select Settings
3.) Select Calling
4.) Select Voicemail
5.) Select Reset Voicemail Pin
6.) Follow the directions in the box.
 |
 |
 |
Voicemail Settings
Default Settings
Some voicemail settings are only available through the 'Webex Calling' section of the Settings Portal. This portal can be accessed here: https://settings.webex.com by signing in with you University credentials, then following the 'Webex Calling' link from the top menu (this will open a new page). On this page click 'Voicemail Settings'.
The default voicemail settings are as follows. These settings can be changed if desired:
- When busy, send calls to voicemail.
- Answer after 3 rings.
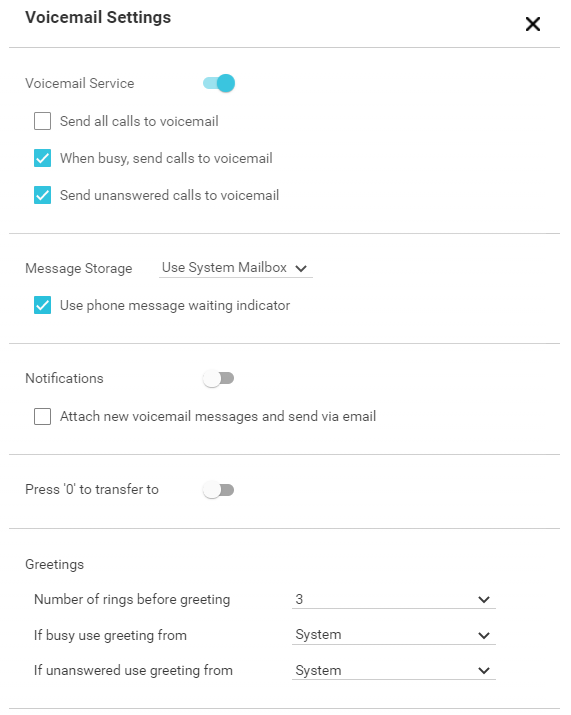
Default Voicemail Settings

Additional Settings
Voicemail to Email
Users can choose to have voice messages sent to email by entering their email address in the Settings Portal.
Voicemail Text Notification
Users can choose to have voice message notifications sent by text by entering their phone number and selecting their provider in the Settings Portal

For further information on voicemail settings see Voicemail Guide
Voicemail Phone Access - Voice Portal
Voicemail can be access through the Voice Portal by dialing: 973-720-3451. You will be prompted to enter:
- Mailbox ID (last 4 digits of extension and # symbol)
- Voicemail Pin and # symbol (set through the web portal, see Setting Voicemail Pin section above.
Greetings
It is also possible to record your personalized name and No Answer greeting through the Voice Portal. Below is the phone menu tree for reference:

Webex Mobile Apps
Installing the Webex Mobile App allows for your mobile device to be notified when someone calls you through Webex. Calls made to Webex extensions will ring the Webex App and notify you with a "ring" that can be answered on your device. The Webex App also allows you to place calls from your mobile device and can be downloaded from either the Apple App Store or Google Play Store.
iOS
The Cisco Webex mobile app is available in the Apple App Store.

Login with your University credentials after install.
Android
The Cisco Webex mobile app is available in the Google Play Store.

Login with your University credentials after install.
Additional Features
Cisco Phone

Cisco Webex Roomkit information
If you are utilizing a room with a Cisco WebEx Roomkits, please visit the Roomkit page for more information.