Microsoft Office 365
Microsoft Office 365 is a subscription-based online office and software plus services suite which offers access to various services and software built around the Microsoft Office platform. This service provides cloud storage and collaboration for both students and faculty members through their University accounts. Some of the features included in Office 365 are Outlook, Newsfeed, OneDrive for Business, Sites and access to the Microsoft Office Web Apps. Both students and faculty member sign into Office 365 through the following site: www.wpunj.edu/365.
Microsoft Office 365 Web Applications
WPUNJ accounts in Office 365 offer access to the following features:
- Outlook
- Calendar
- People
- Newsfeed
- OneDrive for Business @ William Paterson University
Microsoft Office Mobile Applications
Student accounts licensed through WPU provide student users with full editing and document creation abilities in any of the Microsoft Mobile Apps. Current applications include:
- Microsoft Outlook
- Microsoft Word
- Microsoft PowerPoint
- Microsoft Excel
- Microsoft OneNote
These applications are available for free download through your mobile App Store (Apple or GooglePlay store). Once launched, login to the app with your WPU student credentials to connect it to your Microsoft 365 account.
Troubleshooting
If you are having difficulty logging into your email after following these steps:
- Click the following link to access your email: www.wpunj.edu/365
- Login with your full email address, username@student.wpunj.edu, and the same password as WP Connect
Please clear your cache and cookies on the browser you are using to access your email. Here are three short ‘how to’ videos with step by step instructions:
After deleting your cache on the appropriate browser, please attempt logging into your email once again. If you are still experiencing issues, please contact the Help Desk.
License and Terms
Students will have access to Office 365 while enrolled. After a student has left the university the Office 365 license will be disabled. Our student license also includes access to Microsoft Office software that can be downloaded on personal devices as well as access to mobile applications.
Due to a change in Microsoft licensing, as of Summer 2024, current university employees in full time or project/part-time roles will maintain their existing access. However, adjunct faculty, emeritus faculty, and limited populations of non-FT employees will no longer have access to install and use the Microsoft Office software on non-university computers. They will continue to have access to the Microsoft tools available through www.wpunj.edu/365, including Outlook email and the web-based Office programs.
Please note - for all employees and students, Microsoft will also begin enforcing a total storage limit (100GB between email and cloud-based storage, aka OneDrive) for individual accounts. We do not envision that this limit will impact most individuals, and Microsoft will send advance notifications to any individuals approaching that threshold.
Sign out from Teams
1) Click your username in the top right corner

2) Click on Available and select “Sign out of IM”


Outlook
This portion of the Office 365 article will cover the basics of using mail, calendar, and contacts in Office 365.

1.Create a new message by clicking + new mail.
2.Folders. The folder list includes the folders in your mailbox and Favorites. It may include other folders, such as archive folders. You can collapse this pane by clicking the folder icon at the top. You can expand and collapse folders in this view by clicking the triangle icons next to the folder names.
3.Search window. Type what you want to search for here, such as the name of a person you want to find messages from, or text that you want to search for to find a particular message.
4.List of messages in the current folder. Each entry in the list view has additional information, such as how many messages there are in a conversation and how many are unread, or if there is an attachment, flag, or category associated with any messages in the conversation. A conversation can have one or more messages. When a conversation is selected, you can delete it, add a flag, or add a category by clicking the icons. At the top of the list view are filters that you can click to quickly find messages that are unread, that include your name in the To or the Cc line, or that have been flagged. In addition to the filters, you’ll see the name of the folder you’re viewing and the view that you’ve selected.
5.The reading pane is where the conversation that you’ve selected is displayed. You can respond to any message in the conversation by clicking the links at the top of the message.
For Mobile configuration settings
Check our Apple / IOS Email Settings Page and Android Email Settings page
FindTime
FindTime is now Scheduling Poll!
Scheduling Poll
Microsoft's FindTime is now called Scheduling Poll. This tool eliminates the need for Doodle polls or email exchanges to schedule meetings. Scheduling Poll integrates with Outlook and shows what days and times work the best for you and the attendees using free/busy data in our calendars.

Create a "Microsoft Scheduling Poll" or find out more about "Creating a Scheduling Poll"!
Calendar

1.Create a new event by clicking + new event. An event can be an appointment, a meeting, or an all-day event.
2.Use the calendars to navigate from one date to another. Shading will show you what week you’re currently viewing, and darker shading marks the current date. You can use the calendar icon at the top to collapse or expand this side of the calendar view.
3.You can view more than one calendar at a time. This section lets you add other people’s calendars and select which to display.
4.This is another area that you can use to navigate from one day to another. Click any of the dates to jump to that date. Or click the arrows on either end to see the dates before or after what’s displayed.
5.The main window, where calendars will be displayed.
6.Select the view you want, and share or print your calendar.
People

1.Create a new contact by clicking new contact.
2.All the places you can find contact information.
3.Search. Type a person’s name here to search for them in your contacts and in your organization’s directory.
4.List of all contacts in the current folder.
5.The contact card for the selected person.
6.Actions you can take directly from the contact card. Click the icons to send a message, start a chat session, or create a meeting request.
OneDrive for Business

OneDrive for Business is cloud storage provided by Microsoft intended for storing and organizing work/educational related documents. OneDrive for Business, managed by Information Technology, offers the capability of file storing and sharing. OneDrive for Business is different from the Microsoft hosted OneDrive, which is intended for personal storage separate from William Paterson University. OneDrive for Business is also different from your Sites, which is intended for storing team or project-related documents. Documents stored through OneDrive for Business are only accessible when using your University credentials.
On a University managed computer with Office 365, OneDrive is configured to synchronize the following folders (Libraries):
- Documents
- Desktop
On a Windows Device, the Pictures folder is also synchronized. Additional folders (Libraries) may be added in the future.
OneDrive help and learning documentation is also available at https://support.microsoft.com/en-us/onedrive
Managing Storage
You can free up space on your computer by utilizing "Files On-Demand" which stores the contents of your files in the cloud until you need to view/edit them. For more information about Files on Demand, click here.
Storage Capacity
OneDrive for Business for William Paterson is currently allocating 1 TB of space for document cloud storage.
Uploading and Creating Documents
To upload an exiting document to OneDrive for Business, click on the + new document link.

In the following window, you will have the option to either create a new document using Office Web Apps or upload an existing document from your computer. Alternatively, you may also drag existing documents onto the OneDrive for Business page when it is open in your browser.
Sharing
All files stored in OneDrive for Business are private initially – only you can see them – unless you decide to share them. You can easily make a file available to everyone in your organization (William Paterson University) by placing it in the Shared with Everyone folder or you can share files with specified account holders for collaborative projects. Currently, the University does not allow you to share files with external users.
There are two ways to share documents 1) by copying and pasting a link to the document or 2) sending a sharing email through OneDrive for Business.
Sharing a Document via Link
To send a link to a co-worker or peer, navigate to the document you would like to share and click on the three dots located next to the document. A menu will appear showing you a few options for your document. Click on share and a new box should appear. There will be a button that says "Copy" that will copy the link to your keyboard. Once the link has been copied you can paste it in a message or email in order to share it with someone.
Sharing a Document via Email
To send an email with a link to the document you would like to share, navigate to the document and click the three dots located next to the document title. Click on the SHARE link listed at the bottom of the preview window. After clicking the SHARE link, an email options window will open. Type the names of the people you would like to share the document with and type a message then press "Send".

In this window, you can select the level of permission the person you are sharing with has (Can Edit or Can View) and choose to include a personal message with your email. Be sure to make sure the "Send and email invitation" option is checked in order for a notification email to be sent to the person you are sharing with.
You can view documents that have been shared with you by other people by navigating to the "Shared with Me" link located in the left column under the profile picture. Please note that documents that are recently shared with you might not show up instantly.

Syncing with OneDrive for Business Desktop Application
Syncing your OneDrive for Business with the OneDrive for Business Desktop Application allows you to access your cloud based documents directly from your desktop. Having your document available on your computer allows you to open and save your documents directly from the file structure on your desktop without having to log into the Microsoft Online webpage. Syncing with OneDrive for Business is only available to users with Office 2013 or the standalone OneDrive for Business Application.
To sync your OneDrive library directly to your desktop:
- Log into your OneDrive at www.wpunj.edu/365 from the computer you wish to SYNC with your online library.
- Navigate to the SYNC link located in the upper right-hand corner of the window, underneath your user name.

- When the Sync window appears, click SYNC NOW

- You will be prompted to login with your credentials. Be sure to enter your WPU email address and password. This is the email associated with your Office 365 Account. Logging in with other Microsoft accounts (Live ID, MSN,Hotmail etc.) will NOT enable the SYNC from your WPU hosted OneDrive for Business. NOTE: If you are prompted to select between using a Microsoft Account or an Organization Account, please select Organizational Account.


- A confirmation window will open asking you to initiate the Sync. In this box, you also have the option to change the location of the library on your machine.

- Once the sync completes, you will be able to access your OneDrive for Business documents directly from the OneDrive for Business folder located under you Favorites. A green check mark indicates this document has successfully synced with the cloud.

- If you are using Office 2013, you will also be able to save directly to your OneDrive for Business from inside an open Office 2013 Application. You will notice that after the SYNC completes, the following option will be available in your Save and Save As tab in the Office applications:

SharePoint is a web-based collaborative platform that integrates natively with Microsoft Office. It's similar to OneDrive but meant more for department use rather then individual use. Visit our SharePoint Wiki for more information on ways to collaborate.
Take a look at the Microsoft Help Site for SharePoint learning resources as well.
Microsoft Office Online
Office Online is a browser based editing suite that lets you create, edit and share your Excel, Word, PowerPoint and OneNote files from any web browser. Office Online is an integral part of OneDrive for Business and provides basic Office editing features through an entirely online interface.
For more infomation on using Office Web Apps https://support.microsoft.com/en-us
Open an Existing Document with Office Online
To open a document that currently exists in your OneDrive for Business, navigate to the document and click on the title. The document will open in a preview window where you will see the EDIT DOCUMENT link in the menu bar.

Click on the "Edit in Word Online" link in the drop down. The document will open in the Web Application in your browser tab.

Please Note: The ability to open and edit documents in fully functional Office Applications through OneDrive for Business is currently only available for users with Office 2013.
Sites

Office 365 SharePoint Sites are designed to help organize documents in a central location for multiple people and groups to work on. They can be customized in a multitude of ways including appearance, functionality and user permissions.
Currently, site creation is managed by Information Technology. To inquire about creating a site, please submit a Web HelpDesk ticket.
Newsfeed
The Newsfeed encompasses the social component of Office 365. Use the Newsfeed to follow people, documents, and tags to keep informed about activities and updates. On the main page of the Newsfeed, you primarily see posts created by people you’re following, and posts pertaining to other content you are following, such as tags and documents. In addition to the “Following” view, you might occasionally be interested in browsing the “Everyone” view, the organization-wide newsfeed.
Microsoft Teams
Microsoft Teams is available for download on University PCs in the Software Center as well as thru the Mac Managed Software Center. You can also use the web-based version of teams at http://teams.microsoft.com as well as the Microsoft Teams mobile apps (available for download in the Apple and Google Play app stores.) Chat, share, meet thru Teams using your WPUNJ account.
Creating/Using an official 'Team'
Please Note: access to create a 'Team' is currently available to all employees. See the links below for an introduction to creating official Teams. If you need to use teams for ad-hoc communication, we recommend use of the Chat feature that's found on the left side navigation bar
See Microsoft's Welcome video for a brief overview of the Teams application or their Start guide for how to navigate Teams.
Also see Microsoft's article on choosing a team type for additional information on the different types of teams and their related features.
More information can be found on the Microsoft Teams Page as well as at the Microsoft Teams Demp site at https://teamsdemo.office.com.
Using the Teams 'Chat' feature
- Start a chat from the Chat button.
- Search for others on the top bar
- Add addition people to the conversation with the person+ icon in the upper right corner of the window.
- Start an audio, video chat or share your screen from the blue buttons on the upper right corner.
- Schedule a Meeting from the Calendar button

Start a Chat

Group Chat

Make a Video or Audio Call


Enable Live Captioning (for your view)
In the meeting
- Click on the 'three dots' icon on the Meeting control bar.
- Click on 'Turn on Live Captions' to enable captioning in your meeting view.
- This setting turns on captions for the device being used, not for all attendees.

Scheduling Meetings with Teams
Scheduling Meetings within the Teams App
To Schedule a Meeting within Teams, select the Calendar on the left sidebar.

Select +New Meeting on the upper right hand corner of teams. This will allow you to create a calendar invite and provide a Teams meeting link

If you’d like to schedule a meeting with members of an already created chat you can click on the icon denoted below. From here you will be prompted to fill the same information as shown above. Please note, anyone listed as participants of a meeting will recieve an invitation link automatically once the meeting is scheduled.
![]()
Schedule a meeting from Office 365
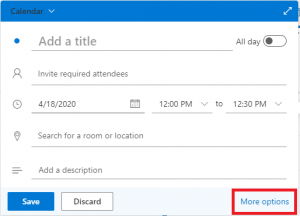
- From your Calendar in Office 365, select New Event in the upper left hand corner, or select a time on your calendar.
- Select "More options" from the lower right hand corner of the new event window
- To designate a Teams meeting, select Add online meeting and select Teams meeting
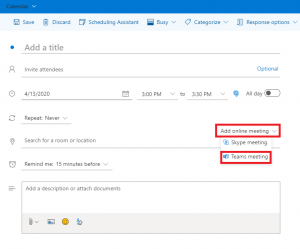
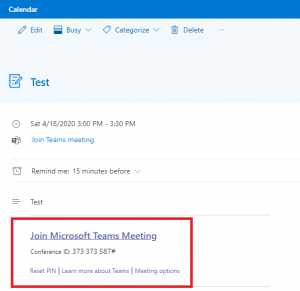
- Once you have saved the event, you will see the meeting link in your calendar event.


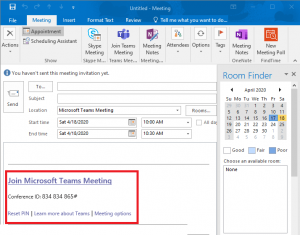
Schedule a meeting from Outlook on a Windows PC
- From the Windows desktop Outlook client create a New Appointment or New Meeting and select Teams Meeting to create the meeting event.
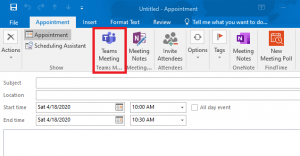
- The Teams Meeting event information with automatically populate in your Meeting invitation.


Managing a Meeting in Teams
Within your meeting invitation, in the Calendar application, you can manage the meeting options using the Meeting options

From the Meeting options you can select options for the lobby, as well as pre-select other Presenters for the meeting, or allow all attendees to share their screen etc.


If you have selected specific presenters, or want to add a presenter while in a meeting, select the specific participant who you want to escalate permissions.
You can also use the 'Pin' option to make your Teams view focus on one particular participant's video.
Visit | Adjust Your View In a Teams Meeting for more information.

Downloading Office on a Student's Personal Machine
With your WPU Student Account Credentials, you are able to install Office on up to 5 computers, 5 phones, and 5 tablets for free.
To download Office 365 with your WPU account through WPConnect:
- Log into WPConnect and locate the "WPUNJ Apps" icon on the top right.
- Click MS Office to install Office onto your personal computer.

To download Office 365 with your WPU account through Office 365 Website:
- Log into Office 365 at www.wpunj.edu/365
- Click "Install Office" on the top right and follow download prompts.

- If installing this on a Mac, the provided applications are slightly different the the PC offerings.

References
For more detailed information about Microsoft Office 365, please visit the following Microsoft pages: