Category:Blackboard - Faculty
Use this link to contact the IT Help Desk
NOTICE:
A message from BLACKBOARD COLLABORATE SUPPORT
Blackboard Collaborate Support Notification for Mac OS X 10.8.4 users who are unable to launch Web Conferencing sessions and recordings.
Affected Platforms
Mac OSX 10.8.4
Issue
Recent security changes released by Apple may prevent Web Conferencing customers from launching Blackboard Collaborate sessions and recordings. Customers using OS X Mountain Lion v10.8.4 will be affected. The security changes no longer allow users to auto-launch JNLP files.
For additional details and information regarding how to enter sessions or play recordings if you have installed this update please reference knowledge base article 2940.
Thank you and regards,
Your Blackboard Collaborate Support Team
Standard Practices
Introduction:
Standard practices are the conventions followed by faculty and the Blackboard support staff in order to guarantee that the semester, in this case, starts smoothly. Sometimes standard practices guarantee a common experience -- students are added to the courses on the same day -- and in other cases they guarantee clear, commonly understood communication between instructors and Blackboard staff.
Basics:
- All students are added to course shells two days prior to the start of the semester.
- Instructors can communicate with students before they are added to shells
- Instructors are responsible for activating their course shells; students will not be able to participate in, or even see, course shells until they're activated. The exception are courses taught completely online.
Before the semester:
- Transfer course content
- Point your web browser to https://liberty.wpunj.edu/bb/transfer/
- In the first of three sections enter the semester and course designations of both the course you are using as a template (origin) and the anticipated course shell (destination)
- Enter your name and email in the second area
- Use the Comments area to make any special requests, for example adding extra sections or asking for retrieval of archived content. And always remember to SUBMIT!
- Merge cross-listed and multi-section course shells Cross-listed and multi-sections can be merged into one shell for ease of use. An instructor or team of instructors teaching multiple sections of one course might find it to their advantage to put all the content into a single shell rather than replicating it across three shells, for example. Please follow the instructions below to request merging a course shell. Requests should be made before the beginning of the semester; waiting until the first week of classes to ask for a merge could result in delayed fulfillment of the request.
- In the first section fill out the department, course number and section of both the parent course (the one that will be used) and the children. In the example below the parent course is History 1050-01 and the children are History 1050 sections -02 and -60.
- Include any special comments or questions in the next section of the interface
- Finally please tell us your name and email address. If more than one instructor is involved only one member of the team needs to be listed.
- Activate course shell There are two ways to one might activate a course shell. Remember that students will not see course content, or even a link to the course, until it has been activated.
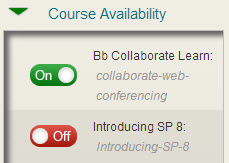
- Find the Qwickly module on my My Blackboard page and select Course Availability
- Click ON to activate a course and OFF to deactivate (at the end of the semester, for example) The old way: Course properties
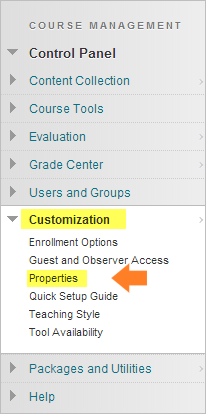
- In the Control Panel (bottom left corner of the course shell) select Customization, then Properties
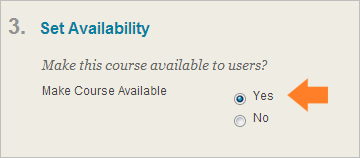
- In area number three select availability to Yes
- Finish by clicking the Submit button
- Commuicate with students before they've been added to course shells
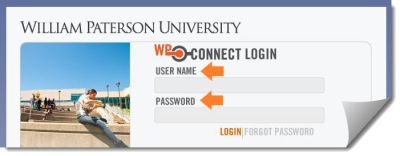
- Point your browser to WPConnect: http://wpconnect.wpunj.edu
- Select the Faculty tab
- In the Faculty Dashboard select the class you are emailing
- In the lower right corner of the ensuing page select Classlist
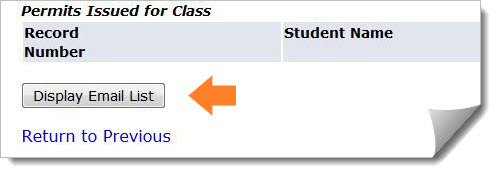
- Select Display Email List
- Copy the student addresses and paste them into the "To:" area of your email browser
In the example above the origin course is from the Fall of 2012 and the destination is the Fall semester 2013. The course extension is the only difference in the course designation area. When looking at old courses remember that the course designation is pre-pended by the year of the course and the semester designation: 01 = Spring, 25 = Summer, 04 = Fall, 05 = Winter
201210 - Spring semester 2012 201025 - Summer session 2010 201140 - Fall semester 2011
200950 - Winter session 2009
-
The new way: Qwickly
Start of the semester
| Browser compatibility & plug-ins |
Blackboard: Getting Started
Building your Course Shell
Content Collection
| Content Collection Manual | Create: Folder | Add: Files | Link: Files to Multiple Courses |
| Add: Zipped Files | Download a package | Email a file |
Discussion Board
| Create a Forum | Grading a Forum | Create a Thread | Grading a Thread |
| Replying to a Thread | Searching and Collecting Posts | Tagging Posts | Changing Forum Settings |
| Insert an in-line image |
Grade Center
Assessments
| Instructors guide to the Turn-it-in (Tii) anti-plagiarism tool | Tii Instructors manual | Inline Assignment Grading |
End of the Semester
| Export course | Archive a course (machine readable) |
Frequently Asked Questions
Pages in category "Blackboard - Faculty"
This category contains only the following page.


