3D Printing: Difference between revisions
| Line 13: | Line 13: | ||
==About 3DPrinterOS== | ==About 3DPrinterOS== | ||
3DPrinterOS is a web based 3D printer management system, allowing users to prepare and slice 3D geometry for many 3D printers accessible on campus. Please log in to https://www.wpunj.edu/3dprint with your William Paterson credentials for access. | 3DPrinterOS is a web based 3D printer management system, allowing users to prepare and slice 3D geometry for many 3D printers accessible on campus. Please log in to https://www.wpunj.edu/3dprint with your William Paterson credentials for access. | ||
New users are given access to the LI120B Replicator+ queue for PLA printing. If you do not see an available printer or the EDUCATION license under your user name please place a [https://www.wpunj.edu/helpdesk WP Web Help Desk] request of visit Media Services in LI120 for additional assistance. | |||
==About 3D Printing== | ==About 3D Printing== | ||
Revision as of 09:57, 2 April 2018

3D Printing on Campus
|
About 3DPrinterOS
3DPrinterOS is a web based 3D printer management system, allowing users to prepare and slice 3D geometry for many 3D printers accessible on campus. Please log in to https://www.wpunj.edu/3dprint with your William Paterson credentials for access.
New users are given access to the LI120B Replicator+ queue for PLA printing. If you do not see an available printer or the EDUCATION license under your user name please place a WP Web Help Desk request of visit Media Services in LI120 for additional assistance.
About 3D Printing
Printing physical object requires 3D geometry. File formats recommended for the 3DPrinterOS slicers are .STL and .OBJ. These files can be acquired via several means.
Repository
Online repositories offer many files to download. These range from user submitted files, scientifically generated, or archival 3D scans.
- MakerBot Thingiverse
- NIH 3D Print Exchange
- 3D printable scanned sculptures at MyMiniFactory
- Where to find models from Ultimaker's "The savvy 3D educator's superlist"
Modeling
You can create geometry in 3D design applications.
- Online 3D modeling software
- 3D modeling software available through Software Center
- Autodesk Fusion 360
- Autodesk Maya
- Pixologic Scultptris
- Autodesk software available for educational home use
University departments may employ additional modeling software as well as mathematic and scientific applications that can generate 3D geometry.
Scanning
You can use a 3D scanner to capture real world data. 3D Systems Sense 3D scanners are available for loan from Media Services. For use of a 3D scanner please place an Equipment Lending request via WP Web Help Desk.
Additional Resources
- MakerBots Educators Guidebook
- The savvy 3D educator's superlist
- Autodesk Design Academy Introduction to 3D Modeling for Fusion 360
3DPrinterOS
MY PROFILE
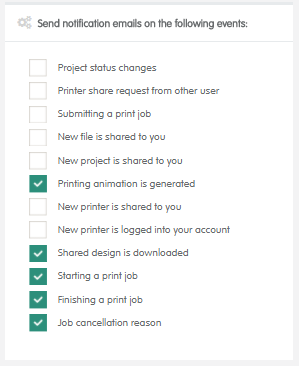
Users will receive many email notifications. These can be configured under Profile Settings from the settings drop down menu in the upper right.
MY FILES
UPLOAD
User can upload files to print here. Please use .STL or OBJ. geometry for layout slicing. GCode from other slicers can also be uploaded to queue.
MY FILES/MY PROJECTS
When a file is edited it will be saved and the name appended with each change. If a file is not already in a project one will be created when first saved.
- Image of the geometry
- Roll over to view
- A time lapse video of its print
- Roll over to play
- Click to download
- 3DPrinterOS file #
- This number is appended to the filename of the next change
- File name
- Click to download file
- “EDIT”
- Click to rename or add metadata
- Always maintain file extension to avoid errors.
- File owner
- Metadata
- File type
- Printer model
- File size or print time estimate
- If a geometry file:
- “REPAIR”: Fixes some errors in files not designed to print.
- “LAYOUT”: Positions files on build plate in STL EDITOR.
- “SLICE”: Calculates GCode for desired printer.
- “…”: Additional apps including reduction, obfuscation, and social media.
- If a printable file:
- “REPAIR”: blank.
- “PREVIEW”: Preview print toolpath and playback in TOOLPATH VIEWER.
- “PRINT”: Queue file to printers.
- “…”: Additional apps including reduction, obfuscation, and social media.
REPAIR
Not all geometry is designed for printing. If you received files from an online repository, an unknown location, or a disreputable source you may need to repair your file before printing. If you are experiencing problems slicing or unexpected geometry errors you may need to repair your file before printing.
Additional Software
Additional 3D applications to assist and resolve these problems are available through the Software Center.
- Autodesk Meshmixer
- Autodesk Netfabb
LAYOUT
You need to prepare your build plate before slicing and printing a file in the STL EDITOR.
- Left Mouse Button: Select.
- Middle Mouse Button: Translate camera.
- Right Mouse Button: Orbit camera.
- Mouse Wheel: Zoom
STL EDITOR
- Move: Translate selected model.
- Shortcuts to center and align model to build plate.
- Rotate: Rotate selected model.
- Scale: Scale selected model.
- Shortcuts for metric and SAE scale conversions and maximum volume.
- Printer: Select your desired printer to preview build volume.
- Camera: Select a fixed camera angle
- Undo: Undo last action.
- On Bed: Translates selected model in the Y axis to 0.
- Extra: Additional tools including, copy, mirror, and center.
- Add File: Add an additional model to your build plate.
Save & Queue: No function with WPU 3D printers, do not use.- Save & Slice: Slice prepared build plate for a specific printer.
- Save: Save and return to “MY FILES”.
- Cancel: Return to “MY FILES” without saving.
SLICE
Fused filament fabrication requires the calculation of all layers a printer will deposit in order to create a physical model. We use a slicer, a type of computer aided manufacturing program, to calculate this and program 3D printers.
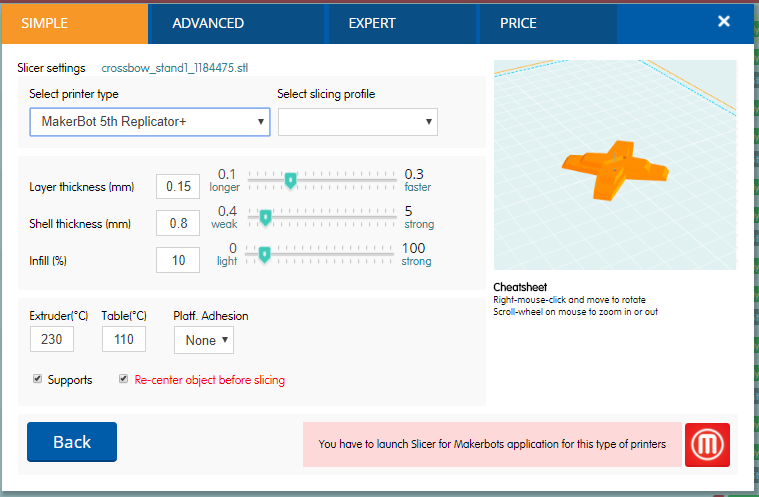
Cloud Slicer & Slicer for Makerbots
- Select printer type: Select your desired printer.
- This should match the printer you chose in “LAYOUT”
- If the printer you selected has a specific required slicer you will prompted to launch it from the bottom right.
- MakerBot Replicator+ requires “Slicer for Makerbots”
- Ultimaker3 requires “Slicer 3”
- Select slicing profile.
- Slicing presets designed by WP staff.
- If there is no slicing profiles you do not have access to a print queue of that model.
- Please see Media Services staff for additional assistance.
- All users get access to the SIMPLE tab.
- This gives you access to following settings:
- Layer Thickness
- This is the resolution height of your print.
- 0.2mm is recommended for most prints.
- 0.1mm is the finest detail available if necessary.
- Shell Thickness or Number of shells
- This is the thickness of your outer wall.
- 2-3 shells is recommended for most prints.
- 1 shell will often fail and gap.
- XY resolution is a 0.4mm nozzle.
- 2 shells = 0.8mm
- 3 shells = 1.2mm
- Infill Percentage or Infill Density
- This is density of your interior as percentage or function of 1.0.
- 10% or .1 infill is sufficient for most prints.
- 20%-30% is sufficient for most prints requiring rigid strength.
- Prints of 0%-10% will often collapse when printing.
- Rafts
- Rafts on.
- Rafts are required on MakerBot Replicator+s for the printed model to adhere to the build plate.
- Supports
- Supports on or off.
- Geometry with overhangs approximately 60° of vertical will collapse unsupported.
- In order to successfully print overhangs additional support structures must be added by the slicing software.
- 45° overhangs and round arches can often self-support without additional geometry.
- Layer Thickness
- This gives you access to following settings:
- Slice: Slice and return to “MY FILES”.
- Slice & toolpath preview: Slice and load toolpath under the “PREVIEW” window.
- If you need access to ADVANCED or EXPERT slicing settings please see Media Services staff or your lab administrator for additional assistance.
Additional Software
When necessary, additional manufacturer slicers are available through the software center.
- MakerBot Print
- Ultimaker Cura
Departments may employ additional slicing software to support their printers.
PREVIEW
You can visualize how your print will be processed by the 3D printer with TOOLPATH VIEWER.
- Left Mouse Button: Select.
- Middle Mouse Button: Translate camera.
- Right Mouse Button: Orbit camera.
- Mouse Wheel: Zoom
TOOLPATH VIEWER
- Printer: Preview your slices in different printer’s build volume.
- Camera: Fixed camera angle selections.
- View layers:
- Scroll through all print layers.
- Playback toolpath as animation.
- Info: View file and material information.
- Slice info: View all slicer settings.
- Print: Queue file for printing.
- Close: Cancel and return to “MY FILES”.
PRINTERS
New users are given access to the LI120B Replicator+ queue for PLA printing. If you do not see a printer to queue after clicking "Print" in TOOLPATH VIEWER, please make sure you have properly sliced your file for the correct model printer. If you do not see any available printers or the EDUCATION license under your user name please visit Media Services for additional assistance.
Queue
Please enter any desired notations for Media Services staff before pressing “Queue”. You will receive email confirmations when your job is started and successfully completed.
WORKGROUP PRINTERS
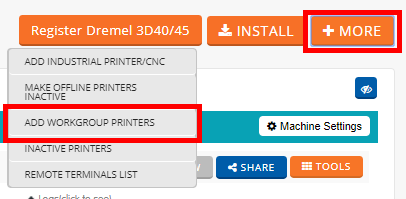
Advanced printers, department printers, and specific queues for classes are available throughout campus. You can access additional print queues by submitting the STUDENT ACCESS CODE provided by the associated faculty or staff member. These can be entered into PRINTERS>MORE>ADD WORKGROUP PRINTERS
Cameras
If a printer has a camera, you will receive a time lapse MP4 of your print. Live camera feeds are accessible from any location via PRINTERS>LIVEVIEW WALL tab.
Need Help?
Need help?
- Visit Media Services in LI120.
- Contact the WP Web Help Desk.
- 3D Printer requests available under Printer/MultiFunctionDevice.


