Mac Laptop Off Campus Networking: Difference between revisions
mNo edit summary |
No edit summary |
||
| Line 13: | Line 13: | ||
3) If you do not have "HOME" and your system was not setup manually for such a connection because you were an early adopter you must connect your computer to the university network and run Managed Software Updates to get the install that will add this setting to your laptop. | 3) If you do not have "HOME" and your system was not setup manually for such a connection because you were an early adopter you must connect your computer to the university network and run [[Managed Software Updates]] to get the install that will add this setting to your laptop. | ||
*Do NOT attempt to change locations here. You will be prompted for an admin account. | *Do NOT attempt to change locations here. You will be prompted for an admin account. | ||
Revision as of 08:37, 4 September 2014
If you have a university owned Mac Laptop you will notice that it will not automatically connect to non-WPU wireless networks. This is due to security settings implemented to protect our network from unauthorized access. In order to use off campus wireless networks please do the following:
1) Open the system preferences and locate the Network pane. Open it.
2) You should see a default "automatic" location active. When you click on it, you should see another location "Home"
3) If you do not have "HOME" and your system was not setup manually for such a connection because you were an early adopter you must connect your computer to the university network and run Managed Software Updates to get the install that will add this setting to your laptop.
- Do NOT attempt to change locations here. You will be prompted for an admin account.
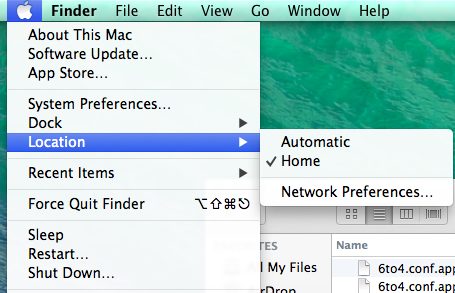
4) If you have the setting, close the system preferences. Click to the Apple menu and select "home" from the "Location" menu. This will switch you from the university settings to a "clean" network setup where you can join whatever wireless (or wired) connection you wish to use.
If you are having problems after following these steps please contact the help desk.

