Hovercam: Difference between revisions
No edit summary |
|||
| (14 intermediate revisions by 2 users not shown) | |||
| Line 2: | Line 2: | ||
=== Getting started with a classroom HoverCam === | === Getting started with a classroom HoverCam === | ||
While some rooms still have self standing document cameras (Wolfvision) installed, we are removing them in favor of a usb peripheral camera that will enable many capabilities that would not be available otherwise. The new cameras are made by a company called [https://www.hovercam.com/ HoverCam] and the model is [https://www.hovercam.com/solo-8plus SOLO 8Plus]. For the purposes of this document we will simply refer to them as HoverCams. If you have taught in Preakness Hall, Hunziker Hall or Raubinger in the last year or so, you are already familiar with them. | |||
Hovercams can be used as a document camera for displaying documents and objects to your class or it can be used as a webcam and microphone for webconferencing and/or teaching with the HyFlex model (teach both in-class and online students simultaneously). | |||
_________________________________________________ | |||
=== HoverCam as a Document Camera === | === HoverCam as a Document Camera === | ||
To use the HoverCam as a document camera, | [[File:Flex11.jpg|thumb|Flex icon]] | ||
To use the HoverCam as a document camera, select '''PODIUM PC''' on the Crestron control panel. | |||
Place the document or object on the desk under the hovercam and point the lens down at it. | |||
Clicking on the green Flex11 Icon on the PC desktop will launch the Flex11 software and display whatever you have placed on the desk below the camera on your computer screen. | |||
[[File:Basecontrolshovercam.jpg|thumb|Hovercam base control buttons]] | [[File:Basecontrolshovercam.jpg|thumb|Hovercam base control buttons]] | ||
There are also | |||
You can zoom | |||
Please note: If the image appears upside-down, you can flip the image 180 degrees by pressing the center button on the base of the HoverCam. | |||
There are also buttons on the base for zooming in and out as well as auto focus recalibrate (AF) and auto focus lock (AF-L) | |||
The Flex software also contains controls to zoom in and out as well as allowing rotation of the image in 90 degree increments and to many other features. | |||
''(You can zoom using the buttons on the base of the camera, the buttons in the software, or by scrolling with the dial on the computer mouse)'' | |||
There is also a light on the HoverCam if needed. The switch is located on the side of the upper portion of the arm. | There is also a light on the HoverCam if needed. The switch is located on the side of the upper portion of the arm. | ||
The Flex software offers many useful features that are shown here including annotation, screen shots, split screen, video recording and time-lapse. To learn more, we recommend watching the videos found here: https://www.hovercam.com/quickstart/solo8plus | The Flex software offers many useful features that are shown here including annotation, screen shots, split screen, video recording and time-lapse. To learn more, we recommend watching the videos found here: https://www.hovercam.com/quickstart/solo8plus | ||
_________________________________________________ | |||
=== HoverCam as Webcam and Microphone === | === HoverCam as Webcam and Microphone === | ||
Useful features of the HoverCam are it’s built in microphone and ability to position the webcam. To use the HoverCam as a webcam and microphone, as in the HyFlex model of teaching, extend the arm the way up so you can see the camera. Adjust the height as necessary. You can use any type of videoconferencing software, including Blackboard Collaborate, Zoom, WebEx, or Teams. The HoverCam should already be the default camera and microphone on the classroom PC but if it is not, it can be changed from the settings page of whatever software you are using. | Useful features of the HoverCam are it’s built in microphone and ability to position the webcam. To use the HoverCam as a webcam and microphone, as in the HyFlex model of teaching, extend the arm the way up so you can see the camera. Adjust the height as necessary. You can use any type of videoconferencing software, including Blackboard Collaborate, Zoom, WebEx, or Teams. The HoverCam should already be the default camera and microphone on the classroom PC but if it is not, it can be changed from the settings page of whatever software you are using. | ||
'''DO NOT LAUNCH FLEX11 SOFTWARE WHEN USING HOVERCAM AS A WEBCAM.''' | |||
Only one program can access the hovercam at a time. If you launch Flex11, it will not be available to the conferencing software. | |||
Software specific instructions can be found here: | Software specific instructions can be found here: | ||
| Line 23: | Line 63: | ||
The camera head has extensive adjustment capability and can be aimed in almost any direction. If the image is upside-down, use the flip button at the base of the camera to correct. If the image is in the wrong orientation, you can rotate the image 90 degrees using the rotate gear on the head. | The camera head has extensive adjustment capability and can be aimed in almost any direction. If the image is upside-down, use the flip button at the base of the camera to correct. If the image is in the wrong orientation, you can rotate the image 90 degrees using the rotate gear on the head. | ||
[[File:Hovercam mic.jpg|thumb|left]] | [[File:Hovercam mic.jpg|thumb|left]] | ||
| Line 30: | Line 68: | ||
[[File:Hovercam webcam.jpg|thumb|right]] | [[File:Hovercam webcam.jpg|thumb|right]] | ||
If the sound and/or video is not being broadcast to your remote students, make sure that the HoverCam is selected for as the microphone and camera in Zoom. To select the HoverCam microphone, open the Audio Settings in Zoom and select (or verify) "Microphone (HoverCam Solo8+(Audio)). Similarly, to select the HoverCam as the webcam, open the Video Settings in Zoom and select (or verify) HoverCam Solo8+. | |||
=== To Learn More === | === To Learn More === | ||
To learn more, we recommend watching the Solo 8Plus Tutorial video found here: https://www.hovercam.com/quickstart/solo8plus NOTE: The HoverCam is already installed so you may ignore the first 20 seconds, which covers installation, but the remaining 70 seconds contains very useful information. There are a number of other useful videos at the [https://www.hovercam.com/quickstart/solo8plus Solo 8Plus Quick Start page]. | To learn more, we recommend watching the Solo 8Plus Tutorial video found here: https://www.hovercam.com/quickstart/solo8plus NOTE: The HoverCam is already installed so you may ignore the first 20 seconds, which covers installation, but the remaining 70 seconds contains very useful information. There are a number of other useful videos at the [https://www.hovercam.com/quickstart/solo8plus Solo 8Plus Quick Start page]. | ||
For best audio quality for remote viewers, always speak in the direction of the camera and not with your back to it. | For best audio quality for remote viewers, always speak in the direction of the camera and not with your back to it. | ||
Be sure to occasionally check the display to see remote viewers and to monitor whether they have questions or comments. | Be sure to occasionally check the display to see remote viewers and to monitor whether they have questions or comments. | ||
{{#ev:youtube|1Vw9xMGGClE| | {{#ev:youtube|1Vw9xMGGClE|700|left}} | ||
{{#ev:youtube|rMn6ed94KXw| | {{#ev:youtube|rMn6ed94KXw|700|right}} | ||
Latest revision as of 13:57, 12 September 2022
HoverCam
Getting started with a classroom HoverCam
While some rooms still have self standing document cameras (Wolfvision) installed, we are removing them in favor of a usb peripheral camera that will enable many capabilities that would not be available otherwise. The new cameras are made by a company called HoverCam and the model is SOLO 8Plus. For the purposes of this document we will simply refer to them as HoverCams. If you have taught in Preakness Hall, Hunziker Hall or Raubinger in the last year or so, you are already familiar with them.
Hovercams can be used as a document camera for displaying documents and objects to your class or it can be used as a webcam and microphone for webconferencing and/or teaching with the HyFlex model (teach both in-class and online students simultaneously).
_________________________________________________
HoverCam as a Document Camera

To use the HoverCam as a document camera, select PODIUM PC on the Crestron control panel.
Place the document or object on the desk under the hovercam and point the lens down at it.
Clicking on the green Flex11 Icon on the PC desktop will launch the Flex11 software and display whatever you have placed on the desk below the camera on your computer screen.

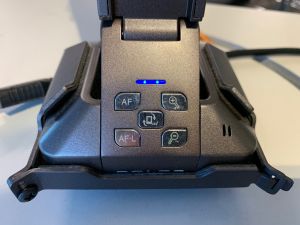
Please note: If the image appears upside-down, you can flip the image 180 degrees by pressing the center button on the base of the HoverCam.
There are also buttons on the base for zooming in and out as well as auto focus recalibrate (AF) and auto focus lock (AF-L)
The Flex software also contains controls to zoom in and out as well as allowing rotation of the image in 90 degree increments and to many other features.
(You can zoom using the buttons on the base of the camera, the buttons in the software, or by scrolling with the dial on the computer mouse)
There is also a light on the HoverCam if needed. The switch is located on the side of the upper portion of the arm.
The Flex software offers many useful features that are shown here including annotation, screen shots, split screen, video recording and time-lapse. To learn more, we recommend watching the videos found here: https://www.hovercam.com/quickstart/solo8plus
_________________________________________________
HoverCam as Webcam and Microphone
Useful features of the HoverCam are it’s built in microphone and ability to position the webcam. To use the HoverCam as a webcam and microphone, as in the HyFlex model of teaching, extend the arm the way up so you can see the camera. Adjust the height as necessary. You can use any type of videoconferencing software, including Blackboard Collaborate, Zoom, WebEx, or Teams. The HoverCam should already be the default camera and microphone on the classroom PC but if it is not, it can be changed from the settings page of whatever software you are using.
DO NOT LAUNCH FLEX11 SOFTWARE WHEN USING HOVERCAM AS A WEBCAM. Only one program can access the hovercam at a time. If you launch Flex11, it will not be available to the conferencing software.
Software specific instructions can be found here:
The camera head has extensive adjustment capability and can be aimed in almost any direction. If the image is upside-down, use the flip button at the base of the camera to correct. If the image is in the wrong orientation, you can rotate the image 90 degrees using the rotate gear on the head.


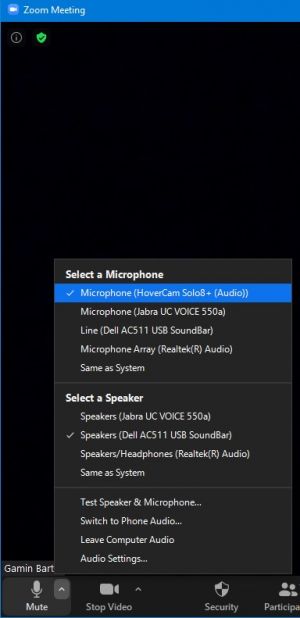
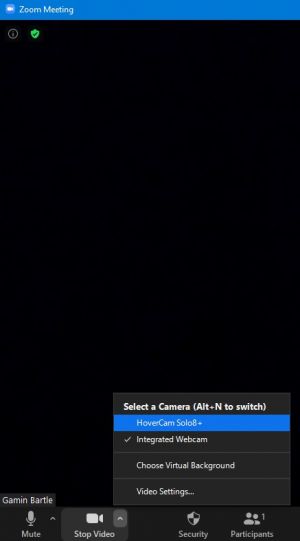
If the sound and/or video is not being broadcast to your remote students, make sure that the HoverCam is selected for as the microphone and camera in Zoom. To select the HoverCam microphone, open the Audio Settings in Zoom and select (or verify) "Microphone (HoverCam Solo8+(Audio)). Similarly, to select the HoverCam as the webcam, open the Video Settings in Zoom and select (or verify) HoverCam Solo8+.
To Learn More
To learn more, we recommend watching the Solo 8Plus Tutorial video found here: https://www.hovercam.com/quickstart/solo8plus NOTE: The HoverCam is already installed so you may ignore the first 20 seconds, which covers installation, but the remaining 70 seconds contains very useful information. There are a number of other useful videos at the Solo 8Plus Quick Start page. For best audio quality for remote viewers, always speak in the direction of the camera and not with your back to it. Be sure to occasionally check the display to see remote viewers and to monitor whether they have questions or comments.