Zoom
What is Zoom?
Zoom is a video conferencing service that can be utilized by WPUNJ Faculty, Staff, and Students using their WPUNJ accounts. www.wpunj.edu/zoom Using Zoom, WPUNJ members can meet utilizing video, audio, and screen sharing.
We are currently licensed for Zoom Meetings, not Webinars.
As announced by CIO Gamin Bartle on 4/16/2026, the University will be discontinuing our Zoom License in early 2027
FAQ: Transition from Zoom to Microsoft Teams
General Questions
Why is the University discontinuing Zoom?
The University is discontinuing its Zoom license as part of an effort to streamline digital tools and reduce redundant services. Microsoft Teams provides comparable functionality and is already included in the University’s Microsoft 365 campus license at no additional cost. Transitioning to Teams allows the University to maintain strong collaboration tools while exercising fiscal responsibility.
When will Zoom access end?
The University’s Zoom license will expire in early 2027. After that time, University email addresses will no longer be eligible for Zoom licensing through William Paterson University.
Will Zoom stop working immediately?
No. Zoom will remain available until the license expires in April 2027. Users are encouraged to begin transitioning to Microsoft Teams well in advance to ensure a smooth change.
Who is affected by this change?
All William Paterson University faculty, staff, and students who currently use Zoom under the University’s license will be affected.
What platform will replace Zoom?
Microsoft Teams will serve as the University’s primary platform for online meetings, collaboration, and virtual instruction.
Do I already have access to Microsoft Teams?
Yes. All WP faculty, staff, and students have access to Microsoft Teams through the University’s Microsoft 365 license: www.wpunj.edu/365
What can Microsoft Teams be used for?
Microsoft Teams supports:
- Online classes and lectures
- Advisement meetings
- Committee and departmental meetings
- Collaboration and file sharing
- Large meetings, webinars, and town halls
Teaching and Blackboard
Is Microsoft Teams integrated with Blackboard?
Yes. Information Technology has integrated Microsoft Teams into Blackboard, allowing instructors to schedule and join Teams meetings directly from within Blackboard.
Do I need to update my course meeting links?
Yes. As you prepare courses for the Fall semester and beyond, any existing Zoom meeting links should be replaced with Microsoft Teams links.
Where can instructors get help using Teams in Blackboard?
The Center for Teaching with Technology (CTT) provides guidance, training, and resources. For assistance:
- Submit a Help Desk ticket
- Select the Blackboard ticket type
Zoom Cloud Recordings
What happens to my Zoom cloud recordings?
Once the Zoom license expires, cloud recordings stored in Zoom will no longer be accessible.
What should I do with important Zoom recordings?
If you have recordings you need to retain, you should:
Download them locally, or Migrate them to Yuja, the University’s official video platform https://itwiki.wpunj.edu/index.php/YuJa#Transferring_Zoom_Recordings_to_YuJa
This should be done before the Zoom license expires.
Can IT help with migrating recordings?
Yes. Information Technology staff are available to assist with downloading or transferring Zoom recordings to Yuja. Submit a Help Desk ticket and select the Yuja ticket type.
Shape
Webinars and Large Events
Does Microsoft Teams support webinars and large events?
Yes. Microsoft Teams includes Webinar and Town Hall features designed for large meetings and events.
Will Teams meet the needs of large campus events?
Information Technology has been reviewing Teams’ webinar and town hall capabilities and will ensure that an appropriate solution is in place to support University needs.
Support and Training
Will training be available for Microsoft Teams?
Yes. Information Technology will continue to offer guidance, documentation, and support to help faculty and staff effectively use Teams for teaching and collaboration.
Who should I contact if I need help?
IT Help Desk:
www.wpunj.edu/helpdesk
(973) 720-4357
Center for Teaching with Technology (CTT)
Planning Ahead
What should I do now?
- Begin familiarizing yourself with Microsoft Teams
- Transition any recurring or future Zoom meetings to Teams
- Identify and download or migrate important Zoom recordings
- Attend available training sessions or request assistance as needed
Getting Started with Zoom
WP's Zoom Portal is available at www.wpunj.edu/zoom. To get started, simply login with your WPUNJ account.
The following support resources are available to assist with how to start using Zoom:
- Zoom's Learning Center, which includes Learning Plans, Live Trainings, and videos, available at https://learning.zoom.us/learn
- Zoom's Top 20 Zoom Resources article (which includes all of resources below,) available at https://support.zoom.us/hc/en-us/articles/360042982391-Top-20-Zoom-resources
- A Frequently Asked Questions guide for how to use Zoom, available at https://support.zoom.us/hc/en-us/articles/206175806-Frequently-Asked-Questions
- The 'How To Zoom' video guide, available on YouTube at https://www.youtube.com/playlist?list=PLKpRxBfeD1kEM_I1lId3N_Xl77fKDzSXe
- Live Training Webinars offered by Zoom, available at https://support.zoom.us/hc/en-us/articles/360029527911
Additional information is also available in the Zoom 'Getting Started' article, available at https://support.zoom.us/hc/en-us/categories/200101697-Getting-Started.

Image from Academic Partnerships Off Campus Toolkit, 2020
Installing Zoom
Zoom meetings can be joined with a desktop client, a mobile app, or using a web browser.
To install Zoom on a university computer, access the Zoom install from either the Software Center (Windows) or Managed Software Center (Mac.) Please note: to install software from the Software Centers while off-campus, you will need to be connected to the university's VPN. Periodically, the Zoom application will prompt you for an update. Follow the prompts to ensure your software stays current.
To install Zoom on a personal computer, simply download and install Zoom from the Zoom portal at https://wpunj.zoom.us/download.
To install Zoom on an iOS or Android phone or tablet, search your respective App store for Zoom. Once installed, sign in using the 'SSO' option with wpunj.zoom.us as the domain.
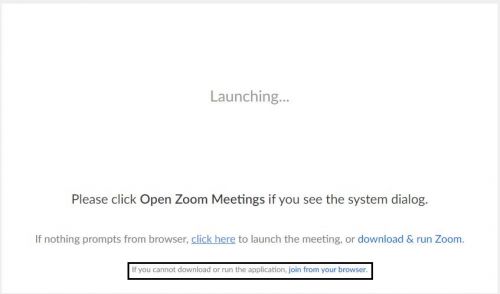
To join a Zoom meeting using a web browser, look for the 'If you cannot download or run the application, join from your browser.' link on the Zoom meeting landing page.
Logging Into Zoom with your WP account
Logging Into Zoom Meeting Software
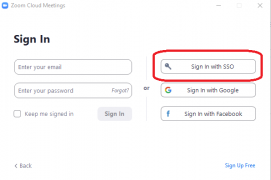
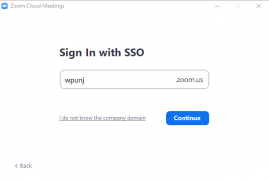
When prompted to login to the Zoom Meeting software:
- Choose ‘Sign in with SSO’ from the right
- Enter wpunj.zoom.us as the Domain and click Continue
- Login to the WPconnect login with your WPUNJ account
-
 Sign In
 -
 Sign in with SSO
 -
 WPUNJ.zoom.us


Logging Into Zoom on the Web
From the Zoom web site you can create and manage meetings.
- To log in to the Zoom website, Sign in at www.wpunj.edu/zoom
- Log in using your WPUNJ account
Logging in with an existing Zoom account tied to your WPUNJ email
If you already have a Zoom login tied to your WPUNJ email, you can convert that account to be licensed under the main William Paterson Zoom account. To access your university-licensed Zoom account:
- Follow the instructions for logging in above, making sure to use the SSO login option which will have you login through WPconnect.
- The first time that you login using the SSO login option, you will receive a prompt that your Zoom account will be transitioned to the 'William Paterson University' account license.
- At that time, your existing Zoom account will be enabled with the 'Pro' features/license of the university account.
If you do not want your existing Zoom account (tied to your WPUNJ email) to be migrated to the university license, do not login using the SSO option. If you have questions on this process, please contact the Helpdesk at www.wpunj.edu/help or (973) 720-4357.
Joining a Zoom Meeting
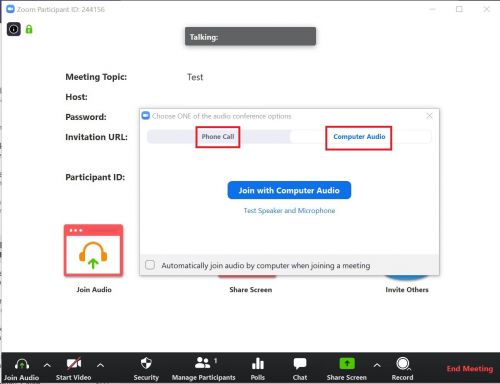
Joining a Zoom Meeting using the Desktop Application
- You should have received a link to join a Zoom meeting. Open the link in a browser.
- Select Open Zoom to open in the Zoom Application.

- Select your Audio option. You can either use your phone or computer for audio.


Joining a Zoom Meeting from your Browser
- Open Zoom link in browser.
- Select Join from Browser.
- If you are unable to join the meeting, the host may not have started the meeting yet.


Scheduling Meetings on Zoom
You can schedule zoom meetings in multiple ways. You can utilize the Zoom web portal, Outlook desktop or web applications, or the Zoom application itself.
Using the Zoom Web Portal or Zoom app
To schedule meetings on the Zoom web portal or in the Zoom app, Zoom provides a quick video introduction and step by step instructions on how to schedule zoom meetings.
Using the Outlook desktop application on PC or Mac
For the Outlook desktop application on university computers, the Zoom Add-in for Outlook is installed and enabled automatically. To schedule a zoom meeting in the outlook calendar, look for the following button when creating a new calendar event:

More information on using the Outlook Add-in for the desktop application can be found on the Zoom Help Center.
Using Outlook 365
For Outlook on the web, the Zoom add-in has been pre-installed for all employee accounts. Please see the Zoom Help Center video and step by step instructions on scheduling Zoom meetings thru Outlook 365.
Cisco Webex Roomkit for utilizing Zoom in 1800 Valley Roads Board Room
If you are utilizing the 1800 Valley Road Board Room, please make sure to set the location for the meeting to be the Roomkit
Security Options and Suggestions
We suggest reviewing the material provided by Zoom, in the Getting Started with Zoom section above.
We recommend utilizing these security options when hosting a meeting:
- Do not share meeting links on Social Media. Try to limit link distribution to participant's email address and ask that participants do not share links.
- Have a Meeting Password
- Enable waiting room
- Mute participants upon entry
- Disable annotation while sharing screen
If you see an improperly named participant in the waiting room, there are three options:
- Send a message to the waiting room to ask them to edit their display name
- Send a message to the waiting room to ask them to use the “Dial-in” feature, admit the dial-in, then ask them to identify.
- Admit them to the meeting, and immediately ask them via mic or chat to rename. If they do not comply, move them back to the waiting room. NOTE If you choose to “remove” a participant rather than move them to the waiting room, it makes it very difficult for the participant to rejoin. These settings can be found in your Zoom Portal Account.
In addition to utilizing these options, you can opt to require meeting attendees to have a Zoom account, or utilize their WPUNJ account to connect to your Zoom meeting. This setting is found under Meeting Options.

Need to add a non-WPUNJ attendee? Use Authentication Exception Add following the Required authentication to join options.


For additional in-depth detail on how to secure your Zoom meetings, see Zoom's Securing Your Zoom Meetings guide.
Zoom Cloud Recording Retention
Zoom sessions that are saved as Zoom Cloud Recordings are set to have a 365 day retention (from date of recording) before they are automatically deleted. Zoom will send automated email notifications to your WP email in advance of a recordings automatic deletion.
If you would like to ensure that a recording you have saved to Zoom's Cloud recordings does not get automatically deleted, you can login to the Zoom web portal (www.wpunj.edu/zoom) and click on the Recordings tab on the left. Then find the recording and click on the three dots to the far right of the recording and click 'Disable Auto Deletion'.
Tips and Tricks for Zoom
Breakout rooms
Breakout rooms are only available in regular Zoom meetings, not in a webinar. The best place to set up breakouts is in the Zoom portal.
- Go to wpunj.zoom.us and use the schedule a meeting option
- Scroll down to the button that says Show options,
- Click breakout room pre-assign
Once in the meeting, click on the breakout tab at the bottom of the Zoom screen, and before opening all rooms, choose options (gear wheel on MAC OS, or Options on Windows OS. There are 2 options for participants:
- Allow participants to choose room (recommended)
- Automatically move all pre-assigned participants into breakout rooms
pre-assigning can be done on the schedule page in the Zoom portal as mentioned above
There are more advanced options on the wpunj.zoom.us portal page as well.
Please refer to the Zoom Support articles for information about Breakout Rooms
Closed Captioning
As of 1/31/21, Zoom now has Built in Captioning and it is available on all university zoom accounts. This needs to be turned on by the host of the meeting following these steps.
- Login to the Zoom Web Portal at www.wpunj.edu/zoom.
- Click on the 'Settings' option on the left menu and then scroll down to Meeting (Advanced.)
- Ensure that Closed Captioning is toggled On and the 'Enabled live transcription service...' checkbox is checked.

Once this is set, the following option will be available in any Zoom meeting scheduled by the host. Clicking on the Live Transcript icon and then Enable Auto-Transcription should enable the transcription for that meeting.

Edit Sharing Settings in Meeting
Start your meeting. When you're in the meeting, click the arrow next to "Share" to see an additional screen where you can change sharing settings and change who can present.

Recording with Audio Transcription
To record meetings with Audio transcription:
- Login to the WPUNJ Zoom web portal (http://www.wpunj.edu/zoom)
- Click on Settings
- Click on the Recording Tab
- Check the 'Audio Transcript' checkbox under Advanced Cloud Recording Settings.
- Recordings must be saved to the cloud
- Shortly after the meeting has completed, you will receive an email from Zoom with a link to the meeting recording with audio transcript
The setting is available here:
.png)
Recording Video Resolution
- To get the maximum resolution, (toggle screen sharing). Then, record locally, not to the Zoom cloud for better video resolution.
- In webinar format, there are choices for HD in the webinar scheduling options:
*Enable HD video for screen shared video
*Enable HD video for attendees
*Always send 1080p video to attendees
There are also more recording options in the Zoom portal under settings/recording on wpunj.zoom.us
Screen Sharing
When sharing a video or audio, choose “share computer sound” and “optimize for video” in the Zoom share config page, then select the box to be shared, and click share. **Also set this if you have video or audio embedded in your PowerPoint Slides. On the Zoom share screen, there is an advanced option to share computer audio ONLY, without sharing your screen. Very useful for providing background music before an event.
Sometimes, there will be “grey” boxes superimposed on top of a shared video representing the panelist panel or chat panel on the screen of the presenter. To remove these, there are 2 options:
- Disable “optimize for video” (this may produce undesirable video effects)

Or:
- To remove these on the app: on MAC OS, go into settings, share screen, advanced, then choose Screen Capture Mode: “Capture with window filtering”
- To remove these on Windows PC, go into settings, share screen, advanced, then choose Screen Capture Mode: “Secure Share with window filtering”
Spotlighting
Locks the selected speaker(s) for all to front and center. This is a global command from the host only. Pinning will move that participant to the top of the local screen of the individual participants, not a global command. Participants have options via the “view” tab at the top right of the Zoom screen. Please note: Spotlighting is not enabled until 3 or more participants are connected.
Virtual Backgrounds
Virtual Backgrounds allow users to mask the background of the room they are in with an image of their choosing. Zoom provides a few default backgrounds, and allows users to select their own image from their device.
Zoom's help center has an article on Using Virtual Backgrounds for PC, Mac and iOS clients.
You can download William Paterson virtual backgrounds at this link.
Zoom Webinar
A Zoom webinar is the same as a Zoom meeting with the following features/exceptions:
Participant panel is broken into two sections:
- Panelists- The webinar panelist is like the Zoom participant with all the functionality of a zoom meeting
- Attendees- The webinar attendee is basically an audience member and can see and hear the panelists, but have no camera or mic access, unless the Zoom host grants permission, one at a time
There is an additional “Q&A” tab at the bottom of the Zoom screen with the controls for attendees to type questions for panelists. Chat is enabled/disabled by the Zoom host.
Zoom Teaching Tricks and Tips
We generally think of Zoom as one of many ways to videoconference individually or in groups however it has many functions that can be leveraged in various ways even when conferencing is not needed.
Present wirelessly to the projection screen from your Laptop, iPad, or iPhone in any PC equipped classroom
It may seem like a lot of steps but in reality it is quite simple. Start a Zoom session on your personal device, click Share Screen, then click on the arrow adjacent to the Participants button and make a note of the Meeting ID (found under the Room System tab)
Go to the teaching station (Podium/Desk/etc) and start up the classroom system by selecting Podium PC on the touchpanel. Log into the PC using your WP credentials and launch zoom. Click on the Join Meeting button and enter the credentials from your laptop. The last thing you should do is click on the Maximize button on the Zoom window so the shared video fills the screen. Also if you want to share video or audio, be sure to check the “include audio” box before you select the screen or app to share.
Present wirelessly to the projection screen from a Laptop, iPad, or iPhone in any PC equipped classroom: Step by step instructions
Start the Zoom session from your device
- Launch Zoom on your laptop/ipad/phone and start a new Meeting
- Click “Join with computer audio” button
- Mute the microphone and speakers on your laptop/ipad/phone
- Click on the arrow to the right of the Participants button and select “Invite…”
- Click the Green Shield on the top of the Zoom meeting, this will display the Meeting ID and Passcode
Set up the Podium PC to display on the projector
- Start up the projection system and select PODIUM PC to turn on the projecto. Log into the podium PC using your WP credentials
- Launch Zoom and click “Join a meeting”
- Enter the Meeting ID and Passcode when prompted
- Click “Join with computer audio” button that appears
- Press the Maximize button in the upper right corner of the Zoom window to make it fill the screen
Share your screen with the Podium PC
- Go back to your laptop/ipad/phone and press the “Share Screen” button in the lower menu of the Zoom window
Lecture capture in Classrooms using Hovercam
- Launch Zoom on your laptop and start a new Meeting
- Click “Join with computer audio” button
- Press the Record Button on the bottom of the Zoom window and select your preferred file location
- We suggest recording to the cloud so the recording will be available from anywhere and there is no risk of losing the file if the PC gets re-imaged or the hard drive malfunctions
Digital Whiteboard
This is great for math professors if you'd like to draw using a Wacom tablet and display it to the class via Zoom meeting. You can also record the lectures and share it with the class.
- Log in and start a zoom session
- Select “Fullscreen” in the view menu of the PC’s Zoom window
- Click on the Share Screen Button in the bottom toolbar and select “whiteboard” from the window that shows
WP Hardware Overview
All room types have Hovercam SOLO8 usb cameras installed. They have a microphone built into the base which will pick up audio from an individual standing at or near the unit or even speaking loudly from a distance if the noise floor is not too high
 The Hovercam can be aimed down towards the desk and used as a document camera, but can also be aimed up at the instructor and used as a webcam for Zoom meetings. (Use middle button on base to flip image vertically)
If you want to show the students in the classroom to the far end, the hovercam rotates at the head. (Please refrain from spinning the base of the hovercam around as the cable can be damaged)
Additional Hardware
Most lecture halls have an additional camera mounted at the rear of the room which can be aimed using the controls that show on the touchpanel when PC is selected
Lecture halls have a usb interface which routes the podium microphone and wireless mic recievers into the PC
Wireless Microphones can be reserved and picked up at the Technical Services Window in Hamilton Hall
To reserve a mic or mics, call the Technical Services Window at (973) 720-4357 x1 or go to this link: webcheckout.wpunj.edu/sso/patron