Capturing a Screenshot: Difference between revisions
Created page with "==PC== {{#ev:youtubehd|8PUGbyXb8XQ|600|left}}<br clear=all> ==Mac== Press Command-Shift-3 on your keyboard. A screenshot of your entire screen is taken and saved to your desktop." |
|||
| (15 intermediate revisions by 5 users not shown) | |||
| Line 1: | Line 1: | ||
== | This article shows you how to take a screenshot of your screen. Screenshots are useful pieces of information when troubleshooting technical problems. | ||
==Windows 10== | |||
To take a snapshot of something on your screen, you will need to open the "Snipping Tool." | |||
1. Select the start button and type "snipping tool" and then select it from the list of results. | |||
[[File:Start menu.jpg]] | |||
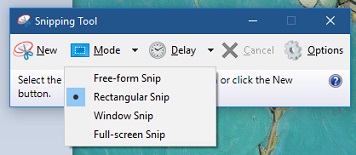
2. Select what mode you want use to take the snapshot. | |||
*Free-form snip. Draw a free-form shape around an object. | |||
*Rectangular snip. Drag the cursor around an object to form a rectangle. | |||
*Window snip. Select a window, such as a browser window or dialog box, that you want to capture. | |||
*Full-screen snip. Capture the entire screen. | |||
[[File:Mode.jpg]] | |||
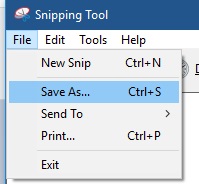
3. After you take your snapshot, you can save the snap by going to FILE and then SAVE AS. | |||
[[File:Save.jpg]] | |||
==Mac== | ==Mac== | ||
Press Command-Shift-3 on your keyboard. A screenshot of your entire screen is taken and saved to your desktop. | Press Command-Shift-3 on your keyboard. A screenshot of your entire screen is taken and saved to your desktop. | ||
==Screenshot Tool== | |||
Click on magnifying glass in the upper right will give you a spotlight search | |||
Then in the spotlight search type in type in screenshot, then under top hit click on screenshot. You will have options to capture an entire screen, capture selected window, capture selected portion where you can crop a certain picture. | |||
[[File:Mac Screenshot1.png|thumb|left]] | |||
Then when you take the picture, left click on it to see which options you can save it on. for example, like saving it on your desktop or in a subfolder. | |||
[[Category:Help Desk]][[Category:Software Guides]][[Category:Apple]][[Category:Windows]] | |||
Latest revision as of 11:59, 26 May 2020
This article shows you how to take a screenshot of your screen. Screenshots are useful pieces of information when troubleshooting technical problems.
Windows 10
To take a snapshot of something on your screen, you will need to open the "Snipping Tool."
1. Select the start button and type "snipping tool" and then select it from the list of results.
2. Select what mode you want use to take the snapshot.
- Free-form snip. Draw a free-form shape around an object.
- Rectangular snip. Drag the cursor around an object to form a rectangle.
- Window snip. Select a window, such as a browser window or dialog box, that you want to capture.
- Full-screen snip. Capture the entire screen.
3. After you take your snapshot, you can save the snap by going to FILE and then SAVE AS.
Mac
Press Command-Shift-3 on your keyboard. A screenshot of your entire screen is taken and saved to your desktop.
Screenshot Tool
Click on magnifying glass in the upper right will give you a spotlight search
Then in the spotlight search type in type in screenshot, then under top hit click on screenshot. You will have options to capture an entire screen, capture selected window, capture selected portion where you can crop a certain picture.

Then when you take the picture, left click on it to see which options you can save it on. for example, like saving it on your desktop or in a subfolder.


