Printing: Difference between revisions
| (10 intermediate revisions by 2 users not shown) | |||
| Line 106: | Line 106: | ||
* Once the job has been uploaded, you will see it in your Job List, where you will be able to preview it and view the job cost. | * Once the job has been uploaded, you will see it in your Job List, where you will be able to preview it and view the job cost. | ||
* Jobs uploaded from My Print Center can be release at any release station on campus, granted the printers have the appropriate abilities for the job (color jobs to color printers, black and white jobs to black and white printers). | * Jobs uploaded from My Print Center can be release at any release station on campus, granted the printers have the appropriate abilities for the job (color jobs to color printers, black and white jobs to black and white printers). | ||
===Uploading Documents using Android=== | |||
* On Android, log in to wpunj.edu/webprint using your University credentials. | |||
* After signing in, tap Upload. A popup should come up to browse your Files. | |||
[[File:Android Print Settings.jpg|thumb|center]] | |||
* Once you're in Files, you have the option for Google Drive, OneDrive, and files stored in the phone's disk space by pressing the three-lined icon on the top left. Note: you cannot upload Google Documents at this time. They need to be a .DOCX, PDF, or other type of accepted file. | |||
===Uploading Documents using iPhone=== | |||
* On iPhone, log into www.wpunj.edu/webprint using your University credentials | |||
* After sign in, tap Upload > Browse <br /><div class="toccolours mw-collapsible mw-collapsed" style="width:350px"> [[Image:WebPrint-iPhone-Upload.jpg|Tap the upload button, then Browse]] </div> | |||
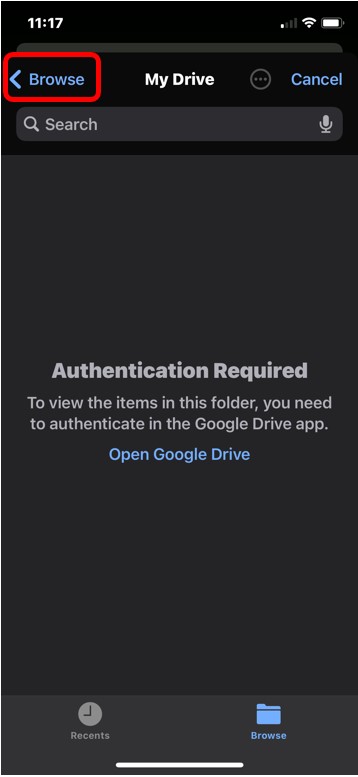
* If you do not have the proper drive listed for either Google drive or OneDrive, Click Browse (in the upper left corner)<br /><div class="toccolours mw-collapsible mw-collapsed" style="width:350px"> [[Image:WebPrint-iPhone-Browse-1.jpg|Tap Browse]] </div> | |||
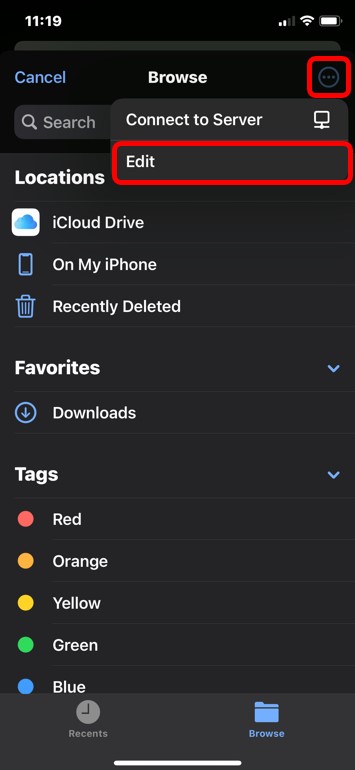
** Tap the three dots on the upper right hand corner > Tap Edit <br /><div class="toccolours mw-collapsible mw-collapsed" style="width:350px"> [[Image:WebPrint-iPhone-EditLocations-1.jpg|Edit Locations]] </div> | |||
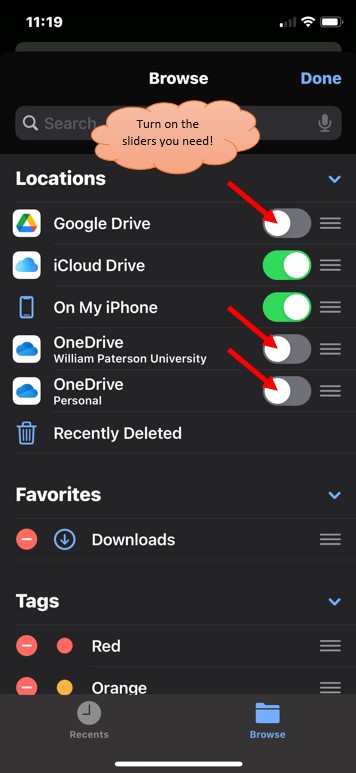
** Enable the location you wish to allow access to > tap Done <br /><div class="toccolours mw-collapsible mw-collapsed" style="width:350px"> [[Image:WebPrint-iPhone-LocationSliders-1.jpg|Use sliders > tap Done]] </div> | |||
*** Note: You must have the app installed and configured on your phone for the locations to be listed | |||
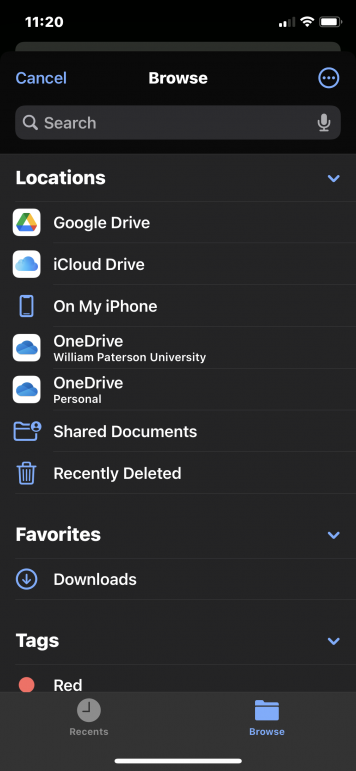
* Tap on either OneDrive to access your Microsoft files, or My Drive to access your Google drive. <br /><div class="toccolours mw-collapsible mw-collapsed" style="width:350px"> [[Image:WebPrint-iPhone-ShowLocations.png|Locations|356px]] </div> | |||
**If Google Drive (My Drive) shows an '''Authentication Required''' message, this means Privacy Screen is turned on. There are two options to work around this, either turning off Privacy Screen, or keeping Privacy Screen & working around it by downloading files locally. | |||
***'''To turn off Privacy Screen''', Open your Google Drive App > Settings > Privacy Screen > turn off the slider <br /><div class="toccolours mw-collapsible mw-collapsed" style="width:350px"> [[Image:WebPrint-iPhone-GoogleDriveSettings.jpg|frame|Google Drive Settings|356px]][[Image:WebPrint-iPhone-GoogleDrivePrivacyScreen.jpg|frame|Google Drive PrivacyScreen Settings Turned Off|356px]] </div> | |||
****You should now be able to browse the files outside of the Google Drive App. | |||
***'''To work around Privacy Screen''', you will have to save the document locally on your device and then browse to upload | |||
****Open Google Drive | |||
****Browse to the document & click the three dots to the right of the file name | |||
****Tap Open in | |||
****Tap Save to files | |||
****Use the drop down arrow under On My iPhone to download the files to a folder. We suggest creating a folder for printing purposes on your phone, and deleting the files as you go. | |||
****You can use the Files app on your iPhone to browse files in the future. Be sure to browse to On My iPhone in order to see what files are stored locally. | |||
===Finishing Options=== | ===Finishing Options=== | ||
| Line 210: | Line 235: | ||
|- | |- | ||
| Student Center by the Bookstore | | Student Center by the Bookstore | ||
|✓ | |||
|✓ | |||
|✓ | |||
|- | |||
| Student Center 208 | |||
|✓ | |✓ | ||
|✓ | |✓ | ||
| Line 219: | Line 249: | ||
|✓ | |✓ | ||
|- | |- | ||
| Valley Road 1040 | | Valley Road 1600 Rm 1040 | ||
|✓ | |||
|✓ | |||
|✓ | |||
|- | |||
| Valley Road 1800 Student Lounge | |||
|✓ | |✓ | ||
|✓ | |✓ | ||
| Line 254: | Line 289: | ||
The Print Shop services all offices, departments, faculty and staff. | The Print Shop services all offices, departments, faculty and staff. | ||
Looking for information on Print Shop Services? Print jobs can be sent to the Print Shop through [[WebCRD]]. The print shop can print posters, large print requests for departmental use or specialty paper requests. More information on the [ | Looking for information on Print Shop Services? Print jobs can be sent to the Print Shop through [[WebCRD]]. The print shop can print posters, large print requests for departmental use or specialty paper requests. More information on the [https://www.wpunj.edu/it/technology-services/printshop/ Print Shop can be found here.] | ||
[[Category:TC Portal]][[Category:Help Desk]] | [[Category:TC Portal]][[Category:Help Desk]] | ||
Revision as of 12:06, 8 February 2022
|

About Uniprint
Information Technology and the Cheng Library have worked together to unify printing resources in an effort to create a greener, more environmentally friendly campus, reduce printing costs, all while allowing students the flexibility to print from anywhere. Utilizing Uniprint, students also have a variety of options for both submitting and releasing/paying for print jobs.
Ways to submit a print job:
- Log into a lab computer on campus and print to the BW or Color print queue
- From any computer, log into My Print Center and upload a document
- Email to Print
Once the document has been submitted, there are several ways it can be paid for and released:
- Visiting any Uniprint location on campus and logging in to pay and release
- Logging into My Print Center to pay and release
Notes and Pricing
- Print jobs must be claimed within 24 hours of uploading. After 24 hours, the print job will be purged from the queue and it must be resubmitted.
- By default, printing is set to duplex and black and white. Duplex printing uses both sides of the paper for print.
- For Lab Printing see the Duplex Printing section of this article for how you can modify your documents to print single sided when you submit the document for printing.
- For Web Print and Email to Print, see Finishing Options for instructions on changing these options.
Print job costs are based on the job attributes outlined below. These prices are also in effect for copying from Multifunction devices:
In this case, a "page" refers to the number of pages in the document you wish to print - NOT necessarily a sheet of paper.
| Paper Size | Attribute | Cost per Page |
|---|---|---|
| Default Paper Size | ||
| Black and White | $0.05 | |
| Color | $0.15 | |
| Black and White, Duplex | $0.02 | |
| Color, Duplex | $0.06 |
Please note prices are subject to change based on paper and toner costs.
Printing Funds
Students
All registered WPUNJ student accounts will be given a printing quota at the start of the Fall Semester of $15.00 per academic year (fall, spring & summer). The counter will reset at the beginning of each year and there will be no carryover. After the $15.00 per year quota is reached, printing charges may be paid by using Pioneer Express - associated with your student ID card. You are responsible for keeping track of your printing quota and budgeting your resources accordingly. Please see Hospitality Services for more information on adding funds to your Pioneer Express account.
Faculty
If faculty need to print from a computer lab for teaching and learning purposes they may submit a Web Help Desk ticket with a “Request Type” of “Printing/Multi-Function Device – Request" to request an allocation.
Printing From Computer Labs
To submit your print from a lab computer that is mapped to Uniprint, select File>Print in the application from which you wish to print. The following queues will appear if the computer is in a lab that maps directly to Uniprint:
\\pharosps\BW\\pharosps\COLOR
Select the print queue that states your intended attribute: BW for black and white prints and COLOR for color prints.
Duplex Printing
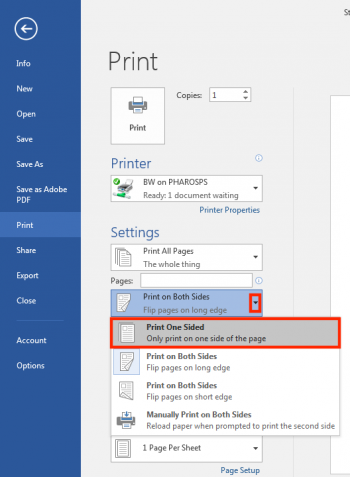
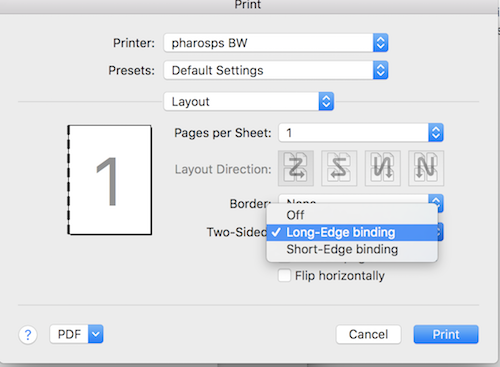
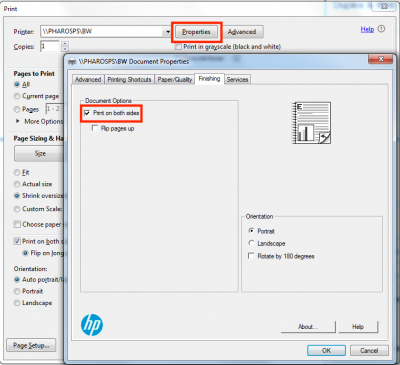
By default, print jobs submitted through Web Print, Email to Print and Lab Printing locations are set to duplex. Duplex printing is automatic printing on both sides of a sheet of paper. While duplex printing is enabled by default in these labs, students can easily change many of the document types to print single sided by changing the printer setting for each print job.
Example of changing printer settings in labs
- Duplex to single sided in Microsoft Word Windows
- Duplex to single sided in Microsoft Word MacOS
- Duplex to single sided in Adobe Acrobat
Using My Print Center

My Print Center can be accessed from any web browser on your personal laptop, smart phone or mobile device. My Print Center allows users to upload documents, view activity history, view transaction history as well as release documents directly from the website.
Uploading Documents
- Using the web browser on your personal computer or mobile device, navigate to www.wpunj.edu/webprint and sign in with your University credentials.
- After sign in, the default tab will be the "Job List" tab. This is where you can view any documents that are currently in your queue.
- To upload a document, click the "Upload" icon and browse your machine to the document you would like to upload.
- Please make note of the accepted file formats:
- PDF - .pdf
- Word Document - .doc|.dot|.docx|.rtf
- Excel - .xls|.xlt|.xlsx|.xltx|.xltm|.xlsm|.csv
- Power Point - .ppt|.pptx|.pptm|.pot|.pps|.potx|.ppsx
- Visio - .vsd|.vss|.vst|.vdx|.vsx|.vtx|.vdw
- Open Office - .odt|.ods|.odp
- Images - .jpg|.jpeg|.png|.bmp|.gif|.tif
- Email Messages - .txt|.mht|.eml|.ini|.cfg
- Once the job has been uploaded, you will see it in your Job List, where you will be able to preview it and view the job cost.
- Jobs uploaded from My Print Center can be release at any release station on campus, granted the printers have the appropriate abilities for the job (color jobs to color printers, black and white jobs to black and white printers).
Uploading Documents using Android
- On Android, log in to wpunj.edu/webprint using your University credentials.
- After signing in, tap Upload. A popup should come up to browse your Files.
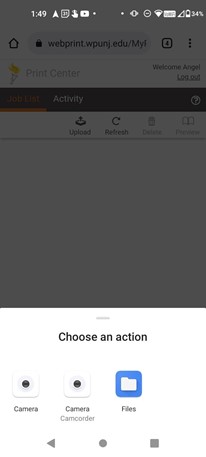
- Once you're in Files, you have the option for Google Drive, OneDrive, and files stored in the phone's disk space by pressing the three-lined icon on the top left. Note: you cannot upload Google Documents at this time. They need to be a .DOCX, PDF, or other type of accepted file.
Uploading Documents using iPhone
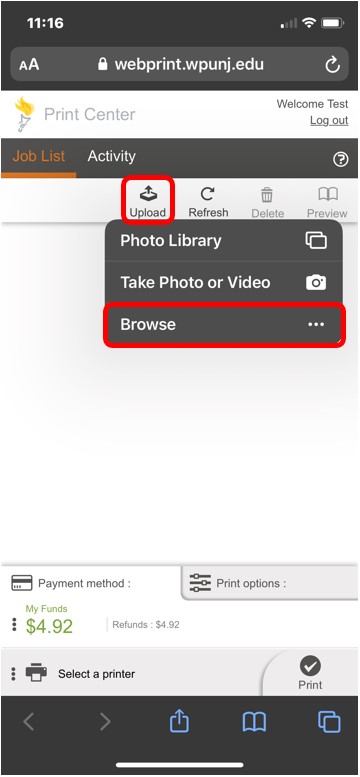
- On iPhone, log into www.wpunj.edu/webprint using your University credentials
- After sign in, tap Upload > Browse
- If you do not have the proper drive listed for either Google drive or OneDrive, Click Browse (in the upper left corner)
- Tap the three dots on the upper right hand corner > Tap Edit
- Enable the location you wish to allow access to > tap Done
- Note: You must have the app installed and configured on your phone for the locations to be listed
- Tap the three dots on the upper right hand corner > Tap Edit
- Tap on either OneDrive to access your Microsoft files, or My Drive to access your Google drive.
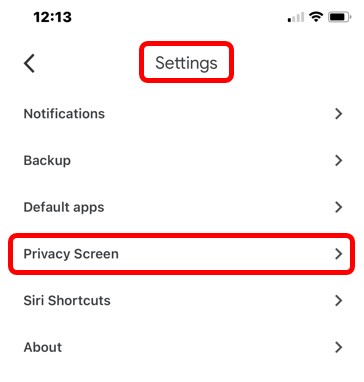
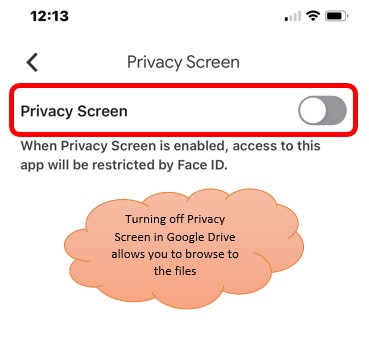
- If Google Drive (My Drive) shows an Authentication Required message, this means Privacy Screen is turned on. There are two options to work around this, either turning off Privacy Screen, or keeping Privacy Screen & working around it by downloading files locally.
- To turn off Privacy Screen, Open your Google Drive App > Settings > Privacy Screen > turn off the slider
- You should now be able to browse the files outside of the Google Drive App.
- To work around Privacy Screen, you will have to save the document locally on your device and then browse to upload
- Open Google Drive
- Browse to the document & click the three dots to the right of the file name
- Tap Open in
- Tap Save to files
- Use the drop down arrow under On My iPhone to download the files to a folder. We suggest creating a folder for printing purposes on your phone, and deleting the files as you go.
- You can use the Files app on your iPhone to browse files in the future. Be sure to browse to On My iPhone in order to see what files are stored locally.
- To turn off Privacy Screen, Open your Google Drive App > Settings > Privacy Screen > turn off the slider
- If Google Drive (My Drive) shows an Authentication Required message, this means Privacy Screen is turned on. There are two options to work around this, either turning off Privacy Screen, or keeping Privacy Screen & working around it by downloading files locally.
Finishing Options
- To edit the finishing options for a document, first select the job from the Job List.
- Navigate to the "Printing options:" section at the bottom of the page to change Color, Pages per Side, Sides and Copies.
- If a finishing option is greyed out, please verify that the printer selected is capable of using that feature. For example, if you have a black and white printer selected, you can not change the finishing option to "color."
Please note that you cannot edit Finishing Options for print jobs submitted from a lab machine. The finishing options were provided by the application on the computer.
Please note that releasing a job from within the website means that the job will print, regardless if you are present to retrieve it or not. Please see notes on Releasing Jobs from My Print Center
About Email to Print
- Print jobs may also be submitted via an email attachment for release at any release station on the William Paterson University campus.
- Print jobs must be claimed within 24 hours of uploading. After 24 hours, the print job will be purged from the queue and it must be resubmitted.
- Print jobs can only be submitted as attachments, not as "share" links from Dropbox, Google Drive, etc. For further instructions about ensuring your document is truly an attachment, please see below.
Submitting a document to Email to Print
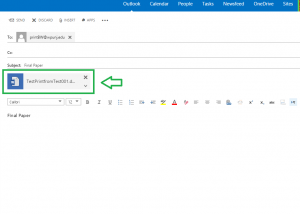
To submit a print job using Email to Print, send the document as an attachment to one of the following emails, depending on the attribute you would like:
- For Black and White printing: printBW@wpunj.edu
- For Color Printing: printcolor@wpunj.edu
Please ensure that the document is sent as a true attachment, not as a share link within the body of the email. It is not necessary for the email body to contain text to send the attachment to Uniprint. Below is a screenshot of an email that contains a true attachment that can be processed by Uniprint:
A confirmation email will be delivered to your email address confirming that your document was uploaded and ready to release.
Locate a Release Station
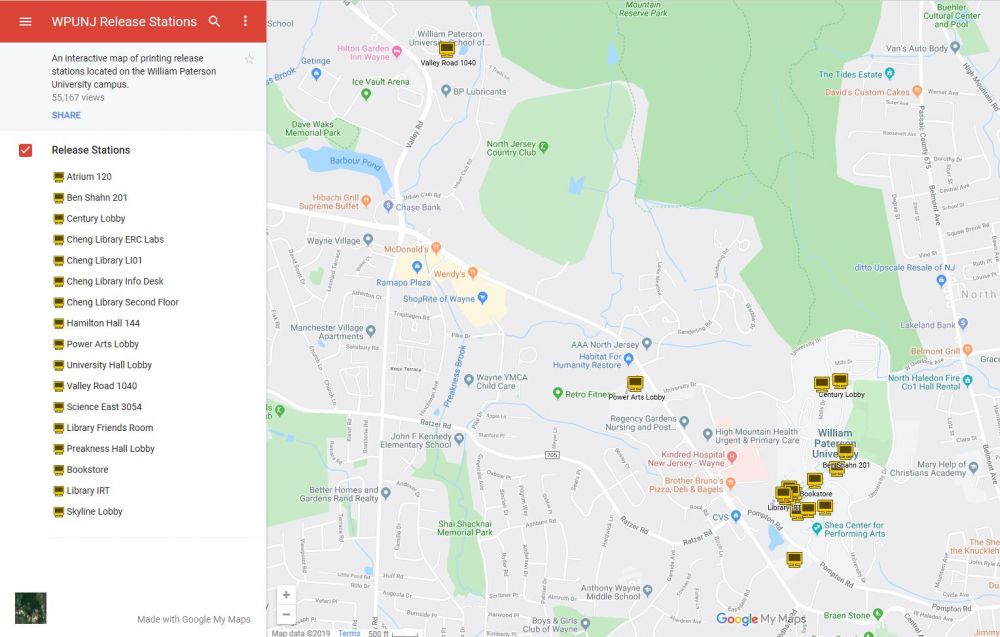
To search an interactive map of release stations on the WPUNJ campus, please click the image below. For more information about release stations, please see Release Station Locations and Attributes
Release Station Locations and Attributes
Release stations are stations from which students can release their queued print jobs. They are typically found in high-volume print areas. An interactive map of release stations on the campus can be found by following the link. A list of release stations are provided below along with the attributes provided by the printers in these areas:
| Location | Black and White | Color | Copy/Scan Available |
|---|---|---|---|
| Atrium 120 | ✓ | ✓ | ✓ |
| Ben Shahn 201 | ✓ | ✓ | ✓ |
| Century Lobby | ✓ | ✓ | ✓ |
| Library Basement | ✓ | -- | -- |
| Library ERC | ✓ | ✓ | ✓ |
| Library Info Desk | ✓ | ✓ | ✓ |
| Library IRT | ✓ | ✓ | ✓ |
| Library Second Floor | ✓ | ✓ | ✓ |
| Hamilton Hall 144 | ✓ | ✓ | ✓ |
| Preakness Hall Lobby | ✓ | ✓ | ✓ |
| Power Arts Lobby | ✓ | ✓ | ✓ |
| Science East 3054 | ✓ | ✓ | ✓ |
| Skyline Lobby | ✓ | ✓ | ✓ |
| Student Center by the Bookstore | ✓ | ✓ | ✓ |
| Student Center 208 | ✓ | ✓ | ✓ |
| University Hall Lobby | ✓ | ✓ | ✓ |
| Valley Road 1600 Rm 1040 | ✓ | ✓ | ✓ |
| Valley Road 1800 Student Lounge | ✓ | ✓ | ✓ |
Releasing Jobs from My Print Center
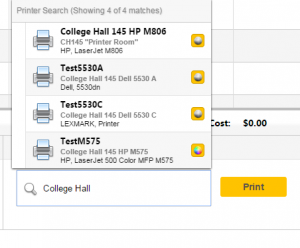
- Jobs may also be release from directly within the website by selecting the job, choosing a destination printer and then clicking the "Print" button in the bottom right-hand corner of the page. It is also possible to search for names or locations of printers from within the Destination field in the lower right corner of the screen.
- Please note that releasing a job from within the website means that the job will print, regardless if you are present to retrieve it or not.
Releasing Print Jobs from a Release Station
By logging into a release station, users can see any job that has been uploaded to their queue and choose to release those jobs to the printers that are assigned to the release station. Only printers with the appropriate attributes will print from the assigned printers - meaning that color print jobs will NOT print to black and white printers. To print a color print job, walk up to a color MFP and release through the embedded release station. Please see Releasing Print Jobs from an Embedded Device for further instructions.
To sign into a release station and release a print job:
- Swipe your ID card or enter your username and password
- Select the print you would like to release. Review the job cost and your balance before clicking "Print"
- You may also delete print jobs from the release station. Select the print you would like to delete and click "Delete"
- Click "Log Off" once your are finished releasing your job
Releasing Print Jobs from an Embedded Device
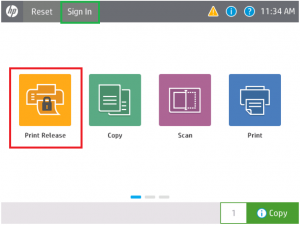
To release print jobs from an embedded device:
- Walk up to the device, touch the screen to wake it up (if applicable),
- If you have your card, scan your card (either proximity or swipe reader). Otherwise, you can tap Sign in and enter your username/password to authenticate
- An "Available Funds" screen will first appear. View your balance and click "OK"
- After being returned to the home screen, click "Print Release"
- Select the document you want to print and click "Print." The option to delete jobs is also available.
Need Help?
Need help? Contact the Help Desk.
Print Shop Services
The Print Shop services all offices, departments, faculty and staff.
Looking for information on Print Shop Services? Print jobs can be sent to the Print Shop through WebCRD. The print shop can print posters, large print requests for departmental use or specialty paper requests. More information on the Print Shop can be found here.
