Zoom: Difference between revisions
No edit summary |
|||
| (55 intermediate revisions by 6 users not shown) | |||
| Line 1: | Line 1: | ||
As of early May 2020, all current William Paterson employees and students have access to Zoom with their WPUNJ logins. | As of early May 2020, all current William Paterson employees and students have access to Zoom with their WPUNJ logins. | ||
<!-- https://learning.zoom.us/learn --> | |||
==What is Zoom?== | ==What is Zoom?== | ||
| Line 9: | Line 10: | ||
WP's Zoom Portal is available at [http://www.wpunj.edu/zoom www.wpunj.edu/zoom]. To get started, simply login with your WPUNJ account. | WP's Zoom Portal is available at [http://www.wpunj.edu/zoom www.wpunj.edu/zoom]. To get started, simply login with your WPUNJ account. | ||
The following support resources are available to assist with how to start using Zoom: | The following support resources are available to assist with how to start using Zoom: | ||
* Zoom's Learning Center, which includes Learning Plans, Live Trainings, and videos, available at https://learning.zoom.us/learn | |||
* Zoom's Top 20 Zoom Resources article (which includes all of resources below,) available at https://support.zoom.us/hc/en-us/articles/360042982391-Top-20-Zoom-resources | * Zoom's Top 20 Zoom Resources article (which includes all of resources below,) available at https://support.zoom.us/hc/en-us/articles/360042982391-Top-20-Zoom-resources | ||
* A Frequently Asked Questions guide for how to use Zoom, available at https://support.zoom.us/hc/en-us/articles/206175806-Frequently-Asked-Questions | * A Frequently Asked Questions guide for how to use Zoom, available at https://support.zoom.us/hc/en-us/articles/206175806-Frequently-Asked-Questions | ||
| Line 21: | Line 21: | ||
Additional information is also available in the Zoom 'Getting Started' article, available at https://support.zoom.us/hc/en-us/categories/200101697-Getting-Started. | Additional information is also available in the Zoom 'Getting Started' article, available at https://support.zoom.us/hc/en-us/categories/200101697-Getting-Started. | ||
[[File:Zoom1-1.png | 700px]]<br>Image from Academic Partnerships Off Campus Toolkit, 2020 | |||
==Installing Zoom== | ==Installing Zoom== | ||
| Line 30: | Line 28: | ||
'''To install Zoom on a university computer''', access the Zoom install from either the [[University_Software|Software Center]] (Windows) or [[Mac_OS_Managed_Software_Center|Managed Software Center]] (Mac.) Please note: to install software from the Software Centers while off-campus, you will need to be connected to the university's [[VPN_Remote_Access|VPN]]. | '''To install Zoom on a university computer''', access the Zoom install from either the [[University_Software|Software Center]] (Windows) or [[Mac_OS_Managed_Software_Center|Managed Software Center]] (Mac.) Please note: to install software from the Software Centers while off-campus, you will need to be connected to the university's [[VPN_Remote_Access|VPN]]. | ||
Periodically, the Zoom application will prompt you for an update. Follow the prompts to ensure your software stays current. | |||
'''To install Zoom on a personal computer''', simply download and install Zoom from the Zoom portal at https://wpunj.zoom.us/download. | '''To install Zoom on a personal computer''', simply download and install Zoom from the Zoom portal at https://wpunj.zoom.us/download. | ||
| Line 65: | Line 64: | ||
''If you do not want your existing Zoom account (tied to your WPUNJ email) to be migrated to the university license, do not login using the SSO option.'' | ''If you do not want your existing Zoom account (tied to your WPUNJ email) to be migrated to the university license, do not login using the SSO option.'' | ||
If you have questions on this process, please contact the Helpdesk at www.wpunj.edu/help or (973) 720-4357. | If you have questions on this process, please contact the Helpdesk at www.wpunj.edu/help or (973) 720-4357. | ||
==Joining a Zoom Meeting== | |||
===Joining a Zoom Meeting using the Desktop Application=== | |||
#You should have received a link to join a Zoom meeting. Open the link in a browser. | |||
#Select '''Open Zoom''' to open in the Zoom Application. <div class="toccolours mw-collapsible innercollapse" style="width:300px">[[File:Zoom4.JPG | 500px]]</div> | |||
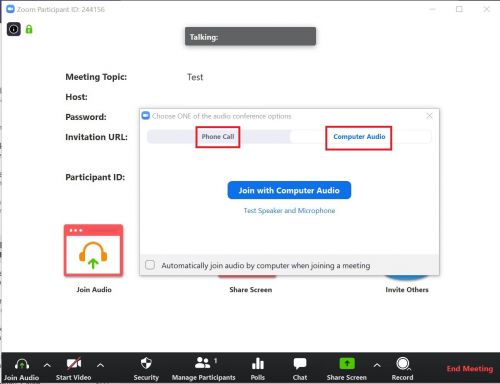
#Select your Audio option. You can either use your phone or computer for audio. <div class="toccolours mw-collapsible innercollapse" style="width:300px">[[File:Zoom5.JPG | 500px]]</div> | |||
===Joining a Zoom Meeting from your Browser=== | |||
#Open Zoom link in browser. | |||
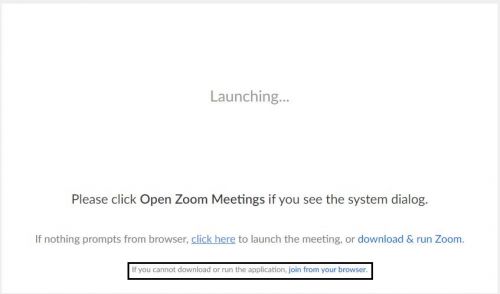
#Select '''Join from Browser.'''<div class="toccolours mw-collapsible innercollapse" style="width:300px">[[File:Zoom1.JPG | 500px]]</div> | |||
#If you are unable to join the meeting, the host may not have started the meeting yet. <div class="toccolours mw-collapsible innercollapse" style="width:300px">[[File:Zoom3.JPG | 500px]]</div> | |||
==Scheduling Meetings on Zoom== | ==Scheduling Meetings on Zoom== | ||
| Line 73: | Line 82: | ||
To schedule meetings on the [http://www.wpunj.edu/zoom Zoom web portal] or in the Zoom app, Zoom provides a quick video introduction and step by step instructions on '''[https://support.zoom.us/hc/en-us/articles/201362413-Scheduling-meetings how to schedule zoom meetings.]''' | To schedule meetings on the [http://www.wpunj.edu/zoom Zoom web portal] or in the Zoom app, Zoom provides a quick video introduction and step by step instructions on '''[https://support.zoom.us/hc/en-us/articles/201362413-Scheduling-meetings how to schedule zoom meetings.]''' | ||
===Using the Outlook desktop application=== | ===Using the Outlook desktop application on PC or Mac=== | ||
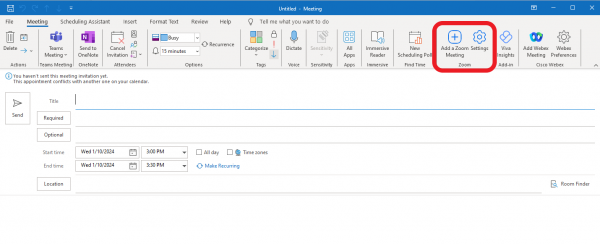
For the Outlook desktop application on university computers, the Zoom Add-in for Outlook is installed and enabled automatically. To schedule a zoom meeting in the outlook calendar, look for the following button when creating a new calendar event: | |||
[[File:Zoom Calendar item.png |600px|Click the icon to open the Zoom meetings screen]] | |||
More information on using the '''[https://support.zoom.com/hc/en/article?id=zm_kb&sysparm_article=KB0062925#collapsePC Outlook Add-in for the desktop application can be found on the Zoom Help Center.]''' | |||
===Using Outlook 365=== | ===Using Outlook 365=== | ||
For Outlook on the web, the Zoom add-in has been pre-installed for all employee accounts. '''[https://support.zoom.us/hc/en-us/articles/115005223126-Zoom-for-Outlook-add-in-web-and-desktop- Please see the Zoom Help Center video and step by step instructions on scheduling Zoom meetings thru Outlook 365.]''' | For Outlook on the web, the Zoom add-in has been pre-installed for all employee accounts. '''[https://support.zoom.us/hc/en-us/articles/115005223126-Zoom-for-Outlook-add-in-web-and-desktop- Please see the Zoom Help Center video and step by step instructions on scheduling Zoom meetings thru Outlook 365.]''' | ||
==Zoom | ===Cisco Webex Roomkit for utilizing Zoom in 1800 Valley Roads Board Room=== | ||
If you are utilizing the 1800 Valley Road Board Room, please make sure to set the location for the meeting to be the [[Cisco WebEx Roomkits|Roomkit]] | |||
[[ | [[category:Software Guides]] | ||
[[ | |||
==Security Options and Suggestions== | ==Security Options and Suggestions== | ||
| Line 97: | Line 103: | ||
We recommend utilizing these security options when hosting a meeting: | We recommend utilizing these security options when hosting a meeting: | ||
* '''Meeting Password''' | * '''Do not share meeting links on Social Media. Try to limit link distribution to participant's email address and ask that participants do not share links. ''' | ||
* '''Have a Meeting Password''' | |||
* '''Enable waiting room''' | * '''Enable waiting room''' | ||
* '''Mute participants upon entry''' | * '''Mute participants upon entry''' | ||
* '''[https://support.zoom.us/hc/en-us/articles/201362153 Disable annotation while sharing screen]''' | * '''[https://support.zoom.us/hc/en-us/articles/201362153 Disable annotation while sharing screen]''' | ||
If you see an improperly named participant in the waiting room, there are three options: | |||
#Send a message to the waiting room to ask them to edit their display name | |||
#Send a message to the waiting room to ask them to use the “Dial-in” feature, admit the dial-in, then ask them to identify. | |||
#Admit them to the meeting, and immediately ask them via mic or chat to rename. If they do not comply, move them back to the waiting room. '''NOTE''' If you choose to “remove” a participant rather than move them to the waiting room, it makes it very difficult for the participant to rejoin. These settings can be found in your Zoom Portal Account. | |||
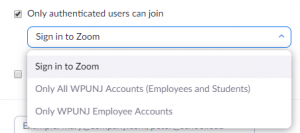
In addition to utilizing these options, you can opt to require meeting attendees to have a Zoom account, or utilize their WPUNJ account to connect to your Zoom meeting. This setting is found under '''Meeting Options'''. | In addition to utilizing these options, you can opt to require meeting attendees to have a Zoom account, or utilize their WPUNJ account to connect to your Zoom meeting. This setting is found under '''Meeting Options'''. | ||
| Line 106: | Line 120: | ||
[[File:Zoom-authenticated-users.png|300px|Zoom Meeting Options]] | [[File:Zoom-authenticated-users.png|300px|Zoom Meeting Options]] | ||
[[ | Need to add a non-WPUNJ attendee? Use '''Authentication Exception Add''' following the '''Required authentication to join''' options. | ||
[[File:Zoom-authenticated-users-exception1.png|300px|Zoom Meeting Authentication Exception]][[File:Zoom-authenticated-users-exception2.png|300px|Zoom Meeting Authentication Exception]] | |||
For additional in-depth detail on how to secure your Zoom meetings, see Zoom's [https://zoom.us/docs/doc/Securing%20Your%20Zoom%20Meetings.pdf Securing Your Zoom Meetings guide]. | |||
==Zoom Cloud Recording Retention== | |||
Zoom sessions that are saved as Zoom Cloud Recordings are set to have a 365 day retention (from date of recording) before they are automatically deleted. Zoom will send automated email notifications to your WP email in advance of a recordings automatic deletion. | |||
If you would like to ensure that a recording you have saved to Zoom's Cloud recordings does not get automatically deleted, you can login to the Zoom web portal (www.wpunj.edu/zoom) and click on the Recordings tab on the left. Then find the recording and click on the three dots to the far right of the recording and click 'Disable Auto Deletion'. | |||
==Tips and Tricks for Zoom== | |||
===Breakout rooms=== | |||
Breakout rooms are only available in regular Zoom meetings, not in a webinar. The best place to set up breakouts is in the Zoom portal. | |||
#Go to wpunj.zoom.us and use the schedule a meeting option | |||
# Scroll down to the button that says Show options, | |||
# Click breakout room pre-assign | |||
Once in the meeting, click on the breakout tab at the bottom of the Zoom screen, and before opening all rooms, choose options (gear wheel on MAC OS, or Options on Windows OS. There are 2 options for participants: | |||
#Allow participants to choose room (recommended) | |||
#Automatically move all pre-assigned participants into breakout rooms | |||
pre-assigning can be done on the schedule page in the Zoom portal as mentioned above | |||
There are more advanced options on the wpunj.zoom.us portal page as well. | |||
[https://support.zoom.us/hc/en-us/articles/206476093-Enabling-breakout-rooms Please refer to the Zoom Support articles for information about Breakout Rooms] | |||
===Closed Captioning=== | |||
As of 1/31/21, Zoom now has Built in Captioning and it is available on all university zoom accounts. This needs to be turned on by the host of the meeting following these steps. | |||
#Login to the Zoom Web Portal at www.wpunj.edu/zoom. | |||
#Click on the ''''''Settings'''''' option on the left menu and then scroll down to '''Meeting (Advanced.)''' | |||
#Ensure that '''Closed Captioning''' is toggled '''On''' and the ''''Enabled live transcription service...'''' checkbox is checked. | |||
[[File:zoom6.jpg | 700px]] | |||
Once this is set, the following option will be available in any Zoom meeting scheduled by the host. Clicking on the '''Live Transcript''' icon and then '''Enable Auto-Transcription''' should enable the transcription for that meeting. | |||
[[File:zoom7.jpg | 500px]] | |||
===Edit Sharing Settings in Meeting=== | |||
Start your meeting. When you're in the meeting, click the arrow next to "Share" to see an additional screen where you can change sharing settings and change who can present. | |||
[[File:Zoom settings - slaymaker.png]] | |||
===Recording with Audio Transcription=== | |||
To record meetings with Audio transcription: | |||
#Login to the WPUNJ Zoom web portal (http://www.wpunj.edu/zoom) | |||
#Click on Settings | |||
#Click on the Recording Tab | |||
#Check the 'Audio Transcript' checkbox under Advanced Cloud Recording Settings. | |||
#Recordings must be saved to the cloud | |||
#Shortly after the meeting has completed, you will receive an email from Zoom with a link to the meeting recording with audio transcript | |||
The setting is available here: | |||
[[File:MicrosoftTeams-image (11).png|Zoom Audio Setting for recording audio transcripts.]] | |||
===Recording Video Resolution=== | |||
#To get the maximum resolution, (toggle screen sharing). Then, record locally, not to the Zoom cloud for better video resolution. | |||
#In webinar format, there are choices for HD in the webinar scheduling options: | |||
*Enable HD video for screen shared video | |||
*Enable HD video for attendees | |||
*Always send 1080p video to attendees | |||
There are also more recording options in the Zoom portal under settings/recording on wpunj.zoom.us | |||
===Screen Sharing=== | |||
When sharing a video or audio, choose “share computer sound” and “optimize for video” in the Zoom share config page, then select the box to be shared, and click share. **Also set this if you have video or audio embedded in your PowerPoint Slides. | |||
On the Zoom share screen, there is an advanced option to share computer audio ONLY, without sharing your screen. Very useful for providing background music before an event. | |||
Sometimes, there will be “grey” boxes superimposed on top of a shared video representing the panelist panel or chat panel on the screen of the presenter. To remove these, there are 2 options: | |||
*Disable “optimize for video” (this may produce undesirable video effects) | |||
[[File: Zoom8.jpg]] | |||
Or: | |||
*To remove these on the app: on MAC OS, go into settings, share screen, advanced, then choose Screen Capture Mode: “Capture with window filtering” | |||
*To remove these on Windows PC, go into settings, share screen, advanced, then choose Screen Capture Mode: “Secure Share with window filtering” | |||
===Spotlighting=== | |||
Locks the selected speaker(s) for all to front and center. This is a global command from the host only. Pinning will move that participant to the top of the local screen of the individual participants, not a global command. Participants have options via the “view” tab at the top right of the Zoom screen. | |||
Please note: Spotlighting is not enabled until 3 or more participants are connected. | |||
===Virtual Backgrounds=== | |||
Virtual Backgrounds allow users to mask the background of the room they are in with an image of their choosing. Zoom provides a few default backgrounds, and allows users to select their own image from their device. | |||
Zoom's help center has an [https://support.zoom.us/hc/en-us/articles/210707503-Virtual-Background#h_bebf36a4-c1e9-4769-9d3c-e0d01457d341 article on Using Virtual Backgrounds for PC, Mac and iOS clients.] | |||
You can download William Paterson virtual backgrounds at [https://www.wpunj.edu/university/virtual-backgrounds this link]. | |||
===Zoom Webinar=== | |||
A Zoom webinar is the same as a Zoom meeting with the following features/exceptions: | |||
Participant panel is broken into two sections: | |||
#Panelists- The webinar panelist is like the Zoom participant with all the functionality of a zoom meeting | |||
#Attendees- The webinar attendee is basically an audience member and can see and hear the panelists, but have no camera or mic access, unless the Zoom host grants permission, one at a time | |||
There is an additional “Q&A” tab at the bottom of the Zoom screen with the controls for attendees to type questions for panelists. | |||
Chat is enabled/disabled by the Zoom host. | |||
Latest revision as of 16:27, 12 January 2024
As of early May 2020, all current William Paterson employees and students have access to Zoom with their WPUNJ logins.
What is Zoom?
Zoom is a video conferencing service that can be utilized by WPUNJ Faculty, Staff, and Students using their WPUNJ accounts. www.wpunj.edu/zoom Using Zoom, WPUNJ members can meet utilizing video, audio, and screen sharing.
We are currently licensed for Zoom Meetings, not Webinars.
Getting Started with Zoom
WP's Zoom Portal is available at www.wpunj.edu/zoom. To get started, simply login with your WPUNJ account.
The following support resources are available to assist with how to start using Zoom:
- Zoom's Learning Center, which includes Learning Plans, Live Trainings, and videos, available at https://learning.zoom.us/learn
- Zoom's Top 20 Zoom Resources article (which includes all of resources below,) available at https://support.zoom.us/hc/en-us/articles/360042982391-Top-20-Zoom-resources
- A Frequently Asked Questions guide for how to use Zoom, available at https://support.zoom.us/hc/en-us/articles/206175806-Frequently-Asked-Questions
- The 'How To Zoom' video guide, available on YouTube at https://www.youtube.com/playlist?list=PLKpRxBfeD1kEM_I1lId3N_Xl77fKDzSXe
- Live Training Webinars offered by Zoom, available at https://support.zoom.us/hc/en-us/articles/360029527911
Additional information is also available in the Zoom 'Getting Started' article, available at https://support.zoom.us/hc/en-us/categories/200101697-Getting-Started.
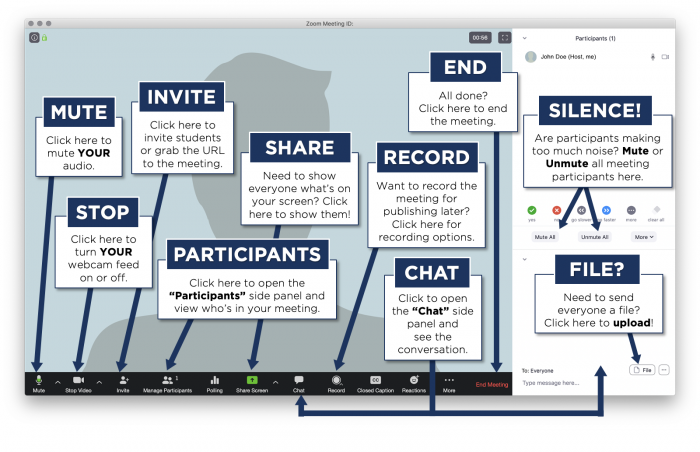
Image from Academic Partnerships Off Campus Toolkit, 2020
Installing Zoom
Zoom meetings can be joined with a desktop client, a mobile app, or using a web browser.
To install Zoom on a university computer, access the Zoom install from either the Software Center (Windows) or Managed Software Center (Mac.) Please note: to install software from the Software Centers while off-campus, you will need to be connected to the university's VPN. Periodically, the Zoom application will prompt you for an update. Follow the prompts to ensure your software stays current.
To install Zoom on a personal computer, simply download and install Zoom from the Zoom portal at https://wpunj.zoom.us/download.
To install Zoom on an iOS or Android phone or tablet, search your respective App store for Zoom. Once installed, sign in using the 'SSO' option with wpunj.zoom.us as the domain.
To join a Zoom meeting using a web browser, look for the 'If you cannot download or run the application, join from your browser.' link on the Zoom meeting landing page.
Logging Into Zoom with your WP account
Logging Into Zoom Meeting Software
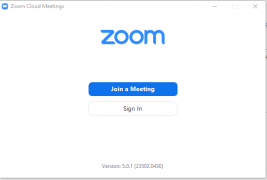
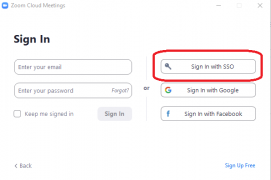
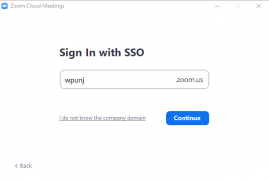
When prompted to login to the Zoom Meeting software:
- Choose ‘Sign in with SSO’ from the right
- Enter wpunj.zoom.us as the Domain and click Continue
- Login to the WPconnect login with your WPUNJ account
Logging Into Zoom on the Web
From the Zoom web site you can create and manage meetings.
- To log in to the Zoom website, Sign in at www.wpunj.edu/zoom
- Log in using your WPUNJ account
Logging in with an existing Zoom account tied to your WPUNJ email
If you already have a Zoom login tied to your WPUNJ email, you can convert that account to be licensed under the main William Paterson Zoom account. To access your university-licensed Zoom account:
- Follow the instructions for logging in above, making sure to use the SSO login option which will have you login through WPconnect.
- The first time that you login using the SSO login option, you will receive a prompt that your Zoom account will be transitioned to the 'William Paterson University' account license.
- At that time, your existing Zoom account will be enabled with the 'Pro' features/license of the university account.
If you do not want your existing Zoom account (tied to your WPUNJ email) to be migrated to the university license, do not login using the SSO option. If you have questions on this process, please contact the Helpdesk at www.wpunj.edu/help or (973) 720-4357.
Joining a Zoom Meeting
Joining a Zoom Meeting using the Desktop Application
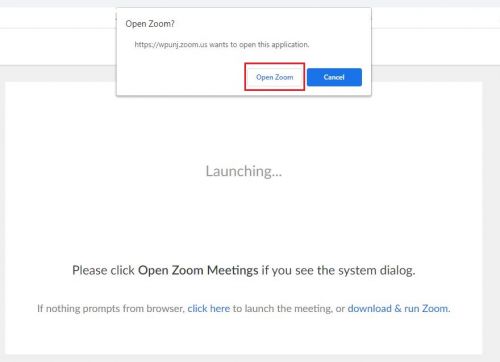
- You should have received a link to join a Zoom meeting. Open the link in a browser.
- Select Open Zoom to open in the Zoom Application.
- Select your Audio option. You can either use your phone or computer for audio.
Joining a Zoom Meeting from your Browser
- Open Zoom link in browser.
- Select Join from Browser.
- If you are unable to join the meeting, the host may not have started the meeting yet.
Scheduling Meetings on Zoom
You can schedule zoom meetings in multiple ways. You can utilize the Zoom web portal, Outlook desktop or web applications, or the Zoom application itself.
Using the Zoom Web Portal or Zoom app
To schedule meetings on the Zoom web portal or in the Zoom app, Zoom provides a quick video introduction and step by step instructions on how to schedule zoom meetings.
Using the Outlook desktop application on PC or Mac
For the Outlook desktop application on university computers, the Zoom Add-in for Outlook is installed and enabled automatically. To schedule a zoom meeting in the outlook calendar, look for the following button when creating a new calendar event:
More information on using the Outlook Add-in for the desktop application can be found on the Zoom Help Center.
Using Outlook 365
For Outlook on the web, the Zoom add-in has been pre-installed for all employee accounts. Please see the Zoom Help Center video and step by step instructions on scheduling Zoom meetings thru Outlook 365.
Cisco Webex Roomkit for utilizing Zoom in 1800 Valley Roads Board Room
If you are utilizing the 1800 Valley Road Board Room, please make sure to set the location for the meeting to be the Roomkit
Security Options and Suggestions
We suggest reviewing the material provided by Zoom, in the Getting Started with Zoom section above.
We recommend utilizing these security options when hosting a meeting:
- Do not share meeting links on Social Media. Try to limit link distribution to participant's email address and ask that participants do not share links.
- Have a Meeting Password
- Enable waiting room
- Mute participants upon entry
- Disable annotation while sharing screen
If you see an improperly named participant in the waiting room, there are three options:
- Send a message to the waiting room to ask them to edit their display name
- Send a message to the waiting room to ask them to use the “Dial-in” feature, admit the dial-in, then ask them to identify.
- Admit them to the meeting, and immediately ask them via mic or chat to rename. If they do not comply, move them back to the waiting room. NOTE If you choose to “remove” a participant rather than move them to the waiting room, it makes it very difficult for the participant to rejoin. These settings can be found in your Zoom Portal Account.
In addition to utilizing these options, you can opt to require meeting attendees to have a Zoom account, or utilize their WPUNJ account to connect to your Zoom meeting. This setting is found under Meeting Options.
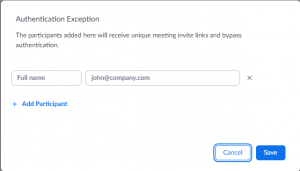
Need to add a non-WPUNJ attendee? Use Authentication Exception Add following the Required authentication to join options.
For additional in-depth detail on how to secure your Zoom meetings, see Zoom's Securing Your Zoom Meetings guide.
Zoom Cloud Recording Retention
Zoom sessions that are saved as Zoom Cloud Recordings are set to have a 365 day retention (from date of recording) before they are automatically deleted. Zoom will send automated email notifications to your WP email in advance of a recordings automatic deletion.
If you would like to ensure that a recording you have saved to Zoom's Cloud recordings does not get automatically deleted, you can login to the Zoom web portal (www.wpunj.edu/zoom) and click on the Recordings tab on the left. Then find the recording and click on the three dots to the far right of the recording and click 'Disable Auto Deletion'.
Tips and Tricks for Zoom
Breakout rooms
Breakout rooms are only available in regular Zoom meetings, not in a webinar. The best place to set up breakouts is in the Zoom portal.
- Go to wpunj.zoom.us and use the schedule a meeting option
- Scroll down to the button that says Show options,
- Click breakout room pre-assign
Once in the meeting, click on the breakout tab at the bottom of the Zoom screen, and before opening all rooms, choose options (gear wheel on MAC OS, or Options on Windows OS. There are 2 options for participants:
- Allow participants to choose room (recommended)
- Automatically move all pre-assigned participants into breakout rooms
pre-assigning can be done on the schedule page in the Zoom portal as mentioned above
There are more advanced options on the wpunj.zoom.us portal page as well.
Please refer to the Zoom Support articles for information about Breakout Rooms
Closed Captioning
As of 1/31/21, Zoom now has Built in Captioning and it is available on all university zoom accounts. This needs to be turned on by the host of the meeting following these steps.
- Login to the Zoom Web Portal at www.wpunj.edu/zoom.
- Click on the 'Settings' option on the left menu and then scroll down to Meeting (Advanced.)
- Ensure that Closed Captioning is toggled On and the 'Enabled live transcription service...' checkbox is checked.
Once this is set, the following option will be available in any Zoom meeting scheduled by the host. Clicking on the Live Transcript icon and then Enable Auto-Transcription should enable the transcription for that meeting.
Edit Sharing Settings in Meeting
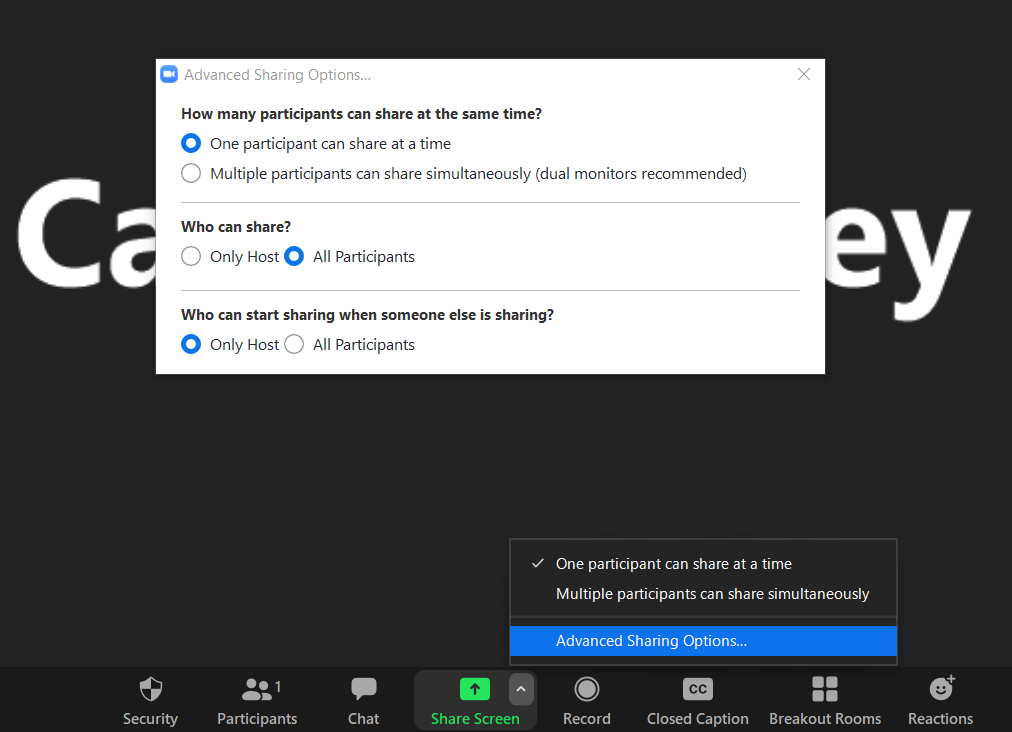
Start your meeting. When you're in the meeting, click the arrow next to "Share" to see an additional screen where you can change sharing settings and change who can present.
Recording with Audio Transcription
To record meetings with Audio transcription:
- Login to the WPUNJ Zoom web portal (http://www.wpunj.edu/zoom)
- Click on Settings
- Click on the Recording Tab
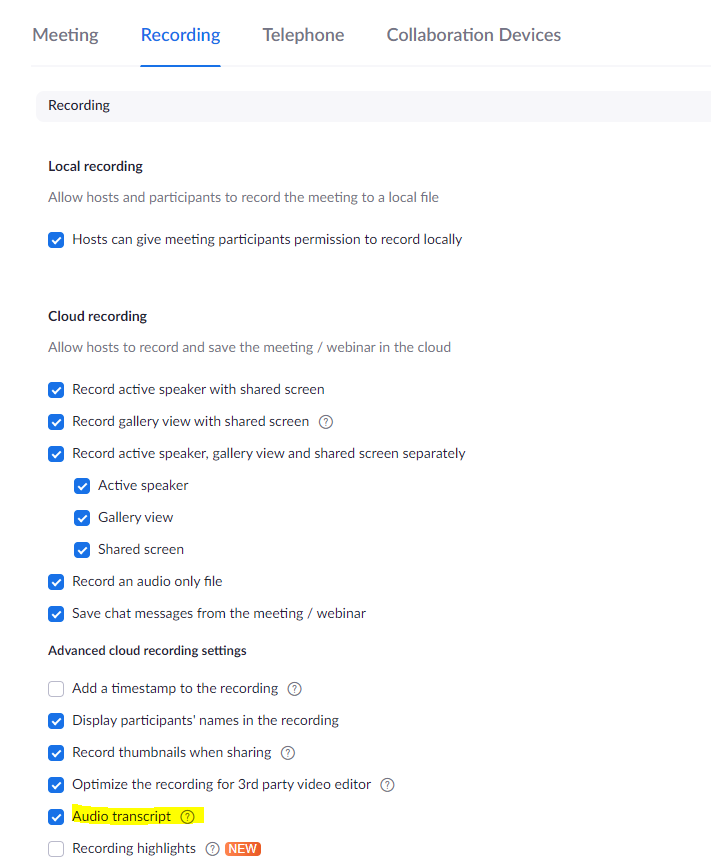
- Check the 'Audio Transcript' checkbox under Advanced Cloud Recording Settings.
- Recordings must be saved to the cloud
- Shortly after the meeting has completed, you will receive an email from Zoom with a link to the meeting recording with audio transcript
The setting is available here:
Recording Video Resolution
- To get the maximum resolution, (toggle screen sharing). Then, record locally, not to the Zoom cloud for better video resolution.
- In webinar format, there are choices for HD in the webinar scheduling options:
*Enable HD video for screen shared video
*Enable HD video for attendees
*Always send 1080p video to attendees
There are also more recording options in the Zoom portal under settings/recording on wpunj.zoom.us
Screen Sharing
When sharing a video or audio, choose “share computer sound” and “optimize for video” in the Zoom share config page, then select the box to be shared, and click share. **Also set this if you have video or audio embedded in your PowerPoint Slides. On the Zoom share screen, there is an advanced option to share computer audio ONLY, without sharing your screen. Very useful for providing background music before an event.
Sometimes, there will be “grey” boxes superimposed on top of a shared video representing the panelist panel or chat panel on the screen of the presenter. To remove these, there are 2 options:
- Disable “optimize for video” (this may produce undesirable video effects)
Or:
- To remove these on the app: on MAC OS, go into settings, share screen, advanced, then choose Screen Capture Mode: “Capture with window filtering”
- To remove these on Windows PC, go into settings, share screen, advanced, then choose Screen Capture Mode: “Secure Share with window filtering”
Spotlighting
Locks the selected speaker(s) for all to front and center. This is a global command from the host only. Pinning will move that participant to the top of the local screen of the individual participants, not a global command. Participants have options via the “view” tab at the top right of the Zoom screen. Please note: Spotlighting is not enabled until 3 or more participants are connected.
Virtual Backgrounds
Virtual Backgrounds allow users to mask the background of the room they are in with an image of their choosing. Zoom provides a few default backgrounds, and allows users to select their own image from their device.
Zoom's help center has an article on Using Virtual Backgrounds for PC, Mac and iOS clients.
You can download William Paterson virtual backgrounds at this link.
Zoom Webinar
A Zoom webinar is the same as a Zoom meeting with the following features/exceptions:
Participant panel is broken into two sections:
- Panelists- The webinar panelist is like the Zoom participant with all the functionality of a zoom meeting
- Attendees- The webinar attendee is basically an audience member and can see and hear the panelists, but have no camera or mic access, unless the Zoom host grants permission, one at a time
There is an additional “Q&A” tab at the bottom of the Zoom screen with the controls for attendees to type questions for panelists. Chat is enabled/disabled by the Zoom host.
