YuJa

YuJa [1] (YuJa) is an enterprise media platform that facilitates online hosting, playback, and user management of digital media, as well as lecture capture, live streaming, social learning, video conferencing, and video test proctoring solutions. It encompasses a front-end website, referred to colloquially as WPU's YuJa zone, which displays media that has been made available to WPU faculty and students for pedagogical purposes, and back-end account capabilities through which WPU members may upload and manage user-specific media content after signing in.
William Paterson University began using YuJa at the end of April 2020 to replace Illumira (formerly known as NJVid).
Overview
Signing Into Your YuJa Account
All William Paterson University faculty, staff, and students are granted YuJa accounts. YuJa has three classifications of user privileges: "Student," "Instructor," and "Administrator." WPU faculty are given "Instructor" status. An individual may access their YuJa account either through Blackboard or through WPU's YuJa zone. YuJa accounts are not tied to particular Blackboard course shells. As a result, a faculty member can sign into their YuJa account from any course shell in Blackboard and still gain access to all content in their YuJa account. Similarly, a user can retrieve any content that they place into their YuJa account irrespective of where they sign into their YuJa account from, including via any Blackboard course shell or www.wpunj.edu/yuja.
If you are a WPU faculty member who is signing into YuJa for the first time, we recommend you do so via Blackboard so that YuJa will recognize you as a faculty member.
Signing in Through Blackboard
1. Sign into Blackboard and navigate to the course in which you intend to use YuJa.
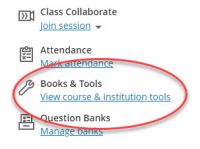
2. Click "View course & institution tools" under “Books & Tools” from the righthand menu.
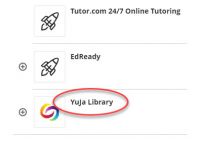
3. Click “YuJa Library.”
Note: If you click the plus ("+") sign to the left of the YuJa Library link, you will post a link to YuJa in the content area.
4. If you are a faculty member who is accessing YuJa via Blackboard for the first time, you might receive an automated email that confirms your account or course has been created.
Signing in Through WPconnect or WPU's YuJa Website
1. Sign into WPconnect and search for the YuJa link, or click the YuJa icon within the Apps display.
2. Alternatively, you may go directly to www.wpunj.edu/yuja and sign in with your William Paterson username and password.
Recording
You can use YuJa to record yourself in front of a webcam, capture video of your computer screen, and/or simply record your voice. Starting Spring 2024, users will be presented with two distinct options to record: via the traditional external Software Capture application, which offers a full suite of features such as annotation capability, or the new Browser Capture option, which provides a stripped-down, quick-and-easy approach to recording for users who do not wish to access the full suite of features through a secondary app. The following tutorial demonstrates operating procedures for both.
Selecting a Recording Method
1. Sign into YuJa and click “Create Recording” from the top menu.
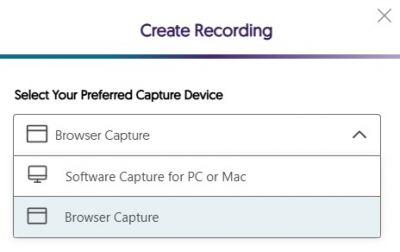
2. Choose your preferred recording method and click "Start."
- Software Capture for PC or Mac - launches the Software Capture app.
- Browser Capture - launches Browser Capture (recommended).
Proceed to the instructions below corresponding to your selection.
Browser Capture
1. Use the menu panel at the bottom to configure your recording, or click the "X" at the top-right to exit Browser Capture.
YuJa's Browser Capture is configured by default to record using your camera and microphone. Each can be separately turned off.
- Microphone: Toggle your microphone on or off. Your microphone will be set to on by default. Turn off your microphone to avoid recording audio. Click the upward arrow to select your microphone.
- Camera: Toggle your camera on or off. Your camera will be set to on by default. Turn off this selection to avoid recording with your camera. Click the upward arrow to select your webcam or similar video source.
- Present: Select this option to record your computer screen. Select what to record: a particular web browser tab, a browser window, or your entire computer screen. When selecting this option, turn off your camera to prevent a PiP recording (see 'PiP' explanation immediately below).
- PiP: Select this option to preview what your picture-in-picture (PiP) recording will look like with both "Present" and "Camera" recording enabled. PiP recordings implement both webcam and computer screen video sources, resulting in a recording with multiple video streams that you can select upon playback.
2. Click "Start Recording." Recording will commence after a three-second countdown.
3. Click "Stop Recording" to finish recording, "Pause" to pause recording, or "Delete" to delete the recording.
4. Upon clicking "Stop Recording," the recording will sent to your YuJa account to process. Click "Watch Video" to review your recording, "New Recording" to create another recording, or "Go to My Media" to go to the location of your YuJa account where your recording is being sent.
Browser Capture Settings
Additional settings are available in the lower-right of the Browser Capture window.
- Click the gear icon to adjust the frame rate and video resolution of your recordings.
- Click the film strip icon to title your recording, select the location within your YuJa account where your recording will be saved, and whether you would like to publish a video to your course channel (not recommended if you do not know what a course channel is).
Software Capture app
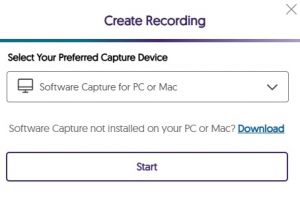
1. If this is your first time attempting to record via the Software Capture app on a University-imaged computer, please install it via Software Center. If this is your first time recording via Software Capture on an off-network home device, click the "Download" button and double-click the installer from your computer's download location. In all other cases, click “Start.” The Software Capture app will open.
2. Enter a title for your recording and click the folder icon at the right to specify its destination.
3. Use the left-hand menu options to configure your recording settings. A preview of your configuration appears in the middle of the screen.
- Video - set Video Source to “On” to record video using your webcam.
- Audio - set Mic Source to “On” to record your voice using your microphone.
- Screen - set this to “On” to record your computer screen activities. Note that if both Video and Screen options are set to “On,” YuJa will record both sources, in which case a picture-in-picture recording will be created.
- Live - set this to “On” to create a live stream.
- Profile - save your settings to a profile that you can conveniently launch later on.
4. Click “Start” to begin recording and “Finish” from the control panel at the bottom-right to finish recording.
5. Click “Save” to add the recording to your YuJa account, or click “Delete” to discard it.
Control Panel Appearance While Recording
When you begin to record, the control panel will minimize to the bottom-right corner of your screen. You have the option to prevent the panel from minimizing.
1. Open the Software Capture app and click "Settings" from the top-right corner.
2. Select the "Configuration" tab.
3. Select your desired option under "Recording Toolbar."
Video Quality
You may adjust the video resolution of your webcam and screen capture recordings. The default setting is "Medium" for webcam recordings.
1. Open the Software Capture app and click "Settings" from the top-right corner.
2. Select the "Sources" tab.
3. Adjust the appropriate video quality settings for "Screen Capture" or "Video Capture" depending on the type of recording you wish to adjust.
Please note that increasing the video quality of a recording increases its file size, which increases its processing time.
Dual Monitor Recording
If you are using a dual monitor setup and would like to record your screen, please use the following instructions to specify which monitor YuJa should record.
1. In the Software Capture app, click "Screen" from the left-hand menu to expand the section.
2. Set Screen Source to "On," click "Display Settings" (or "Advanced Settings" on older versions) and make the appropriate selection for your need. For example, "Single Display" will record the monitor you choose from the dropdown menu, while "Duo Displays" will record multiple monitors.
Annotations
YuJa provides tools to draw and highlight items on the screen while you record.
1. Open the Software Capture app and click "Screen" from the left-hand menu.
2. Set "Show Annotation Toolbar" to "On."
Uploading
There are multiple ways to upload content to YuJa, all of which provide similar features and capabilities, and require similar steps to upload. Please note that by default only you have access to the media you upload, but you are free to share it with other users and/or embed it or email link(s) to it. Also please note that there is a file size limit of 1TB per upload. Finally, please adjust the sleep settings on your upload device to prevent it from falling asleep and interrupting uploads of large files to YuJa.
Uploading via Blackboard
1. Sign into your YuJa account through Blackboard.
2. Along the left-hand menu, click “My Media” if you are not already there. My Media is the location where you will upload media such as video, audio, and text files. You can organize your content into file folders by using the “New Folder” menu option at the top to create folders and then rename them by clicking the gear icon that appears when you mouse over a folder. Only you and those with whom you share will be able to access the content in your My Media section.
3. Navigate to the area or folder within My Media where you want to upload your media, and click “Upload” from the top menu.
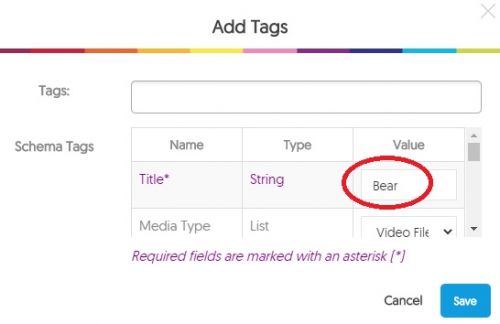
4. Select your media type (the default selection is “video”), and click the red “Add Schema Tags” button. In the ensuing popup Add Schema Tags window, add a title for your media in the text box corresponding to the “Title” row and “Value” column. The other data fields are optional. Click Save.
5. Click the “Browse” button, select the file to upload, and click “Open,” or simply double-click the file. The window will close, and you will see a graphic in the lower right-hand corner indicating that your media is uploading and another when it begins processing. When complete, your media will appear in your My Media folder.
To make adjustments to your media, mouse over it and select “More” to alter the metadata, thumbnail, etc. To select your media, hold "Control" on a PC or "Command" on a Mac and select your media, or lasso them with your mouse. Selections will display a colored border. You can make more than one selection. You can drag and drop your media into other areas of your YuJa account and rearrange their order provided the Sort selection in the upper right-hand corner is set to Custom.
Uploading via the YuJa Phone App
1. Download and install the "YuJa Video" app to your mobile device from the app store.
2. Sign into the app with your William Paterson University email address.
3. At the subsequent screen, switch the dropdown menu selection to "William Paterson University Account," and click “Sign In With SSO.” SSO stands for Single Sign-On.
4. Sign in with your WP username and password.
5. Click the button at the bottom that looks like a "+" sign inside a circle.
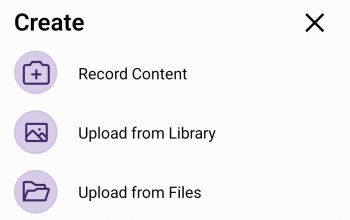
6. If you have already recorded the video you wish to upload, click either "Upload from Library” or “Upload from Files.” They are functionally similar. If instead you want to record a video from scratch using your phone, click "Record Content."
7. If you selected "Upload from Library” or “Upload from Files” in step #6, select the video on your phone and click “Upload.”
Your video will upload to your YuJa account. Please give it some time to upload. When complete, you may wish to obtain the link to the video or submit it for a course assignment.
Uploading via WPU's YuJa Zone
1. Go to WPU's YuJa zone and sign in.
2. Follow the same steps as those listed to upload via Blackboard, beginning with step 2.
Transferring Zoom Recordings to YuJa
Note: Due to WPU's upgrade to Blackboard Ultra, the Blackboard menu selection "Tools" shown throughout this video, such as at 00:24, has been renamed to "Books & Tools."
Uploading YouTube and Vimeo Videos
Users can store publicly accessible YouTube and Vimeo videos in their YuJa account. Although these videos will appear identical to native YuJa videos, technically they simply point to their respective YouTube or Vimeo incarnations residing in their home locations. As a result, some features that can be performed on native YuJa videos won’t be available on these externally hosted videos. For example, users can rename these videos within YuJa, affix quizzes to them, and move them, but they cannot edit them. Furthermore, if these videos get deleted from YouTube or Vimeo, they will become inaccessible within YuJa as well.
1. Navigate to the location in your YuJa account where you would like to upload a YouTube or Vimeo video, and click “Upload” from the top menu.
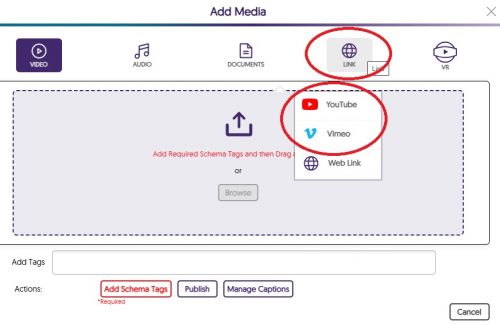
2. Click “Link” from the top menu ribbon, and select either YouTube or Vimeo.
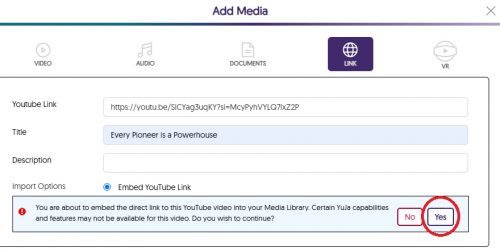
3. Enter the link to the video, its title (which can be different from its native title on YouTube or Vimeo), and click “Yes” in response to the limited capabilities statement.
4. Click the red “Add Schema Tags” button. In the ensuing popup window, enter a title for your video in the text box corresponding to the “Title” row and “Value” column. The other data fields are optional. Click "Save."
5. Click “Start Upload.” The video will appear alongside your other YuJa videos in your YuJa account, and you will be able to embed it into Blackboard as course content.
Settings and Options
You can adjust various settings to the media in your YuJa account. Wherever your media is located (e.g. your My Media folder), simply mouse over a thumbnail of a particular item and make a selection.
- Play - plays your media.
- Share - allows you to share this particular media with other YuJa accounts (colleagues, students, et al.). Click in the "Share With" box, search for and select the name of the individual with whom you want to share (you may successively select more than one person), select the level of access, and then click the "Share" button and "Save." "Full Access" gives the full set of access permissions to the person with whom you are sharing, including the ability to delete your video. "Edit Access" allows the individual to edit the video and embed it into Blackboard, but not delete it. "Read Only" allows the recipient only to watch the video in his/her account. Content that you share will appear in the recipient's "Shared with Me" folder. Users cannot remove content in their Shared with Me folders to which they only have "read only" access. All WPU YuJa users can share content with all other YuJa users, but recipients of shared content can only further share the shared content with other users if they have "full access" or "edit access." If they have been granted "read only" access, they will be unable to pass the shared content onward to other users.
- Publish - allows you to make this particular media item visible to others. To publish media to your students, select "All Channels," search and find your course, and select it. Then click "Select" to save. Now when your students log into their YuJa accounts, they will be able to access your published media when they click on your course channel.
- Delete - deletes your media.
- Edit - launches the Video Editor, with which you can make simple trims and other edits to your content, and adjust its captions.
- More - launches a window with the full suite of settings adjustment options (see next section).
More Settings and Options
When a user mouses over a video in their YuJa account and clicks "More," a "Media Details" window appears with the following menu options.
- Actions - move the video to a different folder or user account, delete the video, share the video so that it appears in another user's YuJa account, etc.
- General - adjust the Title, Description, add metatags, etc.
- Thumbnails - you may change the thumbnail that is displayed to viewers by clicking any of the thumbnail options presented here and then "Save Thumbnails," or you may upload your own by clicking "Upload Custom Thumbnail" --> select your video --> "Add to Thumbnails" --> "Save Thumbnails"
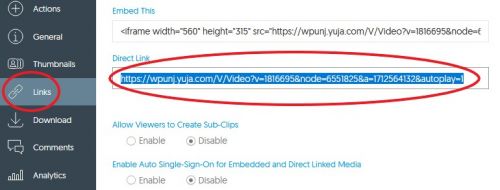
- Links - the "Direct Link" is the link you should use if wish to send someone a link to this media item (e.g. if you want to email a link to your video); "Embed This" is the embed code to use when embedding the item into a webpage or Blackboard with embed code
"Enable Auto Single-Sign-On for Embedded and Direct Linked Media" is located within the Links submenu. Set this to "Enable" if you wish students to be able to watch the password-protected videos you have embedded into Blackboard without having to sign in a second time after already signing in to Blackboard. This setting is recommended. Your videos will remain password protected outside of Blackboard.
- Downloads - under "Allow viewers to download," select "Enable" if you wish users (e.g. students) to be able to download your media item; otherwise, click "Disable," which is the default selection. Note: Viewers who wish to download from their phone must set their phone to autorotate and then hold their phone horizontally to be presented with the download option via the gear icon on the media player.
- Analytics - presents brief viewing statistics about the video. Click "See More" for a more advanced presentation of statistics. For example, at this advanced analytics interface, click into the Playback tab to see a list of names of those who have watched the video, their viewing duration, when the viewing occurred, and so on.
- Quizzes - use this feature to create a Playback Quiz or Video Quiz for this video. A Playback Quiz gives students credit for watching the video, whereas a Video Quiz enables the students to answer instructor-authored questions while they watch the video within a traditional quiz assessment format (e.g. true/false, multiple choice, fill-in, etc.). Students' quiz grades are recorded in their course's corresponding Blackboard gradebook.
- Accessibility - You may upload captions in .srt, .xml, or .webvtt formats, or a transcript in plain text (.txt) or .pdf formats. If you don't have captions or a transcript, you can request to have them created for you. You can also view a list of any Accessibility items that have already been created for your video, which you may download or delete from YuJa. See Captioning Your Videos for more information on creating and editing captions.
- Syndication - Use this feature to post to various third-party platforms through your YuJa account. Click the "Configure" button next to YouTube or LinkedIn to link your accounts on those social platforms to your YuJa account. Then click "Upload" or "Share," respectively, to post your YuJa video to those platforms, or to Facebook or X (Twitter).
Downloading From Your YuJa Account
Password Protecting Your Videos
To assign access restrictions to your content, mouse over a video and click "More." In the pop-up window, click "Links" and then "Security Settings." All uploads are made "public" by default, meaning anybody with a link to it will be able to view it. To password protect it instead, under Additional Restrictions, select "Password or Authentication Restriction" and then "Platform Authentication" to force viewers to sign in with their WPU username and password to access the content; or select "Simple Password" to enter your own custom password that viewers must enter to view the content. There are additional access restrictions available to you in this section as well.
Media Player
By default, YuJa plays videos in a minimalist media player that provides controls to adjust volume and fullscreen playback, toggle captions on and off, and a gear icon housing controls to adjust playback speed, video resolution, browse the video's thumbnails, create a clip, pop out the video into an external player, and rewind the video 10 seconds. Content owners may switch to a maximalist version of the media player featuring a more robust suite of player controls, including the ability for students and other viewers to leave comments on the video and open a sidebar panel that lists saved comments, the video's captions, and notes that you've left for yourself regarding the video. Please note that this switch will need to be performed for each video.
Switching the Media Player
1. Mouse over a video in your YuJa account and click "More."
2. In the popup window, click "More Options" and then "Branding" along the left-hand menu.
3. Under Media Player Branding, switch the drop-down menu selection to "All Settings" and click "Save Player."
Legend
1. Play/Pause button
2. Volume control
3. Current playback time/Complete length of the video
4. Playback bar
5. Toggle closed captions on/off (if available)
6. Sidebar -- the Sidebar provides access to a linked Index of intervals throughout the video for convenient, quick access; linked Captions; and supplied user Notes, Comments and Resources
7. Fullscreen playback
8. Gear icon -- in addition to those described above, here you will find additional controls, when permitted by the video owner, to leave a comment, download the video, and choose alternative caption languages
Editing Your Videos
You can use YuJa's built-in Video Editor to edit videos in your YuJa account. To get started, mouse over a video and click "Edit." Please consult YuJa's own tutorial for further assistance. In addition, WPU provides access to Adobe Premier via Software Center to help you perform more advanced video editing.
Virtual Backgrounds
Note: Rather than clicking "Image tools" as demonstrated at 1:06 in the following tutorial video, click "Background" from left side menu, and rather than clicking "Select File" at 1:20, click "Upload Media." The written instructions beneath the tutorial are up-to-date.
1. Mouse over a video and click "Edit." This will open the Video Editor.
2. Click "Background" from the left side menu.
3. In the tab that slides out, click "Upload Media," and find and select the image you'd like to use as your Virtual Background. Official WPU Virtual Backgrounds are available to download.
4. Select the appropriate video stream (if necessary) and click "Apply."
5. Click "Save" from the top menu, and click either to replace the existing video or save the new version so that it will be added alongside the existing version.
Clips and Segments
You can link to shorter clips and segments of longer videos within YuJa. A clip is a video that begins at a point within the video and plays to its end. A segment begins and ends where the user specifies.
1. Play a video and click its gear icon at the lower-right of the video player.
2. Click "Create Clip."
3. Select the appropriate tab for Clip or Segment and adjust the timecode as needed.
Playlists
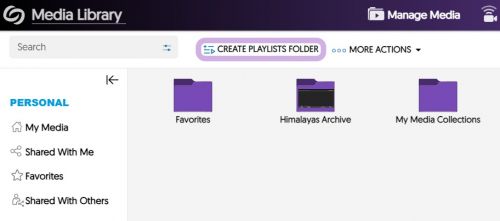
Playlists let viewers watch multiple videos in succession. To activate this feature, sign into your YuJa account, click "Manage Media" from the top menu, and click "Create Playlists Folder."
Creating a Playlist
1. Click "Manage Media" from the top menu to enter your My Media section.
2. Click "New Playlist" from the secondary top menu.
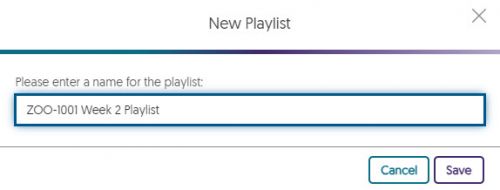
3. Name the Playlist where prompted and click "Save."
4. Navigate to a video you'd like to add to the Playlist. Mouse over it and click "More" --> "Actions" --> "Add to Playlist."
5. Select the Playlist to which you'd like to add the video and click "Save."
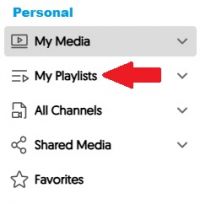
6. Click "My Playlists" from the left-hand menu to view your Playlists.
7. Click into the appropriate playlist to view its contents. You may drag and drop content to rearrange their order of playback within the Playlist.
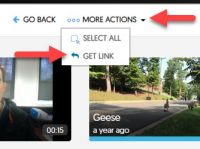
8. To get the link to the Playlist to share with your audience, enter the Playlist and click "More Actions" from the secondary top menu and "Get Link." Copy the link to the Playlist located in the Direct Link box.
Note: Alternatively, you may embed the Playlist into your Blackboard course shell using the YuJa Media Chooser tool (see Embedding Videos Into Blackboard).
Captions and Transcripts
Effective May 2022, all new videos added to one's YuJa account will be automatically captioned in English without requiring human intervention. These captions will have approximately 70% speech-to-text accuracy but can be manually edited after-the-fact to improve their correctness. Furthermore, captions can be additionally produced in any of 28 other languages via the steps below. However, please note that users cannot translate a spoken language to a different language in captions (e.g. Spanish captions can be generated for spoken Spanish, but the auto-generated English captions in that case will be gibberish worth deleting).
Creating Captions
To generate non-English captions, please follow these instructions:
1. Mouse over a video in your YuJa account that you want to caption and click "More."
2. In the popup window, click "Accessibility" from the left-hand menu.
3. Click "Auto Caption" and select the spoken language from the drop-down menu. Then click "Send Caption Request."
4. Please wait some time for the captions to generate. They will be automatically added to your video. You may receive an email notifying you when this process has completed.
Note: If the button is greyed out, please fill out a Help Desk ticket. Choose "YuJa" as the ticket's Request Type. Your YuJa account likely needs to be upgraded to Instructor status.
Editing Captions
Note: The caption button demonstrated at 00:30 in the following tutorial is now located within the left side menu.
1. Mouse over your video and click "Edit." You will be taken to the Video Editor.
2. Click "Caption" along the left side menu.
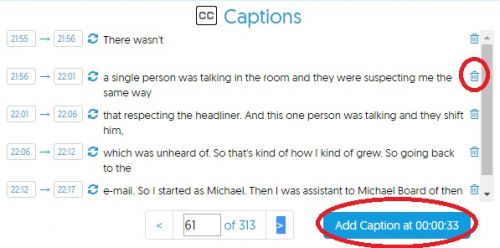
3. Click the text of a caption you would like to alter and enter your correction. To create and add a new caption from scratch, use the blue "Add Caption" button. To outright delete a particular caption, click its associated trash can icon.
4. When complete, click "Save" from the top menu.
Finding the Link to a Video
1. Mouse over the video and click "More."
2. In the popup window, click "Links" from the left-hand menu.
3. Copy the contents of the "Direct Link" box. This is the link to the video.
4. (Optional) You can click "Custom Direct Link" to customize a link of your own. Click "Apply" to save it. This option might come in handy, for example, if you consider the default link obtained in Step #3 to be unsightly.
Embedding Videos Into Blackboard
Faculty may embed YuJa videos into their Blackboard course shells. Embedding lets students watch videos directly within Blackboard without having to click a hyperlink that exits to the YuJa website.
Embedding Into Bb Ultra
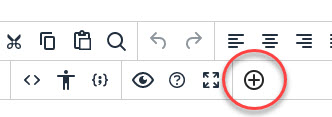
Note: The plus icon shown at 3:02 is now located to the left of the content area, and at 3:19, rather than clicking 'Add Content,' click 'Content' under 'Select a type of content to add a block'. The remaining instructions are the same.
1. Go to your course shell in Blackboard and navigate to the content area where you would like to embed a YuJa video.
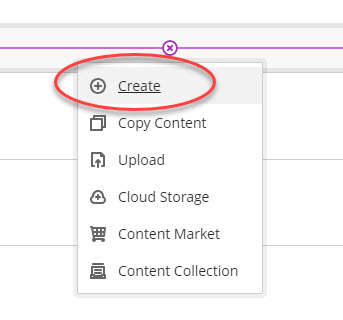
2. Click the plus icon to the left and click "Create."
3. Click "Document" under Course Content Items.
4. At the top of the webpage, edit the placeholder title of the video you are embedding.
5. Where it reads "Select a type of content to add a block" click "Content."
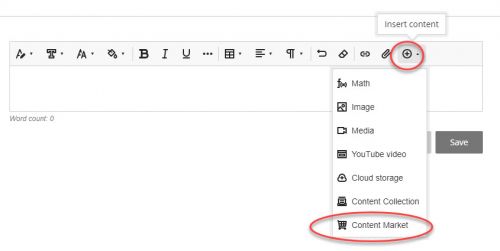
6. In the textbox's toolbar, click the "Insert Content" button and then click "Content Market."
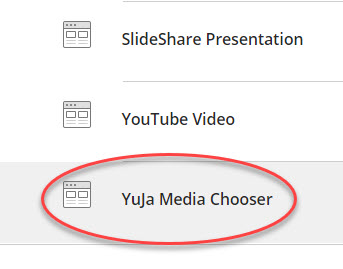
7. Scroll down and select YuJa Media Chooser.
8. Find your video, select it, and click "Insert Content" at the lower righthand corner of the webpage. Note: If you wish to embed a Playlist, click the "Playlists" button from the top menu rather than "Media."
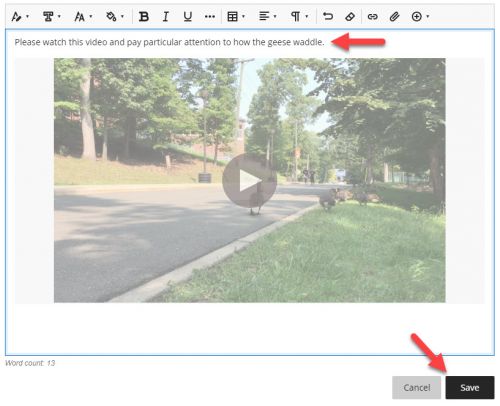
9. Enter a Display Name for your video and click "Insert." Your video will appear embedded into the textbox.
10. In the textbox, enter a contextual message for your students (optional), and click Save.
11. Switch the associated dropdown from "Hidden from students" to "Visible to students."
Student view of the embedded video in my Week 1 folder
Embedding Into Bb Classic
Note: If you are using a course template in Blackboard Classic, click the Video Placeholder and then click "Add content" within the toolbar. It looks like a cross within a circle. Then proceed to step 4 below. If you are not using a template, begin with step 1.
1. Go to your course shell in Blackboard and navigate to the content area where you would like to embed a YuJa video.
2. Mouse over “Build Content” from the top menu and select "Item" under the Create heading.
3. Type a name and click the "Add content" button within the second row of the Text toolbar. (Click the "More" button at the end of the first row, if necessary, to bring up the second row.)
4. In the Add Content window, select “YuJa Media Chooser.”
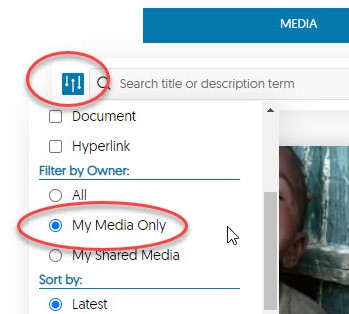
5. Scroll down until you see the text box reading, “Search title or description term.” Here, either search by title to find the video you want to embed, or scroll further down and select the video from the list. You may also filter your search parameters by clicking the filter icon to the left of the search bar and scrolling down to the appropriate filter. For example, select "My Media Only" to choose from only the media in your My Media folder. Click "Filter" at the bottom when done.
6. Select the video(s) you wish to embed, click “Insert Videos” at the bottom right-hand corner, and click "Submit."
Student Uploads
Every WPU student is given a YuJa account. Students may upload content to their YuJa account and share it with their instructor by following these steps:
1. Sign into YuJa.
2. Click “My Media” from the left-hand menu, or click "Manage Media" from the top menu.
3. Click “Upload” from the secondary top menu.
4. Select your media type (the default selection is “video”), and click the red “Add Schema Tags” button. In the ensuing popup Add Schema Tags window, add a title for your media in the text box corresponding to the “Title” row and “Value” column. The other data fields are optional. Click "Save."
5. Click the “Browse” button and double-click the file you wish to upload. You will see a graphic indicating that your video is uploading and another when it begins processing. When complete, your video will appear in your My Media area.
Note: If your professor has instructed you to use YuJa's "Share" feature to share your video, follow these additional steps:
6. Mouse over the thumbnail of your video and click “Share.”
7. In the “Share With” box, search for your professor's name and select it.
8. In the dropdown box to the right, change “Full Access” to “Edit Access.”
9. Click “Share” and then “Save.”
10. Notify your instructor that you have shared your video. Your instructor will be able to log into his/her YuJa account and see your video in his/her "Shared with Me" folder.
Student Embedding Into Blackboard
Students have the ability to embed their YuJa videos directly into their Discussion Board posts in Blackboard. Please note, though, that since Discussion Board posts are visible to all students enrolled in a course, classmates will be able to watch the videos that are posted. The following are instructions for students.
1. Begin a Discussion Board post and click the "Insert content" button within the Text toolbar and then "Content Market."
2. In the Content Market window, select “YuJa Media Chooser.”
3. Scroll down and select your video or search for it using the text box reading “Search title or description term.” You may also filter your search parameters by clicking the filter icon to the left of the search box.
4. Click “Insert Content” at the bottom right-hand corner and then "Insert" and "Save."
Submitting Videos for Assignments in Blackboard
System Compatibility
The latest version of the downloadable YuJa Software Capture app is compatible with macOS 10.13 and later and Windows 7 and later. Users with earlier, non-compatible operating systems are encouraged to upgrade their OS when possible. Otherwise, they may download the older version of the YuJa app with the following link: https://yuja.egnyte.com/dl/kRTY08RN5t. The app is not compatible with Google Chromebook.
Phone App
YuJa is available to download as a phone app through your mobile device's app store. It may be labeled "YuJa video" in the store. This mobile app provides users with a quick and convenient way to record and upload content to their YuJa account. However, users must access YuJa through a desktop computer or laptop to manage content in their account, such as retitling, relocating, and editing videos.
Help Desk Assistance
To request additional assistance with YuJa, fill out a Help Desk ticket and choose "YuJa" as the ticket's Request Type.
External links
WPU YuJa zone <-- This is WPU's own YuJa website
