Sponsored Guests: Difference between revisions
Jump to navigation
Jump to search
(Created page with " A new feature that has been introduced with WP Wireless is the WP Guest network which allows Employees of the University to sponsor access for any guests that they have (Vis...") |
No edit summary |
||
| Line 1: | Line 1: | ||
A new feature that has been introduced with WP Wireless is the WP Guest network which allows Employees of the University to sponsor access for any guests that they have (Visitors from another school or organization, for example). | <span width="600px">A new feature that has been introduced with WP Wireless is the WP Guest network which allows Employees of the University to sponsor access for any guests that they have (Visitors from another school or organization, for example). </span> | ||
== Set Up Your Sponsor Account == | |||
<ol> | <ol> | ||
<li>Visit http://sponsors.wpunj.edu | <li>Visit [http://sponsors.wpunj.edu WPUNJ Sponsors] | ||
<li>Login with your WP Connect Username/Password | <li>Login with your '''WP Connect''' Username/Password | ||
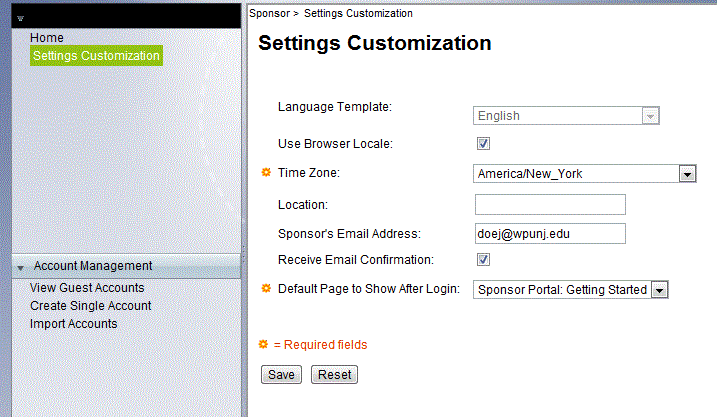
<li>Click on Settings Customization | <li>Click on '''Settings Customization''' | ||
<li>Enter your email address under the Sponsors Email Address Field | <li>Enter your email address under the '''Sponsors Email Address Field''' | ||
<div class="toccolours mw-collapsible mw-collapsed" style="width:720px"> | |||
[[Image:Sponsor-email-720w.gif|center|720px]] | |||
</div> | |||
<li>Click on '''"Save"''' | |||
== How to Sponsor a Guest == | |||
<ol> | <ol> | ||
| Line 24: | Line 28: | ||
<li>Login with your WP Connect Username/Password | <li>Login with your WP Connect Username/Password | ||
<li>Click on Create Guest Account | <li>Click on Create Guest Account | ||
<div class="toccolours mw-collapsible mw-collapsed" style="width:210px"> | |||
[[Image:Create-guest-account-210w.gif|center|210px]] | |||
</div> | |||
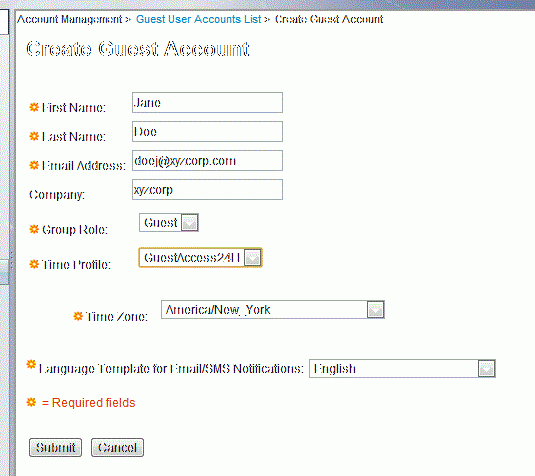
<li>Enter Guest Information (First Name, Last Name, Email) | <li>Enter Guest Information (First Name, Last Name, Email) | ||
<div class="toccolours mw-collapsible mw-collapsed" style="width:535px"> | |||
[[Image:Create-guest-information-535w.gif|535px]] | |||
</div> | |||
<li>Select a Time Profile (24 Hour, 48 Hour, or 72 Hour) | <li>Select a Time Profile (24 Hour, 48 Hour, or 72 Hour) | ||
<li>Click on "Save" | <li>Click on "Save" | ||
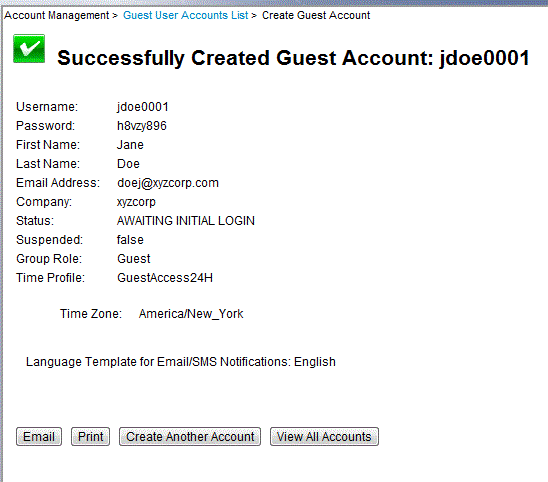
<li>You will see a screen showing the username and password of the guest. | <li>You will see a screen showing the username and password of the guest. | ||
<div class="toccolours mw-collapsible mw-collapsed" style="width:550px"> | |||
[[Image:Guest-account-created-550w.gif|550px]] | |||
</div> | |||
<li>Click on Email | <li>Click on Email | ||
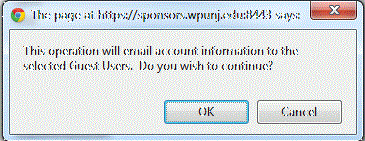
<li>Click on OK | <li>Click on OK | ||
<div class="toccolours mw-collapsible mw-collapsed" style="width:365px"> | |||
[[Image:Email-ok-365w.gif|365px]] | |||
</div> | |||
<li>The Guest account is now Created and the Guest has been emailed. | <li>The Guest account is now Created and the Guest has been emailed. | ||
<li>The Guest can log in by joining the WP Guest SSID and launching an internet Browser. They will be redirected to the login page. | <li>The Guest can log in by joining the '''WP Guest SSID''' and launching an internet Browser. They will be redirected to the login page. | ||
</ol> | </ol> | ||
Contact [https://help.wpunj.edu/helpdesk/ Help Desk Request] if you encounter any difficulty. | |||
[[:Category:Network Services|Network Services]] | [[:Category:Network Services|Network Services]] | ||
Revision as of 14:34, 13 December 2012
A new feature that has been introduced with WP Wireless is the WP Guest network which allows Employees of the University to sponsor access for any guests that they have (Visitors from another school or organization, for example).
Set Up Your Sponsor Account
- Visit WPUNJ Sponsors
- Login with your WP Connect Username/Password
- Click on Settings Customization
- Enter your email address under the Sponsors Email Address Field
- Click on "Save"
How to Sponsor a Guest
- Make sure you have followed instructions to Set Up Your Sponsor Account
- Guest Accounts must be created on the day of, or day before guests are due to arrive. If the account is created more than 1 day prior to the guests
- Visit http://sponsors.wpunj.edu
- Login with your WP Connect Username/Password
- Click on Create Guest Account
- Enter Guest Information (First Name, Last Name, Email)
- Select a Time Profile (24 Hour, 48 Hour, or 72 Hour)
- Click on "Save"
- You will see a screen showing the username and password of the guest.
- Click on Email
- Click on OK
- The Guest account is now Created and the Guest has been emailed.
- The Guest can log in by joining the WP Guest SSID and launching an internet Browser. They will be redirected to the login page.
Contact Help Desk Request if you encounter any difficulty.


