Manually Connect WP Wireless: Difference between revisions
Jump to navigation
Jump to search
Tavoularisr (talk | contribs) (Created page with "Manually adding the '''WP Wireless''' Network can fix the following problems <ul> <li>Microsoft Windows security warning when connecting to '''WP Wireless''' <li>Domain Mach...") |
Tavoularisr (talk | contribs) No edit summary |
||
| Line 35: | Line 35: | ||
<li>Check '''Verify the Server's identity by validating the certificate''' | <li>Check '''Verify the Server's identity by validating the certificate''' | ||
<li>Check '''Connect to these servers''' | <li>Check '''Connect to these servers''' | ||
<li>Specify the following servers | <li>Specify the following servers: '''ise.wpunj.edu''' | ||
<li>Check any Trusted '''Root Certification Authorities''' from ''' | <li>Check any Trusted '''Root Certification Authorities''' from '''DigiCert High Assurance EV Root CA''' | ||
<li>Select '''Don't ask user to authorize new servers or trusted CAs''' from the Notifications before connecting''' | <li>Select '''Don't ask user to authorize new servers or trusted CAs''' from the Notifications before connecting''' | ||
<li>Click on '''Configure''' next to Secured Password (EAP-MSCHAV v2) | <li>Click on '''Configure''' next to Secured Password (EAP-MSCHAV v2) | ||
Revision as of 15:48, 7 January 2014
Manually adding the WP Wireless Network can fix the following problems
- Microsoft Windows security warning when connecting to WP Wireless
- Domain Machines trying to logon to WP Wireless with the local machine credentials
- Having to enter username/password twice when connecting to WP Wireless
In order to manually connect to WP Wireless
- Manually Add a Wireless Network
- For Windows 7 clients, go to the Network and Sharing Center and then click Manage Wireless Networks
- For Windows 8 Clients, go to the Network and Sharing Center and then click Set up a new connection or Network
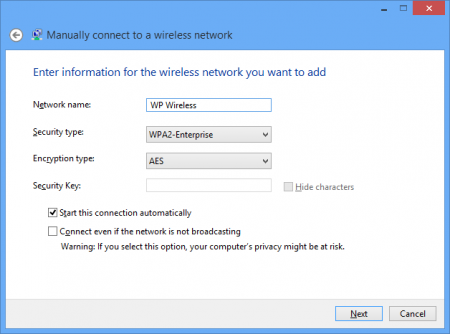
- Enter WP Wireless for Network Name
- Select WPA2-Enterprise for Security Type
- Select AES for Encryption Type
- Click Next
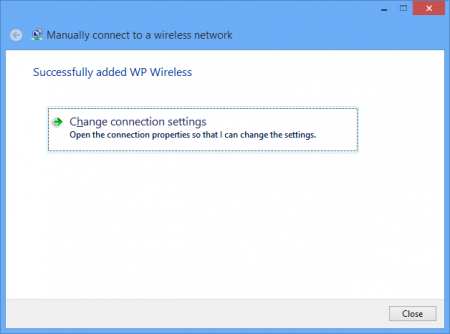
- Click on Change Connection Settings
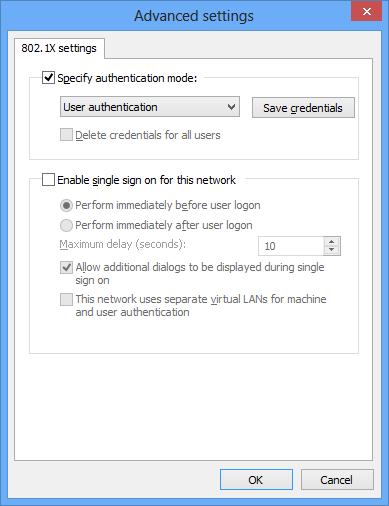
- Click the Security Tab at the top and click on Advanced Settings
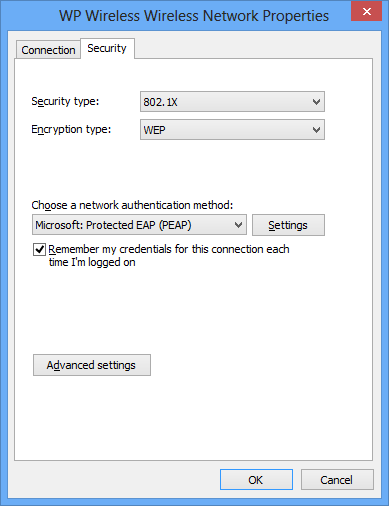
- Check Specify authentication mode and select User authentication and press ok
- Click on Settings next to Microsoft: Protected EAP (PEAP)
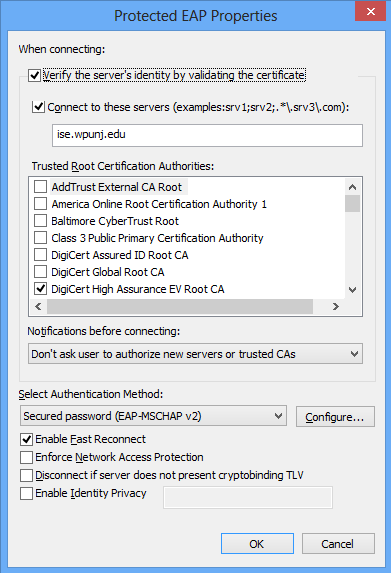
- Check Verify the Server's identity by validating the certificate
- Check Connect to these servers
- Specify the following servers: ise.wpunj.edu
- Check any Trusted Root Certification Authorities from DigiCert High Assurance EV Root CA
- Select Don't ask user to authorize new servers or trusted CAs from the Notifications before connecting
- Click on Configure next to Secured Password (EAP-MSCHAV v2)
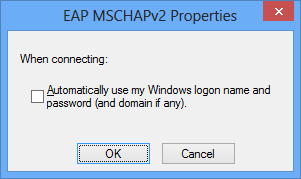
- Make sure that the option to automatically use your Windows logon name and password is unchecked
- Select OK, save all settings, and attempt to connect.


