Android Email Settings: Difference between revisions
m (→Students) |
|||
| (18 intermediate revisions by 5 users not shown) | |||
| Line 1: | Line 1: | ||
[[file:Android_logo.gif|350px|right]] | [[file:Android_logo.gif|350px|right]] | ||
To setup email on your Android smartphone please use the following information. These instructions may differ from phone to phone because of the different versions of Android available and the way different carriers implement the | To setup email on your Android smartphone please use the following information. These instructions may differ from phone to phone because of the different versions of Android available and the way different carriers implement email clients. | ||
If you are having difficulty configuring your email we suggest that you contact your service provider with the information presented in this article. Given the many variations of Android, our documentation cannot address all situations. Your service provider will be of the best assistance. | |||
'''If you have already opted-in to Multifactor Authentication''' please [https://play.google.com/store/apps/details?id=com.microsoft.office.outlook&hl=en_US download the Outlook App from the Google Play store for use on Android devices]. | |||
==Students== | ==Students== | ||
' | # From the Applications menu, select your device's email app (called Mail, Email, or Gmail). | ||
# Type your full email address (ex: smithj1@student.wpunj.edu), password, and click next. | |||
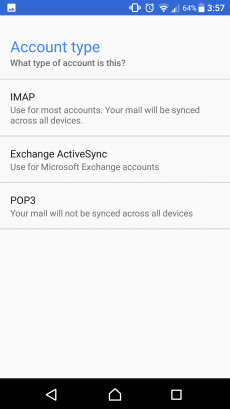
# Select '''Exchange''' as the account type. This option may be named Exchange ActiveSync on some versions of Android. | |||
# Your account should automatically connect. ''If it doesn't connect, tap Manual Setup and follow the instructions below.'' | |||
# | Manual Email Settings | ||
# Type your full email address | # Select '''Exchange''' from the options menu. | ||
# Email Address: Type your full email address. | |||
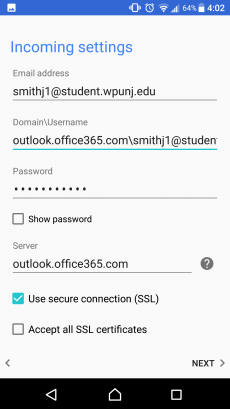
# Domain\Username: If your email address is smithj1@student.wpunj.edu, type '''outlook.office365.com\smithj1@student.wpunj.edu'''. If the Domain and Username are separate text boxes in your version of Android, leave the Domain box empty and type your full email address in the Username box. | |||
# Enter your password for your email. | |||
# | # Exchange server: '''outlook.office365.com''' | ||
# | # Select Next and then type a name for this account and the name you want displayed when you send e-mail to others. Accept any permissions required by this account. Your email account is now connected. | ||
#Select Next and then type a name for this account and the name you want displayed when you send e-mail to others. | {|style="margin: 0 auto;" | ||
| [[File:Android Email 1.png|thumb|upright|alt=A|1. Select Exchange as your account type]] | |||
| [[File:Android Email 2.png|thumb|upright|alt=A|2. This is the information you will need to enter]] | |||
|} | |||
==Faculty and Staff== | ==Faculty and Staff== | ||
# From the | Please [https://play.google.com/store/apps/details?id=com.microsoft.office.outlook&hl=en_US download the Outlook App from the Google Play store for use on Android devices]. The native android mail client is not compatible with Microsoft Modern Authentication. Some third party mail applications may work depending on their support of Microsoft Modern Authentication. | ||
# | |||
# Select | # From the Settings menu, select Accounts. | ||
# | # Select Add Account, select Email account. | ||
# Enter Username as your full email address user@wpunj.edu, and your WPU password. | |||
# Select account type, Microsoft Exchange ActiveSync. | |||
#If prompted for mail server information, enter the server as '''mail.office365.com'''. | |||
Depending on your phone, you may have to accept security settings when it first connects to the Exchange Server. You must press Activate or Allow. | Depending on your phone, you may have to accept security settings when it first connects to the Exchange Server. You must press Activate or Allow. | ||
[[Category:Mobile]][[Category:Email]] | |||
[[Category:Mobile]] | |||
Revision as of 12:02, 6 March 2020
To setup email on your Android smartphone please use the following information. These instructions may differ from phone to phone because of the different versions of Android available and the way different carriers implement email clients.
If you are having difficulty configuring your email we suggest that you contact your service provider with the information presented in this article. Given the many variations of Android, our documentation cannot address all situations. Your service provider will be of the best assistance.
If you have already opted-in to Multifactor Authentication please download the Outlook App from the Google Play store for use on Android devices.
Students
- From the Applications menu, select your device's email app (called Mail, Email, or Gmail).
- Type your full email address (ex: smithj1@student.wpunj.edu), password, and click next.
- Select Exchange as the account type. This option may be named Exchange ActiveSync on some versions of Android.
- Your account should automatically connect. If it doesn't connect, tap Manual Setup and follow the instructions below.
Manual Email Settings
- Select Exchange from the options menu.
- Email Address: Type your full email address.
- Domain\Username: If your email address is smithj1@student.wpunj.edu, type outlook.office365.com\smithj1@student.wpunj.edu. If the Domain and Username are separate text boxes in your version of Android, leave the Domain box empty and type your full email address in the Username box.
- Enter your password for your email.
- Exchange server: outlook.office365.com
- Select Next and then type a name for this account and the name you want displayed when you send e-mail to others. Accept any permissions required by this account. Your email account is now connected.
Faculty and Staff
Please download the Outlook App from the Google Play store for use on Android devices. The native android mail client is not compatible with Microsoft Modern Authentication. Some third party mail applications may work depending on their support of Microsoft Modern Authentication.
- From the Settings menu, select Accounts.
- Select Add Account, select Email account.
- Enter Username as your full email address user@wpunj.edu, and your WPU password.
- Select account type, Microsoft Exchange ActiveSync.
- If prompted for mail server information, enter the server as mail.office365.com.
Depending on your phone, you may have to accept security settings when it first connects to the Exchange Server. You must press Activate or Allow.


