Hovercam
HoverCam
Getting started with a classroom HoverCam
For the past few years we have been installing new document cameras in classrooms. They are made by a company called HoverCam and the model is SOLO 8Plus. For the purposes of this document we will simply refer to them as HoverCams. If you have taught in Preakness Hall, Hunziker Hall or Raubinger in the last year or so, you are already familiar with them. They have now been installed in all classrooms and lecture halls across campus, including at Valley Road 1600. There are two uses for the HoverCams, one is as a document camera for displaying documents and objects to your class, and the other is as a webcam and microphone to teach with the HyFlex model (teach both in-class and online students simultaneously).
HoverCam as a Document Camera
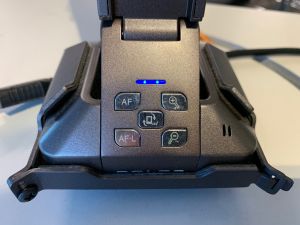
To use the HoverCam as a document camera, click on the Flex11 Icon on the desktop and point the camera down at the document. This will display whatever you have placed on the desk below the camera on your computer screen. Please note: If the image appears upside-down, you can correct easily by pressing the button in the center of the base of the HoverCam.

There are also controls in the Flex11 software to allow rotation of the image in 90 degree increments. To display this image to the students in your classroom, select PC on the Crestron control panel. Please note, to reduce confusion, we have eliminated the Doc Cam button in rooms that do not still have Wolfvision document cameras installed. You can zoom in and out using the buttons on the base of the camera, the zoom feature in the software, or by scrolling with the dial on the computer mouse. There is also a light on the HoverCam if needed. The switch is located on the side of the upper portion of the arm. [pic] The Flex11 software offers many useful features that are shown here including annotation, screen shots, split screen, video recording and time-lapse. To learn more, we recommend watching the videos found here: https://www.hovercam.com/quickstart/solo8plus
HoverCam as Webcam and Microphone
One of the useful features of the HoverCam is it’s built in microphone. To use the HoverCam as a webcam and microphone, as in the HyFlex model of teaching, open it all the way up so you can see the camera. Adjust the height as necessary. You can use any type of videoconferencing software, including Blackboard Collaborate, Zoom, WebEx, or Teams. The HoverCam should already be the default camera and microphone on the classroom PC but if it is not, it can be changed from the settings page of whatever software you are using.
Software specific instructions can be found here:
- Zoom: '''https://itwiki.wpunj.edu/index.php/Zoom'''
- Teams: [[1]]
- Webex: [[2]]
The camera head has extensive adjustment and can be aimed in almost any direction. If the image is upside-down, use the flip button at the base of the camera [pic] to correct. If the image is in the wrong orientation, you can rotate the image 90 degrees using the rotate gear on the head.[pic]
To Learn More
To learn more, we recommend watching the Solo 8Plus Tutorial video found here: https://www.hovercam.com/quickstart/solo8plus NOTE: The first 20 seconds covers installation but the remaining 70 seconds contains very useful information. There are a number of other useful videos at the Solo 8Plus Quick Start page. For best audio quality for remote viewers, always speak in the direction of the camera and not with your back to it. Be sure to occasionally check the display to see remote viewers and to monitor whether they have questions or comments.