Adobe Acrobat: Difference between revisions
Jump to navigation
Jump to search
Mccafferys (talk | contribs) |
No edit summary |
||
| (19 intermediate revisions by 2 users not shown) | |||
| Line 2: | Line 2: | ||
Adobe Acrobat is a family of application software and web services developed by Adobe Systems to view, create, manipulate, print and manage files in Portable Document Format (PDF). ''[http://en.wikipedia.org/wiki/Adobe_Acrobat Source]'' | Adobe Acrobat is a family of application software and web services developed by Adobe Systems to view, create, manipulate, print and manage files in Portable Document Format (PDF). ''[http://en.wikipedia.org/wiki/Adobe_Acrobat Source]'' | ||
<b>Adobe Acrobat DC</b> | <b>Adobe Acrobat DC</b> | ||
==Opening a Document== | ==Opening a Document== | ||
| Line 15: | Line 7: | ||
# Locate and select the PDF document you want to open. | # Locate and select the PDF document you want to open. | ||
# Click on the <b>OPEN</b> button. | # Click on the <b>OPEN</b> button. | ||
==Signing a Document== | |||
[[File:Examplesignature.PNG|thumb|An example signature on a WPU Document.]] | |||
# Open the Document in Adobe DC (full version) | |||
# Click TOOLS, then Fill and and Sign. | |||
# If you're signing it, click "Me" | |||
# Click "sign" in the upper right. Then the Add Signature option. | |||
# Save a new signature to your liking. | |||
# Use the mouse to click where you want the signature to go. | |||
# Save the document. | |||
==Signing a Document with a Digital Signature== | |||
===If you do not have an Adobe Digital ID (First time instructions)=== | |||
* Open an existing PDF document using Adobe Acrobat Pro DC. | |||
* Click Tools > Certificates. | |||
* Click Digitally Sign. | |||
* Using the target cursor, drag and place the appropriate sized rectangle where you would like the digital signature placed. | |||
[[File:Sign1.PNG|thumb|center]] | |||
* Click "Configure New Digital ID". Then click Continue. | |||
[[File:Sign2.1.PNG|thumb|center]] | |||
* Click the option to Save to Windows Certificate Store. | |||
[[File:Sign10.PNG|thumb|center]] | |||
* Fill out the required fields. | |||
[[File:Sign5.PNG|thumb|center]] | |||
* Click continue to use your new Adobe Digital ID to sign the document. | |||
* Click Sign. | |||
* Re-save the document. | |||
===If you already have an Adobe Digital ID=== | |||
* Open an existing PDF document using Adobe Acrobat Pro DC. | |||
* Click Tools > Certificates. | |||
* Click Digitally Sign. | |||
* Using the target cursor, drag and place the appropriate sized rectangle where you would like the digital signature placed. | |||
[[File:Sign1.PNG|thumb|center]] | |||
* If you already have an Adobe Digital ID, please select it from the list. | |||
* Click Sign. | |||
* Re-save the Document | |||
===More info on Digital IDs=== | |||
For more information on creating a digital ID, refer to this article from Adobe. [https://helpx.adobe.com/acrobat/using/digital-ids.html Creating and Using Digital IDs] | |||
==Using the Navigation Pane== | ==Using the Navigation Pane== | ||
| Line 40: | Line 75: | ||
[[File:Create portfolio.jpg]] | [[File:Create portfolio.jpg]] | ||
==Converting a file to PDF== | ==Converting a file to PDF== | ||
#Click '''CREATE PDF''' from the file menu. | #Click '''CREATE PDF''' from the file menu. | ||
#Find and click on the file you want to | #Find and click on the file you want to covert into a PDF. | ||
#Click on the '''OPEN''' button. | #Click on the '''OPEN''' button. | ||
| Line 66: | Line 92: | ||
#Select the '''COMBINE FILES''' button. | #Select the '''COMBINE FILES''' button. | ||
#Chose the location to save the file and enter a file name in the '''FILE NAME (SAVE AS)''' box. After click the '''SAVE''' button. | #Chose the location to save the file and enter a file name in the '''FILE NAME (SAVE AS)''' box. After click the '''SAVE''' button. | ||
[[File:Combinefiles.jpg]] | |||
==Converting a Web Page to PDF== | ==Converting a Web Page to PDF== | ||
| Line 83: | Line 111: | ||
*To enter a page range: Click '''FROM''' and enter the page range | *To enter a page range: Click '''FROM''' and enter the page range | ||
#Click on the '''OK''' button then click the '''YES''' button to confirm you want to delete the page. | #Click on the '''OK''' button then click the '''YES''' button to confirm you want to delete the page. | ||
[[File:Toolbar.jpg]] | |||
==Renumbering Pages== | ==Renumbering Pages== | ||
#Select the '''PAGES''' button in the ''' | #Select the '''PAGES''' button in the '''NAVIGATION PANE.''' | ||
#Select the '''PANEL OPTIONS''' button in the '''PAGES''' panel and select '''NUMBER PAGES.''' | #Select the '''PANEL OPTIONS''' button in the '''PAGES''' panel and select '''NUMBER PAGES.''' | ||
#Select the '''CREATE''' button, the click the '''SAVE''' button on the '''FILE''' toolbar | #Select the '''CREATE''' button, the click the '''SAVE''' button on the '''FILE''' toolbar | ||
| Line 93: | Line 123: | ||
#5) Finally, click on the OK button. | #5) Finally, click on the OK button. | ||
[[category:Software Guides]] | [[category:Software Guides]] | ||
[[category:TC Portal]] | [[category:TC Portal]] | ||
Latest revision as of 13:54, 8 September 2020

Adobe Acrobat is a family of application software and web services developed by Adobe Systems to view, create, manipulate, print and manage files in Portable Document Format (PDF). Source Adobe Acrobat DC
Opening a Document
- Select OPEN from the FILE menu.
- Locate and select the PDF document you want to open.
- Click on the OPEN button.
Signing a Document

- Open the Document in Adobe DC (full version)
- Click TOOLS, then Fill and and Sign.
- If you're signing it, click "Me"
- Click "sign" in the upper right. Then the Add Signature option.
- Save a new signature to your liking.
- Use the mouse to click where you want the signature to go.
- Save the document.
Signing a Document with a Digital Signature
If you do not have an Adobe Digital ID (First time instructions)
- Open an existing PDF document using Adobe Acrobat Pro DC.
- Click Tools > Certificates.
- Click Digitally Sign.
- Using the target cursor, drag and place the appropriate sized rectangle where you would like the digital signature placed.

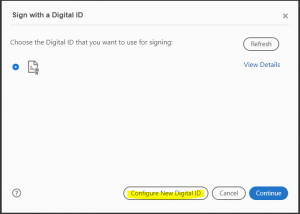
- Click "Configure New Digital ID". Then click Continue.
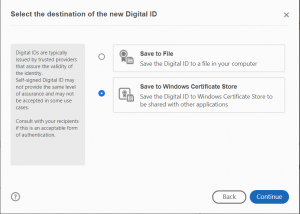
- Click the option to Save to Windows Certificate Store.
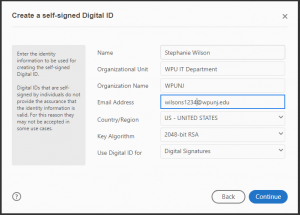
- Fill out the required fields.
- Click continue to use your new Adobe Digital ID to sign the document.
- Click Sign.
- Re-save the document.
If you already have an Adobe Digital ID
- Open an existing PDF document using Adobe Acrobat Pro DC.
- Click Tools > Certificates.
- Click Digitally Sign.
- Using the target cursor, drag and place the appropriate sized rectangle where you would like the digital signature placed.

- If you already have an Adobe Digital ID, please select it from the list.
- Click Sign.
- Re-save the Document
More info on Digital IDs
For more information on creating a digital ID, refer to this article from Adobe. Creating and Using Digital IDs
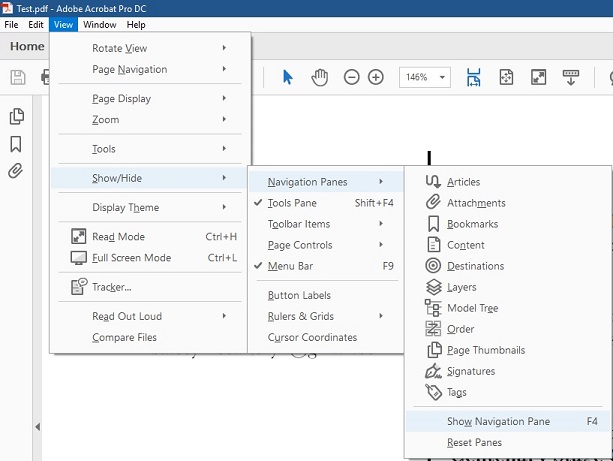
- To open, select NAVIGATION PANELS from the VIEW menu and select SHOW NAVIGATION PANE.
- To open or switch between panels, select NAVIGATION PANELS from the VIEW menus and click a navigation panel button on the left side.
- F4 is a keyboard shortcut to display navigation pane.
Saving a PDF file
- Click on SAVE from the FILE menu.
- Select where you would like to save the document.
- Change the name of the file in the FILE NAME BOX.
- Click on the SAVE button.
Creating a PDF Portfolio
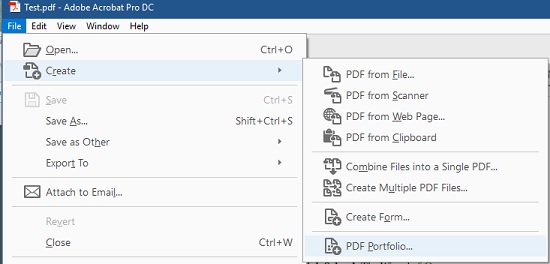
- Click on CREATE PDF PORTFOLIO from the file menu. Then click on ASSEMBLE PDF PORTFOLIO.
- Do ONE of the following:
- To add a file, choose the ADD FILES button. Once you have located the file, click the OPEN button.
- To add all files contained in a folder, choose the ADD EXISTING FOLDER button. Select the folder and click the OK button.
- When done adding files, click on SAVE PORTFOLIO from the FILE menu.
- Choose a location to save the file, enter a name to save it under in the FILE NAME (SAVE AS) box and then click SAVE.
Converting a file to PDF
- Click CREATE PDF from the file menu.
- Find and click on the file you want to covert into a PDF.
- Click on the OPEN button.
Creating a PDF from Multiple Files
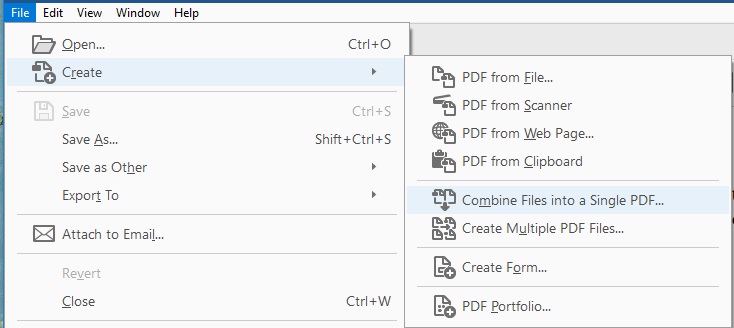
- Click on combine from the FILE menu and select MERGE FILES INTO SINGLE PDF.
- In the COMBINE FILES dialog box, click ON THE ADD FILES BUTTON do any of the following:
- To add files: Click ADD FILES choose the file you want then select the ADD FILES button.
- To add all the files contained in a folder: Click the ADD FOLDERS button. Locate the folder you want and click the OK button.
- To reuse recently combined files: Click on REUSE FILES. Select the file you want and click on the ADD FILES button.
- In upper-right hand corner of the window, you can do one of the following:
- To create a PDF file, click SINGLE PDF.
- To create a PDF Portfolio, click PDF PORTFOLIO.
- Select the COMBINE FILES button.
- Chose the location to save the file and enter a file name in the FILE NAME (SAVE AS) box. After click the SAVE button.
Converting a Web Page to PDF
- Click CREATE PDF from the FILE menu and click FROM WEB PAGE
- Enter in the Internet address in the URL box
- Select the CREATE button, the click the SAVE button on the FILE toolbar.
Creating a PDF from Another Application
- Open the document you would like to convert.
- Click on the ACROBAT TAB on the top of the document. Then click on CREATE PDF.
- After that has been completed, enter a file name and SAVE.
Deleting Pages
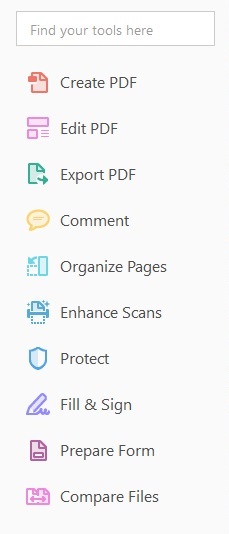
- Click ORGANIZE PAGES from the tools menu.
- To delete the selected pages: Click on SELECTED.
- To enter a page range: Click FROM and enter the page range
- Click on the OK button then click the YES button to confirm you want to delete the page.
Renumbering Pages
- Select the PAGES button in the NAVIGATION PANE.
- Select the PANEL OPTIONS button in the PAGES panel and select NUMBER PAGES.
- Select the CREATE button, the click the SAVE button on the FILE toolbar
- In the NUMBERING PAGES section, do one of the following:
- To begin a numbering section: Click BEGIN NEW SECTION.
- To extend the numbering previously used: Click Extend numbering used in preceding section to selected pages.
- 5) Finally, click on the OK button.
