Outlook Calendar Sharing: Difference between revisions
No edit summary |
Ta-degraafr (talk | contribs) No edit summary |
||
| (7 intermediate revisions by one other user not shown) | |||
| Line 1: | Line 1: | ||
==Windows Users== | ==Windows Users== | ||
If you are a Windows User and are looking to share your calendar with a friend or college, you need to follow a few simple steps. Please see the steps below. | If you are a Windows User and are looking to share your calendar with a friend or college, you need to follow a few simple steps. Please see the steps below. | ||
<br> | |||
. | |||
1) Open outlook – Select Calendar in bottom left corner.<br> | |||
[[File:Jedit1.png]] | |||
[[File: | |||
2)Right-click your calendar that you want to share on the left side list of calendars. <br> | |||
3) Click on Share<br> | |||
3) Then Share Calendar <br> | |||
[[File:Jedit22.png]] | |||
More information visit Microsoft's Support Page [[ https://support.office.com/en-us/article/video-share-your-calendar-2fcf4f4f-8d46-4d8b-ae79-5d94549e531b |here]]. | 4) You may now enter or search the name/email of the person you want to share with | ||
[[File:Jedit3.png]] <br> | |||
* You have the option of allowing your recipient to see your Availability Only, See Limited details or Full details | |||
* You can also request permission to view their calendar | |||
5) Then click Share/Send, and then yes to confirm to share your calendar | |||
More information visit Microsoft's Support Page [[ https://support.office.com/en-us/article/video-share-your-calendar-2fcf4f4f-8d46-4d8b-ae79-5d94549e531b |here]]. | |||
==Mac Users== | ==Mac Users== | ||
1 . At the bottom of the navigation pane, select the Calendar icon. | 1 . At the bottom of the navigation pane, select the Calendar icon. | ||
[[File:Mac Calender 1.png | [[File:Mac Calender 1.png]] | ||
Select and view the calendar you want to share. | Select and view the calendar you want to share. | ||
On the '''Organize''' tab, choose '''Calendar Permissions'''. | On the '''Organize''' tab, choose '''Calendar Permissions'''. | ||
[[File:Mac Calender 3.png | [[File:Mac Calender 3.png|Calendar Permissions]] | ||
In the Calendar Properties box, choose Add User. | In the Calendar Properties box, choose Add User. | ||
[[File:Mac Calender 4.png | [[File:Mac Calender 4.png]] | ||
Add user button on Calendar Permissions tab | Add user button on Calendar Permissions tab | ||
In the Search box, enter the name of the person you want to share your calendar with. When you see their name appear in the list, select it and then choose Add. | In the Search box, enter the name of the person you want to share your calendar with. When you see their name appear in the list, select it and then choose Add. | ||
[[File:Mac Calender 6.png | [[File:Mac Calender 6.png]] | ||
Click Add | Click Add | ||
Tip: Their name will show up in the Calendar Properties box. | Tip: Their name will show up in the Calendar Properties box. | ||
In the Calendar Properties box, select the Permission Level down arrow, and choose the permission level to assign to the person you added. Note that the settings for Read, Write, Delete, and Other options change based on the permission level you choose. | In the Calendar Properties box, select the Permission Level down arrow, and choose the permission level to assign to the person you added. Note that the settings for Read, Write, Delete, and Other options change based on the permission level you choose. | ||
[[File:MAc Calender 8. png.png | [[File:MAc Calender 8. png.png]] | ||
More information visit Microsoft's Support Page [[ https://support.office.com/en-us/article/share-your-calendar-in-outlook-for-mac-1534a3e9-b6d1-420f-88ae-89abb17ad57e |here]]. | More information visit Microsoft's Support Page [[ https://support.office.com/en-us/article/share-your-calendar-in-outlook-for-mac-1534a3e9-b6d1-420f-88ae-89abb17ad57e |here]]. | ||
Latest revision as of 13:01, 27 May 2020
Windows Users
If you are a Windows User and are looking to share your calendar with a friend or college, you need to follow a few simple steps. Please see the steps below.
.
1) Open outlook – Select Calendar in bottom left corner.
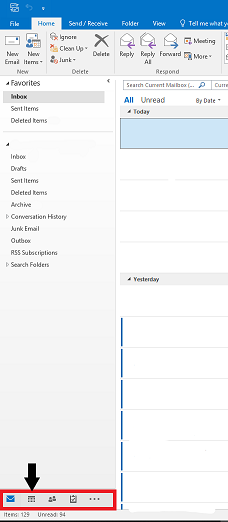
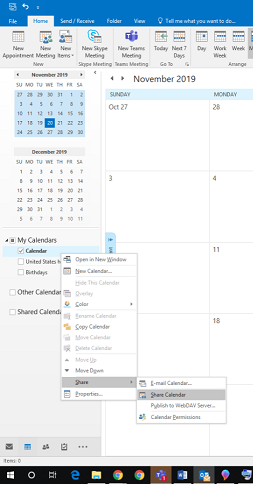
2)Right-click your calendar that you want to share on the left side list of calendars.
3) Click on Share
3) Then Share Calendar
4) You may now enter or search the name/email of the person you want to share with
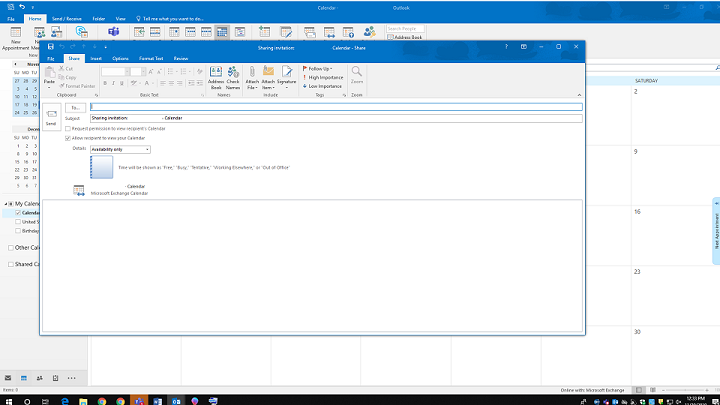
- You have the option of allowing your recipient to see your Availability Only, See Limited details or Full details
- You can also request permission to view their calendar
5) Then click Share/Send, and then yes to confirm to share your calendar
More information visit Microsoft's Support Page [[ https://support.office.com/en-us/article/video-share-your-calendar-2fcf4f4f-8d46-4d8b-ae79-5d94549e531b |here]].
Mac Users
1 . At the bottom of the navigation pane, select the Calendar icon.
![]()
   Select and view the calendar you want to share.
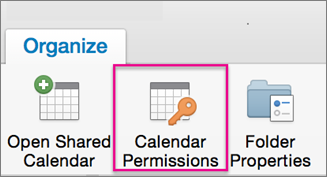
   On the Organize tab, choose Calendar Permissions.
In the Calendar Properties box, choose Add User.
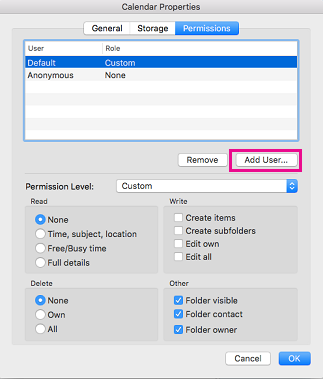 Add user button on Calendar Permissions tab
In the Search box, enter the name of the person you want to share your calendar with. When you see their name appear in the list, select it and then choose Add.
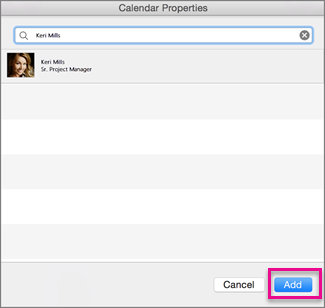 Click Add
Tip: Their name will show up in the Calendar Properties box.
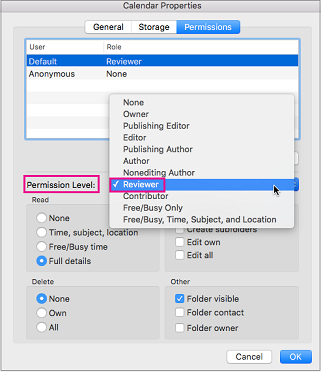
In the Calendar Properties box, select the Permission Level down arrow, and choose the permission level to assign to the person you added. Note that the settings for Read, Write, Delete, and Other options change based on the permission level you choose.
More information visit Microsoft's Support Page [[ https://support.office.com/en-us/article/share-your-calendar-in-outlook-for-mac-1534a3e9-b6d1-420f-88ae-89abb17ad57e |here]].
