Map a Network Drive: Difference between revisions
Jump to navigation
Jump to search
mNo edit summary |
|||
| Line 27: | Line 27: | ||
[[Category:Apple]] | [[Category:Apple]] | ||
[[Category:Windows]] | [[Category:Windows]] | ||
[[Category:Network Storage]] | |||
Revision as of 09:19, 19 October 2017
While on campus using a University issued, or imaged computer, you will be automatically connected to your network drives. This article contains instructions on how to connect to a network drive on a personal computer, and from off campus.
Windows PC Instructions
- If you are off campus, use the VPN Client to connect. You won't be able to connect to the network folders without a VPN connection. If you are on campus, ignore this step and proceed to step 2.
- On your PC, click the start button in the lower left
- Click Computer
- Click Map Network Drive
- Select K: and type \\unv.campus.wpunj.edu\wpu-folders\
- Select U: and type \\unv.campus.wpunj.edu\wpu-folders\user folders\<YOUR USERNAME>\
- Click the check box "Connect using different credentials" and click Finish
- Enter your username and password when prompted
Mac Instructions
Instructions on how to map the university Groups and User Folder shares
- If you are on campus, proceed to step number 3
- If you are off campus, use the VPN Client to connect securely to the campus network.
- Click the Finder icon on your dock

- Click Go on the menu bar at the top of your screen
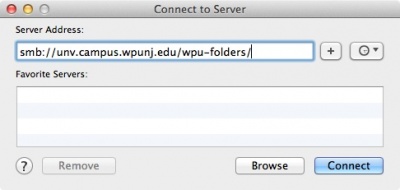
- Click Connect to Server
- Type smb://unv.campus.wpunj.edu/wpu-folders/ in the Server Address field and click Connect
- Enter your username and password
- A Finder window will open and you can browse the "Groups" folder for whatever group folder you have permissions to access.
- If you are looking for your User Folder you can browse the "User Folders" directory for your network User Folder.
