Blackboard Ultra: Difference between revisions
| (112 intermediate revisions by the same user not shown) | |||
| Line 93: | Line 93: | ||
<templatestyles src="Template:Main_page/styles.css"/> | <templatestyles src="Template:Main_page/styles.css"/> | ||
You can use an Ultra sandbox, the Ultra Course Preview, or both to explore and try Ultra Course View and the conversion from the Original to Ultra. We strongly recommend converting and developing your first Ultra course in an Ultra sandbox, which provides a risk-free environment for you to explore the Ultra Course View and experiment. | You can use an Ultra sandbox, the Ultra Course Preview, or both to explore and try Ultra Course View and the conversion from the Original to Ultra. We strongly recommend converting and developing your first Ultra course in an Ultra sandbox, which provides a risk-free environment for you to explore the Ultra Course View and experiment. After trying out the Ultra Course View and experimenting in the Ultra sandbox, you can use the Ultra Course View conversion option on a past or current course. | ||
<div style="clear: both;"></div> | <div style="clear: both;"></div> | ||
| Line 143: | Line 143: | ||
</div> | </div> | ||
==Path to Ultra Courses== | |||
<templatestyles src="Template:Main_page/styles.css"/> | <templatestyles src="Template:Main_page/styles.css"/> | ||
You can take different approaches to adopt the Blackboard Ultra course view. Based on your needs and the courses you teach, you can choose the ways that most satisfy your needs. | |||
<div style="clear: both;"></div> | <div style="clear: both;"></div> | ||
| Line 153: | Line 153: | ||
<div id="audiences" class="mainpage_row"> | <div id="audiences" class="mainpage_row"> | ||
<div class="mainpage_box"> | <div class="mainpage_box"> | ||
<h3><span class="header_icon" aria-hidden="true" role="presentation">[[File:Ultra.png|32px|middle|link=]]</span><span>Convert Original to Ultra | <h3><span class="header_icon" aria-hidden="true" role="presentation">[[File:Ultra.png|32px|middle|link=]]</span><span>Convert Original Courses to Ultra</h3> | ||
<div id="mainpage-admins" title="System administrators" class="items"> | <div id="mainpage-admins" title="System administrators" class="items"> | ||
You can convert your Original | #You can convert your existing courses from Original to Ultra using the course copy tool within the Ultra course. | ||
# | #*[https://wpunj.yuja.com/V/MediaFile?mediaFile=588924&node=34951808&a=2138007224&autoplay=1 Click here] to see a tutorial of course copy in Ultra. | ||
#*[https://www.youtube.com/watch?v=U5MRMQRa0dk&list=PLontYaReEU1tCbsCDP Click here] to watch a video about course copy in Ultra. | |||
#* | |||
[[File: | [[File:Ultra-Course-Copy.png|thumb|center]] | ||
#In the destination course, click the three dots in the top-right corner of the Course Content area, then select '''Copy Items'''. | |||
# In the '''Copy Items''' panel, select the course you want to copy over. | |||
# To copy a specific item of the course, select the '''arrow''' next to the name of a folder/module, then select the item | |||
# Click '''Start Copy''' in bottom-right corner of the page. | |||
</div> | </div> | ||
</div> | </div> | ||
| Line 193: | Line 194: | ||
# Use CTT Ultra course template to build your course structure. Visit the Create Ultra Courses from Scratch section to see how to copy CTT Ultra Course template and how to import the zip file of the template into your Ultra course. | # Use CTT Ultra course template to build your course structure. Visit the Create Ultra Courses from Scratch section to see how to copy CTT Ultra Course template and how to import the zip file of the template into your Ultra course. | ||
#Copy individual contents, especially assessments such as assignments, tests, and exams from your Original courses to the Ultra sandbox. | #Copy individual contents, especially assessments such as assignments, tests, and exams from your Original courses to the Ultra sandbox. | ||
{{#ev:youtube|-IoXfVqW_Qw|210| | {{#ev:youtube|-IoXfVqW_Qw|210|center|Copy Course Content from Original to Ultra}} | ||
</div> | </div> | ||
</div> | </div> | ||
</div> | </div> | ||
== Building and Modifying Ultra Courses == | == Building and Modifying Ultra Courses == | ||
| Line 325: | Line 313: | ||
== Grading and Gradebook == | == Grading and Gradebook == | ||
=== Grading=== | |||
{{#ev:youtube|-k1Ex9LENwo|210|right|Streamline Grading}} | |||
The Needs Grading view in Original is discontinued. In Ultra, grading indicators are provided in the Activity Stream and on the list view of the Gradebook. You can choose to start grading from: | |||
*'''Activity Stream''' on the navigation panel | |||
*'''Grades''' on the navigation panel | |||
*'''Gradebook''' on the navigation bar within the course | |||
*'''Assignment''' within the course | |||
Click '''Activity Stream''' on the navigation panel, you can see how many assignments are ready to grade in all your courses. | |||
Click '''Grades''' on the navigation panel on the left, you will see the global grades page, where you have immediate access to all your courses's grading tasks. All your grading tasks are organized by course. You can quickly scan your progress, set priorities across the board, and even begin grading. No need to navigate to each course to see what's ready for grading. | |||
The page only displays information if you need to take action. You see assignments that are ready to grade or which assignments are overdue for how many students. | |||
In Ultra, most grading functions are available in the Gradebook. The Needs Grading view in Original is discontinued. Gradebook in Ultra provides grading indicators in the Activity Stream and on the list view of the Gradebook. | |||
If you wnat to narrow your focus on a particular course, you can access the course '''Gradebook''' on the navigation bar within the course. In Ultra, most grading functions are available in the Gradebook. The Needs Grading view in Original is discontinued. Gradebook in Ultra provides grading indicators in the Activity Stream and on the list view of the Gradebook.Click '''Gradebook''', you can see who has made submissions and start grading. | |||
You can also start garding from an assignment. | |||
Blackboard offers streamlined grading. The system tells you when students have submitted test and assignment by notifying you in the Activity Steam. A simple click will bring you right into the assessment where you can see who has submitted, who is late, and what has been graded. The submission and assessment is always tie together, so you can access both whenever you open the assessment. | |||
To start grading, | |||
#Select an item’s title to see what students’ submissions need grading and which haven’t received their grades yet. | |||
#Inside the submissions list for a gradable item, use the '''Filter''' menu to display only those submissions that need grading. You can filter by "All Grading Statuses," "Needs Grading," "Needs Postin," etc. | |||
#Click student's submission to grade. | |||
You can switch to the '''Students''' tab to view an overall picture of each student’s engagement. And the '''Student''' grid view is similar to the Grade Center in the Original Course View. | |||
=== Access Gradebook === | === Access Gradebook === | ||
{{#ev:youtube|tlUZHOnDBpE|210|right|Gradebook Overview}} | |||
You can access Gradebook in two different ways: | You can access Gradebook in two different ways: | ||
# Click '''Grades''' on the Base Navigation panel on the left, and you will see everything that needs grading in all your courses on the global grades page. All your grading tasks are organized by course, and courses appear in alphabetical order. Click the course title to open the Guidebook. | # Click '''Grades''' on the Base Navigation panel on the left, and you will see everything that needs grading in all your courses on the global grades page. All your grading tasks are organized by course, and courses appear in alphabetical order. Click the course title to open the Guidebook. | ||
# Within a course, you will have access to the '''Gradebook''' from the '''Gradebook tab''' on the navigation bar. | # Within a course, you will have access to the '''Gradebook''' from the '''Gradebook tab''' on the navigation bar. | ||
=== Gradable Items List and Student | === Gradable Items List and Student Grid View === | ||
[[File: Gradebook.png|200px|thumb|right|Gradable items List]] | |||
[[File: ultra_instructor_gradebook_student_view.png|200px|thumb|right|Student Grid View]] | |||
The Gradebook is populated with students when they're enrolled in your course. You can grade coursework, manage items, and post grades from two views: | The Gradebook is populated with students when they're enrolled in your course. You can grade coursework, manage items, and post grades from two views: | ||
| Line 358: | Line 368: | ||
You can also add attendance on the main Gradebook page. Select the plus sign wherever you want the attendance row to appear in the list and select '''Add Attendance'''. | You can also add attendance on the main Gradebook page. Select the plus sign wherever you want the attendance row to appear in the list and select '''Add Attendance'''. | ||
=== | === Gradebook Settings === | ||
You can switch to the Students tab to view an overall picture of each student’s engagement. | |||
In Ultra, you can | In Ultra Course View, you can automatically assign zeroes (0) for assessments that are not submitted by the due date. | ||
Grades are not visible to students by default in the Ultra Course View; you use Post when you have grades ready for your students to see. Overall grade now supports weighted, points-based overall grade calculation and advanced calculation. | |||
[[File:help.png|18px|left]][https://help.blackboard.com/Learn/Instructor/Ultra/Grade Blackboard Tutorial on Grading] | |||
== Messages == | |||
{{#ev:youtube|a6DeGb4olh8|210|right|Messages in Ultra}} | |||
[[File: Message.png|200px|thumb|right|Unread Message Notifications]] | |||
In Original, you can use both Send Email and Messages features to communicate with your students. In Ultra, Send Email feature is discontinued. Unlike Send Email in Original, which allows you an easy way to send email messages outside of the Blackboard system without having to log in to a separate email client, the Messages tool in Ultra is used for communication within your course only, although you do have the option to send an email copy of your message to your students. Messages activity remains inside the Blackboard system and is part of your course record. | |||
As an instructor, you can easily access Messages and quickly send messages to your students about important deadlines and schedule changes. Messages may be sent to a single user, a group of users, or the entire class. | |||
You don't need to add a link to course messages. The Messages icon is always part of course navigation in the Ultra Course View, which, just like other navigation icons, cannot be removed. | |||
===Unread message notifications=== | |||
An encircled identifiable number count highlights any new messages received. When you select the Messages tool on the Base Navigation, a red number count changes to a red pill icon to reduce distraction. When you navigate away from this page, the system shows again the unread message count. | |||
===Access Your Message=== | |||
You can access all your messages right from the Base Navigation or from your course by clicking the Messages menu item on the Content page. To access Messages from the Base Navigation panel: | |||
# Click Messages, which will open the Message page. | |||
# An encircled identifiable number count next to the course link indicates which course has unread messages and how many unread messages in that course haven't been read. | |||
# Click the link to the course to view the unread message. | |||
===Create a Course Message=== | |||
[[File: Send messages.png|200px|thumb|right|Create a Message]] | |||
# Select your course. | |||
# Tap the Messages bar on the horizontal menu of the Content page. | |||
# Click the plus sign on the right to compose a new message. | |||
# On the New Message Page, click in the Recipients box or begin typing the name of the recipient in the Recipient box, and recipient names will pop up. | |||
# Additionally, you can choose to send an email copy of your message to your students by checking the "Send an email copy to recipients" box. You can also uncheck "Allow replies to this message" to create read-only course messages for students. | |||
# Write your message in the text box. | |||
# Click Send on the bottom right to send the message. | |||
Please note that email copy is a send-only tool. The email receivers cannot reply to the email and you don't receive emails in Blackboard or in your email account, which you are able to do in Original. | |||
== Blackboard Instructor App == | == Blackboard Instructor App == | ||
| Line 448: | Line 455: | ||
| [https://www.youtube.com/watch?v=gV5Qz5BIsso <span style="color:#0000FF"><small>Edit Your Profile</small></span>] || [https://www.youtube.com/watch?v=XJ0UxI-Qx_E&list=PLontYaReEU1tCbsCDP-u_wsKdkDBegIhH&index=24 <span style="color:#0000FF"><small>Batch Edit</small></span>] || [https://www.youtube.com/watch?v=C0h_BZ23FA8&t=4s <span style="color:#0000FF"><small>Grant Student Accommodations</small> </span>] || [https://www.youtube.com/watch?v=OmZRkkAp1FQ&list=PLontYaReEU1s1rags0oIRtAsBlWUOX7Ya&index=3 <span style="color:#0000FF"><small>Running Total</small></span>] || [https://www.youtube.com/watch?v=m0l3DYRfl5A <small>Email</small>]</s> | | [https://www.youtube.com/watch?v=gV5Qz5BIsso <span style="color:#0000FF"><small>Edit Your Profile</small></span>] || [https://www.youtube.com/watch?v=XJ0UxI-Qx_E&list=PLontYaReEU1tCbsCDP-u_wsKdkDBegIhH&index=24 <span style="color:#0000FF"><small>Batch Edit</small></span>] || [https://www.youtube.com/watch?v=C0h_BZ23FA8&t=4s <span style="color:#0000FF"><small>Grant Student Accommodations</small> </span>] || [https://www.youtube.com/watch?v=OmZRkkAp1FQ&list=PLontYaReEU1s1rags0oIRtAsBlWUOX7Ya&index=3 <span style="color:#0000FF"><small>Running Total</small></span>] || [https://www.youtube.com/watch?v=m0l3DYRfl5A <small>Email</small>]</s> | ||
|- | |- | ||
| [https://www.wpunj.edu/ctt/set-course-availability.pdf <span style="color:#0000FF"><small>Activity Stream</small></span>] || [https://www.youtube.com/watch?v= | | [https://www.wpunj.edu/ctt/set-course-availability.pdf <span style="color:#0000FF"><small>Activity Stream</small></span>] || [https://www.youtube.com/watch?v=-IoXfVqW_Qw&t=3s <span style="color:#0000FF"><small>Copying Content from Original to Ultra</small></span>] || [https://www.youtube.com/watch?v=UVL9kdf54tQ <span style="color:#0000FF"><small>Assessment Exception</small></span>] <span style="color:#0000FF"> | ||
|| [https:// | || [https://www.youtube.com/watch?v=abD9cIIQNdo&t=29s <span style="color:#0000FF"><small>Import Question Banks</small></span>]</s> <span style="color:#0000FF"> || [https://www.youtube.com/watch?v=2EPoI8h8O0c <span style="color:#0000FF"><small>Notification Settings</small></span>] | ||
|- | |- | ||
| [https://help.blackboard.com/course_page/playlist/instructors%3A%20building%20your%20course/how%20to%20design%20your%20course%20entry%20point <span style="color:#0000FF"><small>Find Your Courses</small></span>] || [https://www.youtube.com/watch?v=uIB4S56DMD0 <span style="color:#0000FF"><small>Copying Content within a Course</small></span>] || [https://www.youtube.com/watch?v=6sWok3f2mLI&list=PLontYaReEU1tCbsCDP-u_wsKdkDBegIhH&index=28 <span style="color:#0000FF"><small>Use SafeAssign</small></span>] || [https://www.niu.edu/blackboard/tutorials/reuse-questions-ultra.shtml <span style="color:#0000FF"><small>Reuse Questions</small></span>] || [https://www.youtube.com/watch?v=lqNM36Ifn9o&list=PLontYaReEU1tCbsCDP-u_wsKdkDBegIhH&index=41 <span style="color:#0000FF"><small>Create Discussion</small></span>] | | [https://help.blackboard.com/course_page/playlist/instructors%3A%20building%20your%20course/how%20to%20design%20your%20course%20entry%20point <span style="color:#0000FF"><small>Find Your Courses</small></span>] || [https://www.youtube.com/watch?v=uIB4S56DMD0 <span style="color:#0000FF"><small>Copying Content within a Course</small></span>] || [https://www.youtube.com/watch?v=6sWok3f2mLI&list=PLontYaReEU1tCbsCDP-u_wsKdkDBegIhH&index=28 <span style="color:#0000FF"><small>Use SafeAssign</small></span>] || [https://www.niu.edu/blackboard/tutorials/reuse-questions-ultra.shtml <span style="color:#0000FF"><small>Reuse Questions</small></span>] || [https://www.youtube.com/watch?v=lqNM36Ifn9o&list=PLontYaReEU1tCbsCDP-u_wsKdkDBegIhH&index=41 <span style="color:#0000FF"><small>Create Discussion</small></span>] | ||
| Line 471: | Line 478: | ||
'''Blackboard Ultra Institute''' | '''Blackboard Ultra Institute''' | ||
Currently, the Center for Teaching with Technology offers Blackboard Ultra training workshops twice a day throughout the summer. To register for one of our upcoming Blackboard Ultra sessions, please visit https://wpunj.qualtrics.com/jfe/form/SV_9SpilY6ao5x46Vg. All faculty are welcome. | |||
Blackboard also offers some wonderful webinars on Ultra. [https://go.blackboard.com/Instructor-webinar-series Instructor Webinar Series] This Blackboard site provides ongoing free webinars to help with getting the most out of teaching with Blackboard Learn. | Blackboard also offers some wonderful webinars on Ultra. [https://go.blackboard.com/Instructor-webinar-series Instructor Webinar Series] This Blackboard site provides ongoing free webinars to help with getting the most out of teaching with Blackboard Learn. | ||
Revision as of 11:48, 6 August 2023
Blackboard is the William Paterson University’s Learning Management System. Blackboard Ultra is the systems’ most significant change and improvement in terms of functionality and user experience in recent years. To better support teaching and student learning at WPU, the university has begun the gradual transition from Blackboard Original to Blackboard Ultra. The first step of this transition is to enable the Ultra Base Navigation, which we activated in May 2022. The next step is to transition from Original Course View to Ultra Course View. This page is to help the university community smoothly and successfully complete this transition.
What is Blackboard Ultra Experience?
The Ultra Experience is the next generation of Blackboard site and course experiences. It delivers a modern, intuitive, and fully responsive interface, streamlined workflows and capabilities, and a more seamless transition between mobile and desktop.
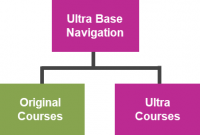
Blackboard has two user experiences – Base Navigation and Course View - and two user interfaces and workflows – Original and Ultra. Currently, WP deploys Ultra Base Navigation and Original Course View. The next step of our phased transition is to gradually shift from our current format to Ultra Base Navigation and Ultra Course View.
Introduction to Blackboard Learn with the Ultra Experience for Instructors
Introduction to Blackboard Learn with the Ultra Experience for Students
In Blackboard Learn, base navigation is a user interface and the experience a user has outside of a course. The Ultra Base Navigation, which was enabled in May 2022 at WPU, is a new and modern user interface and experience in Blackboard Learn Ultra and a new way of navigating Blackboard. For more about Ultra Base Navigation, please visit our Ultra Base Navigation page.
| Navigation Panel | Ultra Base Navigation Menu Items | Ultra Base Navigaiton Video |
|---|---|---|
|
Profile: Select your name in the list and make changes to your online persona. Activity Stream: See up-to-the- minute action for all of your courses. Courses: Navigate to past, present, and future courses. Organizations: Access the organizations that you lead or are a member of. Calendar: View course events and due dates for all your courses. Messages: View and send messages in all courses. Grades: See what needs grading across all your courses. Tools: Access global functions outside of your courses. |
Ultra Course View
The Ultra Course View is the next generation of Blackboard Learn. While enabling Ultra Base Navigation brings changes outside of course sites only, transitioning to Ultra Course View will have a significant impact on course content, structure, functionality, tools, and navigation inside the course. The Ultra Course View has a more modern design, intuitive and easy-to-use interface, and streamlined workflow with some new tools that are not available in the Original Course View. It helps instructors and students stay organized and easily engage with content and each other.
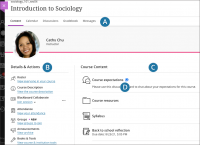
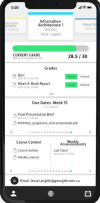
The screenshots on both sides show the modern and simplified look of Ultra Course View and its streamlined navigation and workflows. For the screenshot on the left: A. Navigation bar. B. Details & Actions. C. Add Content. D. New activities.
Original vs. Ultra Highlights - Click here to see what has changed in Ultra Course View.
Ultra Course View Feature Guide
Blackboard has tripled Ultra development resources, accelerated the development process, and delivered new features at a much faster pace. Click here to see What's New in Learn Ultra
Ultra Adoption
Since all courses at WPU will need to transition from the Original Course View to the Ultra Course View by Fall 2023, we strongly recommend that faculty get started with Ultra Course View in one or more of their courses as soon as possible.
How to Plan Your Move to Ultra?
Here are a few steps you might want to consider when you plan your move to Ultra:
- Learn about the Ultra Experience and how it changes your course by attending workshop, webinars and Learn about about training opportunities, course conversion, and other features exclusive to the Ultra Experience.
- When you decide whether to adopt Ultra Course View, you might want to take a look at what new features and functions Ultra Course View offers and what tools you currently use in an Original course that are unavailable in Ultra and evaluate how important they are to your transition to the Ultra course. Click here to learn Ultra vs Learn Original Highlights.
- Check and make sure that the third-party (such as your textbook publisher) integration with Blackboard works in Ultra by consulting your textbook publisher and CTT.
- Discuss your Ultra adoption plan and roadmap with CTT staff.
- Decide on a strategy that fits your course (e.g. to convert or redesign) and schedule.
Ultra Sandbox or Ultra Course Preview?
You can use an Ultra sandbox, the Ultra Course Preview, or both to explore and try Ultra Course View and the conversion from the Original to Ultra. We strongly recommend converting and developing your first Ultra course in an Ultra sandbox, which provides a risk-free environment for you to explore the Ultra Course View and experiment. After trying out the Ultra Course View and experimenting in the Ultra sandbox, you can use the Ultra Course View conversion option on a past or current course.
Using Ultra Sandbox
- A Blackboard sandbox is an exercise course shell, which can be used to try out different settings, tools, and functionalities of Blackboard Ultra in a risk-free environment away from your live course shells.
- You can copy your Original courses into the sandbox, which will be automatically converted into Ultra Course View by Blackboard. Then you can explore your Original course in the Ultra preview and make necessary changes and resolve conversion issues.
- You can also use the Ultra sandbox to develop your new Ultra courses from scratch.
- After completing your Ultra course development in the sandbox, you can copy the course content in the sandbox to your live course shells.
Request an Ultra Sandbox or Ultra Course Preview Option
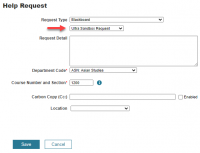
All WP faculty are invited to try Ultra Course View and the course conversion. If you are interested, please click this link and create a helpdesk ticket to request an Ultra sandbox or the option of Ultra Course Preview in Blackboard. For "Request Type", choose "Blackboard" on the first drop-down menu and "Ultra Sandbox Request" on the second drop-down menu. If you request the option of Ultra Course Preview, write "Ultra Course Preview" in the Request Detail box.
You can use the sandbox to import or copy an existing Original course and explore the features and functions of Ultra Course View. The name of the Ultra Course preview shell is “Course Name-Ultra-your username", which you should be able to find on your course list.
Ultra Course Preview
- Another option for you to explore and convert your Original course to Ultra is to use Ultra Course Preview.
- Unlike an Ultra sandbox, which is a separate Ultra course shell, the Instructor Choice option allows you to fully explore your Original course in the Ultra preview before you switch to Ultra. In the Ultra Course preview, you can see exactly how your content will look in Ultra and what changes and is not converted.
How to Use Ultra Course Preview?
- Make the Original course you want to preview in Ultra Course View unavailable to students.
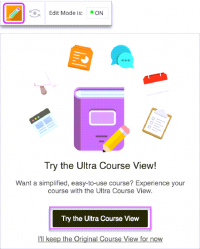
- Open your course and select the Experience the new Learn icon in the top-right corner.
- Click “Try the Ultra Course View!”
- Please note that you can only preview courses that aren't currently open to students. Make your course private before trying the Ultra preview.
- If you switch your course from Private to Open during the preview, the course will be converted to Ultra Course View automatically, and you won't be able to switch back to the Original Course View.
- Any changes you make to your course while in the Ultra Course View preview won't be saved if you exit the preview and choose to continue in the Original Course View. But if you choose to permanently convert your course to Ultra, the changes you made during the preview are saved.
Path to Ultra Courses
You can take different approaches to adopt the Blackboard Ultra course view. Based on your needs and the courses you teach, you can choose the ways that most satisfy your needs.
Convert Original Courses to Ultra
- You can convert your existing courses from Original to Ultra using the course copy tool within the Ultra course.
- Click here to see a tutorial of course copy in Ultra.
- Click here to watch a video about course copy in Ultra.
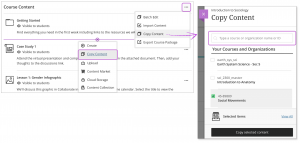
- In the destination course, click the three dots in the top-right corner of the Course Content area, then select Copy Items.
- In the Copy Items panel, select the course you want to copy over.
- To copy a specific item of the course, select the arrow next to the name of a folder/module, then select the item
- Click Start Copy in bottom-right corner of the page.
Create Ultra Courses from Scratch
If you choose to create a course in Ultra Course View from scratch, follow these steps:
- Request an Ultra sandbox.
- Build your course structure first using modules and create a consistent structure.
- You are encouraged to take advantage of the CTT Ultra course template to build your new Ultra course. The template is structured in alignment with the standards of quality for online teaching.
- WPU faculty can download this zip file of CTT Ultra Course Template, and then upload it into your sandbox.
- Click here to see how to import a course package into an Ultra Course tutorial.
- It is recommended to build one learning Module with all of the components that you want to have in each module first, and then copy it for each module.
Combine Rebuilding and Copying
Combining rebuilding and copying might be the most efficient way for the transition from the Original to Ultra Course View.
- Request an Ultra sandbox.
- Build your course structure with all the components in the Ultra sandbox.
- Use CTT Ultra course template to build your course structure. Visit the Create Ultra Courses from Scratch section to see how to copy CTT Ultra Course template and how to import the zip file of the template into your Ultra course.
- Copy individual contents, especially assessments such as assignments, tests, and exams from your Original courses to the Ultra sandbox.
Building and Modifying Ultra Courses
Content Creation and Course Design
Create Content Items or Documents
Your course creation starts on the Course Content page. To add content, follow these steps:
- Select the plus sign wherever you want to add content.
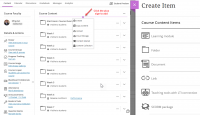
- Select one of the options listed on the drop-down menu (Create, Copy Content, Upload, Content Market, Cloud Storage, and Content Collection). You can choose to create new content, copy content from your existing courses, upload content, or add content from external sources.
- To create new course content items, select Create to open the Create Item menu on the right side.
- Choose course content type:
- Learning module
- Folder
- Document
- Link
- Test
- Assignment
- Discussion
- Journal
For more information about each of these options, visit this Create Content tutorial
Learning Modules vs Content Folders
You can use either Learning module or Folder as a content container to present and organize your course content. What is the difference between a Folder and a Learning Module in Ultra?
Both can be used to organize course content in a logical and engaging way, but a Learning Module encourages and can force sequential viewing of the items it contains. Learning Modules let students navigate from one content item to the next without distractions, while students need to open and close each item in Folder to access the content. Instructors and students experience modules differently. For students, learning module content is presented sequentially, with navigation arrows that students use to move through the content horizontally. (Instructors can only see this in Student Preview. If your content comprises multiple files for download, a content folder may be the best option. If you want to immerse students in the lesson or concept you're teaching or logically structure a collection of course content – similar to a chapter in a textbook, choose Learning Module.
Blackboard Course Content Tutorials
More tutorials: Batch Edit . Release Content . Best Practices
Create Assignments
Create and Edit Assignments
- On the Course Content page, navigate to the folder you would like to add content to.
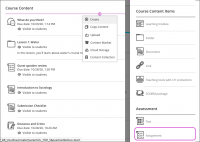
- Select the plus icon and click Create in the pop-up menu.
- From the sidebar that opens, select Assignment under Assessment. The new Assignment page opens
- Create your assignment in the Content area.
- Complete the Assignment Settingsincluding Name and Grading. Then select the Save icon on the bottom right to save.
- If you need to edit the Assignment further, click the More Options icon on the right side and select Edit.
Video on Create an Assignment in the Ultra Course View.
Common Questions about Assignment
Click here to see common questions about Assignments:- How do I create assignments?
- How do I grade assignments?
- Can I edit, reorder, or delete assignments?
- A student says they submitted their work but I don't see it. How do I know if they really finished the assignment?
Student Questions about Assignments
Click here to see some of the questions students often ask about assignments in a Blackboard course and the answers to those questions.
Create Tests
Unlike the Original, where you create your tests at Test, Survey, and Pools and then deploy them in the Content area, in Ultra, you create tests where you want to deploy them.
- On the Course Content page, select the plus sign where you want to add a test, then select Create
- On the Create Item panel, scroll down and select Test under the Assessment section
- On the new Test page, name your test.
- To add new questions, select the plus sign and choose the desired question type. You can also add files and text, such as instructions for the test.
- Set the point value for each question you create.
- Select the Test Settings (gear) icon to open the panel where you can set test options and provide the test's details and information.
Watch a video on how to create a test in the Ultra Course View
Blackboard Help page - Create Test
Common Questions about Test
Grading and Gradebook
Grading
The Needs Grading view in Original is discontinued. In Ultra, grading indicators are provided in the Activity Stream and on the list view of the Gradebook. You can choose to start grading from:
- Activity Stream on the navigation panel
- Grades on the navigation panel
- Gradebook on the navigation bar within the course
- Assignment within the course
Click Activity Stream on the navigation panel, you can see how many assignments are ready to grade in all your courses.
Click Grades on the navigation panel on the left, you will see the global grades page, where you have immediate access to all your courses's grading tasks. All your grading tasks are organized by course. You can quickly scan your progress, set priorities across the board, and even begin grading. No need to navigate to each course to see what's ready for grading.
The page only displays information if you need to take action. You see assignments that are ready to grade or which assignments are overdue for how many students.
If you wnat to narrow your focus on a particular course, you can access the course Gradebook on the navigation bar within the course. In Ultra, most grading functions are available in the Gradebook. The Needs Grading view in Original is discontinued. Gradebook in Ultra provides grading indicators in the Activity Stream and on the list view of the Gradebook.Click Gradebook, you can see who has made submissions and start grading.
You can also start garding from an assignment.
Blackboard offers streamlined grading. The system tells you when students have submitted test and assignment by notifying you in the Activity Steam. A simple click will bring you right into the assessment where you can see who has submitted, who is late, and what has been graded. The submission and assessment is always tie together, so you can access both whenever you open the assessment.
To start grading,
- Select an item’s title to see what students’ submissions need grading and which haven’t received their grades yet.
- Inside the submissions list for a gradable item, use the Filter menu to display only those submissions that need grading. You can filter by "All Grading Statuses," "Needs Grading," "Needs Postin," etc.
- Click student's submission to grade.
You can switch to the Students tab to view an overall picture of each student’s engagement. And the Student grid view is similar to the Grade Center in the Original Course View.
Access Gradebook
You can access Gradebook in two different ways:
- Click Grades on the Base Navigation panel on the left, and you will see everything that needs grading in all your courses on the global grades page. All your grading tasks are organized by course, and courses appear in alphabetical order. Click the course title to open the Guidebook.
- Within a course, you will have access to the Gradebook from the Gradebook tab on the navigation bar.
Gradable Items List and Student Grid View
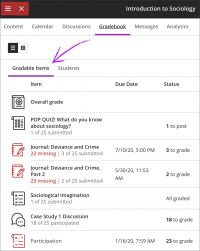
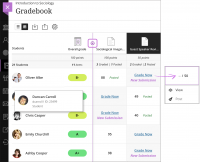
The Gradebook is populated with students when they're enrolled in your course. You can grade coursework, manage items, and post grades from two views:
- Gradable Items List
- Student Grid
The default Gradebook view is a list of the graded items. You can view all the coursework you've assigned and your grading progress. You can also change the settings of the Gradebook.
Gradable items are automatically created when you create gradable items in the course content area. But you can select the plus sign wherever you want to add the following to the Gradebook:
- Add Item
- Add Calculation
- Add Attendance
Add Item can be used for manually added grade items, such as participation, extra credits, etc. For manually added items, no submissions exist. You assign scores and feedback on the student list page.
You can also add attendance on the main Gradebook page. Select the plus sign wherever you want the attendance row to appear in the list and select Add Attendance.
Gradebook Settings
You can switch to the Students tab to view an overall picture of each student’s engagement.
In Ultra Course View, you can automatically assign zeroes (0) for assessments that are not submitted by the due date.
Grades are not visible to students by default in the Ultra Course View; you use Post when you have grades ready for your students to see. Overall grade now supports weighted, points-based overall grade calculation and advanced calculation.
Blackboard Tutorial on GradingMessages
In Original, you can use both Send Email and Messages features to communicate with your students. In Ultra, Send Email feature is discontinued. Unlike Send Email in Original, which allows you an easy way to send email messages outside of the Blackboard system without having to log in to a separate email client, the Messages tool in Ultra is used for communication within your course only, although you do have the option to send an email copy of your message to your students. Messages activity remains inside the Blackboard system and is part of your course record.
As an instructor, you can easily access Messages and quickly send messages to your students about important deadlines and schedule changes. Messages may be sent to a single user, a group of users, or the entire class.
You don't need to add a link to course messages. The Messages icon is always part of course navigation in the Ultra Course View, which, just like other navigation icons, cannot be removed.
Unread message notifications
An encircled identifiable number count highlights any new messages received. When you select the Messages tool on the Base Navigation, a red number count changes to a red pill icon to reduce distraction. When you navigate away from this page, the system shows again the unread message count.
Access Your Message
You can access all your messages right from the Base Navigation or from your course by clicking the Messages menu item on the Content page. To access Messages from the Base Navigation panel:
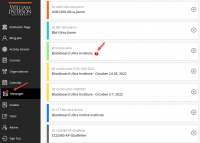
- Click Messages, which will open the Message page.
- An encircled identifiable number count next to the course link indicates which course has unread messages and how many unread messages in that course haven't been read.
- Click the link to the course to view the unread message.
Create a Course Message
- Select your course.
- Tap the Messages bar on the horizontal menu of the Content page.
- Click the plus sign on the right to compose a new message.
- On the New Message Page, click in the Recipients box or begin typing the name of the recipient in the Recipient box, and recipient names will pop up.
- Additionally, you can choose to send an email copy of your message to your students by checking the "Send an email copy to recipients" box. You can also uncheck "Allow replies to this message" to create read-only course messages for students.
- Write your message in the text box.
- Click Send on the bottom right to send the message.
Please note that email copy is a send-only tool. The email receivers cannot reply to the email and you don't receive emails in Blackboard or in your email account, which you are able to do in Original.
Blackboard Instructor App
Blackboard now offers a unified Blackboard app for both instructors and students. And Blackboard's support for the previous Blackboard Instructor app ended on September 30, 2022. For more information about the app, visit Blackboard App Help.
As an instructor, you can perform these tasks in the Blackboard Learn app:
- Preview course items, assignments, and tests
- Create and upload course content
- Participate in discussions
- Send announcements
- Grade assignments and update assessment settings
- Change item settings for assessments and other content
- Work with both Original and Ultra courses
Getting Help
Tutorials, Guides, Webinars
- Blackboard Learn Help for Instructors - Ultra Course View
- Blackboard Ultra Video Playlist
- Anthology/Blackboard Community The Community is a platform for Anthology/Blackboard users to connect, share knowledge and information, and collaborate. It is a place for Blackboard users to help and learn from each other.
- Instructor Webinar Series This Blackboard site provides ongoing free webinars to help with getting the most out of teaching with Blackboard Learn.
- "Blackboard App" help page Blackboard Instructor is a mobile app that enables you to view the course content, modify settings, grade assignments, connect with students in discussions, and launch Blackboard Collaborate sessions.
Trainings and Workshops
Blackboard Ultra Institute
Currently, the Center for Teaching with Technology offers Blackboard Ultra training workshops twice a day throughout the summer. To register for one of our upcoming Blackboard Ultra sessions, please visit https://wpunj.qualtrics.com/jfe/form/SV_9SpilY6ao5x46Vg. All faculty are welcome.
Blackboard also offers some wonderful webinars on Ultra. Instructor Webinar Series This Blackboard site provides ongoing free webinars to help with getting the most out of teaching with Blackboard Learn.

